

cd_reloaded
-
Posts
40 -
Joined
-
Last visited
Content Type
Profiles
Forums
Blogs
Gallery
Everything posted by cd_reloaded
-
Hi folks, at the moment I'm working with 50%, I'm satisfied with that.
-
Have Fun — its a wonderful tool.
-
Hello TK, sure I will test it as soon as possible, but I doubt it will be possible before next weekend.- Anyway thx. Im sure it will be a improvement anyway :drool: I will let you know ....
-
FIFO = :question:
-
Hi Cit, I use the latest FW-Version. Maybe I should try to switch it off. I will continue testing ...
-
Hello TK, I tested and tested and I found out that this strange effect happens, when a lot of midi-information comes together. e.g. when recording controller events. And I can imagine that your theory about the hanging Midi-Note couldbe the reason. My Jx3P and my DW8000 tend to have hanging notes from time to time. I will keep on watching that. Thanks btw. I love the SEQs and there is a little chance that we play at the "Lange nacht der Musik" again. Its not sure yet, but maybe ....
-
Hello TK, as you can imagine, I didn't have much time recently to make some music. After I came back from Lanzarote I did have a lot of things to do, like playing emergenca band contest, caring about my daughter and my new girlfriend and so on and so on. Finally I found some time to test my SEQs. And here is a little bug report (FW 0.55): All of my three SEQs have the same symptoms: After a few minutes of playing the realtime-record-mode doesn't work anymore. You see notes beeing recorded and the next time the position indicator comes around the notes just get deleted instead of beeing played. With notes that are beeing recorded in step record mode that doesn't happen. When you switch into realtime-record-mode the recorded notes immideatley get deleted. Do you understand what I'm talking about? What could be the reason for that strange behaviour? PS: I just updated all SEQs to 0.56 and that bug still exists.
-
 I Like!
 -
 I like! :thumbsup:
 -

SEQV4L - Virtual Four Handed (MIDIfied piano)
cd_reloaded replied to Hawkeye's topic in Songs & Sounds
Yesyesyesyes – this ist what it is ment to be! I love it. The ultimate live-tool. Thx for the video. -
11 x 5mm 7 x 30mm 7 x 10mm One more week before I fly to Lanzarote – and then 4 weeks off .... – surfing
-
@ all: You need a vector based graphics program to work with the files I provided. This is not a ready-to-order-file. It is a cool basis to do what you want to do. So, as mentioned before you need Adobe Illustrator, Corel-Draw or a similar programm. If anybody knows a really good working freeware tool to handle SVG-Files, please be so kind and let us know. PS: I just found out that there is a suitable freeware program to handle these files. It is calles "Inkscape" and you can use it on a Windows-PC or on a Mac. Here is the link to Inkscape: http://inkscape.org/ I'm always in a lack of time so I'm not able to provide a file for a closed case wich is ready to use at the moment. As soon as I have a few minutes left I will do that. What I have here is the original SVG File wich I took as the basis to built my acrylpanels. Maybe this is helpful for any one of you. This SVG file was exported from KiKad, wich is the layout software I used to make the board. This SVG file is in 1:1 scale and the measures are 100% exact. You can download this file here: MB_SEQ_V4L-brd.zip
-
Hi mastomo, just download the attached file, choose wich frontpanel you like (the one with engravings or the clear one) and place it + the backpanel on the Formulor/Ponoko-Template (download from Formulor.de/Ponoko.com) and you will have the same .... And if you are familiar with Adobe Illustrator or Corel Draw, there are no limits to your creativity. template.zip
-
@ jojjelito: This ist how my housing looks. At the moment I'm not having the sequencer right next to me so I can not measure the thickness of the frontpanel PCB. (aprox. 1mm) These dimensions fit. /Edit TK: this diagram is obsolete, see next page (6) for updated picture with new spacer sizes (5mm + 2x18mm) Link to original diagram (again: obsolete) http://www.pixel-schmied.de/SEQ/dimensions.jpg
-
ProtoPCBs of V4L
-
-
From the album: cd_reloaded - V4L
Exact decription: http://midibox.org/forums/topic/15979-midibox-seq-v4lite/page__view__findpost__p__143354 -
From the album: cd_reloaded - V4L
Exact decription: http://midibox.org/forums/topic/15979-midibox-seq-v4lite/page__view__findpost__p__143354 -
From the album: cd_reloaded - V4L
Exact decription: http://midibox.org/forums/topic/15979-midibox-seq-v4lite/page__view__findpost__p__143354 -
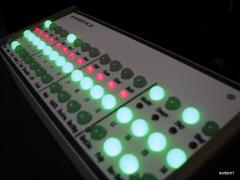
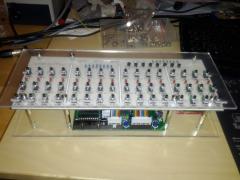
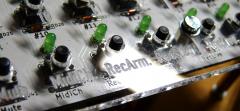
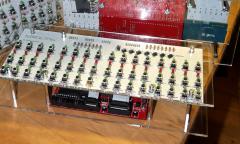
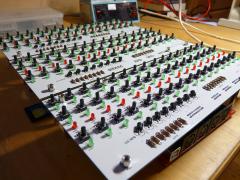
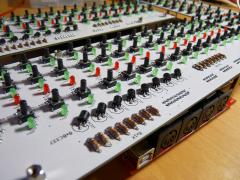
Here ist what I call a minimum case – in fact it is just a protection from above and from underneath. But it works for me – thats all I want since I have already some Midi tools that look very similar, as you can see on the pictures. Those acrylic parts were manufactured by formulor.de, which ist the german version of ponoko.com. The elements that I used to get the boards manufactured are here in this svg-File. KLICK HERE TO DOWNLOAD Look at the technical specefications of Formulor or Ponoko. The different colours mean engravings or cutting thru the material. If you know how to handle Corel-Draw or Adobe-Illustrator it will be easy for you to modify those files to build your own case and to modify the file the way you want it to get complete protection from the sides, the front and the back. Do whatever you like. If the PCBs are white, like the PCBS of the prototype series, I do not recommend laser engravings. The printings on the PCB are perfect to read thru the acryl material. If you have dark PCBs or if you choose to have a coloured acryl housing, you should have the material laser engraved. (consider that you should never choose same LED and housing colour. You will not see the LEDs, the light will be fitered) But do whatever you want ... The holes fit perfect. Maybe the holes for the switches could be a little bit smaller. I think I chosed 4.6 mm to be on the safe side. You can modify that as well, but make shure you don't touch the exact position! One more recommendation: Solder the transistors like I did: Bend them, so they lie flat on the face. That will provide the space needed to mount the front panel. The Micro-SD-Card Adapter sticks on the bottom panel with a double-sided adhesive tape. Here are some picture of the final result – enjoy. PS: if you need further information concerning the case, don't hesitate to contact me. There is a svg-file of the PCB wich I used as the basis for the exact position of he holes. I couldn't find it it must be on my computer anywhere. Maybe I have to generate a new one. But this file could help you designing your own cases ...
-
Hello Cit, The Firmware of the MB_SEQV4L is based on the SEQ V4 Firmware wich supports analog-out modules. I do not know if Thorsten left that part of program script in the V4L-Firmware. But I can imagine that he did. There are connectors (J19 as far as I know) on the LPC17-Core-Modul to connect analog out (cv/gate) modules. I do not exactly know the facts – but I doubt that it is impossible and I think it will not be very difficult. C
-
 There is a PCB-Bulk Order and there will an Illustrator-eps provided to get cases for the v4l produced by formulor.de
 -
From the album: cd_reloaded - V4L
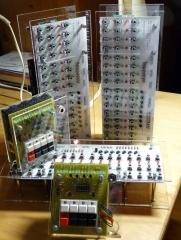
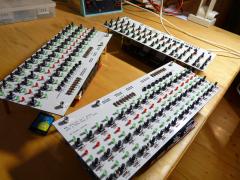
3x SEQ V4L from the first prototype PCB series, waiting for the acrylic cases wich are beeing made by formulor.de<br />anybody jealous :) -
From the album: cd_reloaded - V4L
3x SEQ V4L from the first prototype PCB series, waiting for the acrylic cases wich are beeing made by formulor.de<br />anybody jealous :) -
From the album: cd_reloaded - V4L
3x SEQ V4L from the first prototype PCB series, waiting for the acrylic cases wich are beeing made by formulor.de<br />anybody jealous :) -
OK – Problem solved – I did install ubuntu as a virtual machine. Works perfect.