Search the Community
Showing results for tags 'case'.
Found 20 results
-
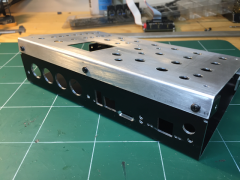
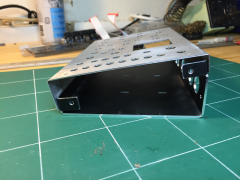
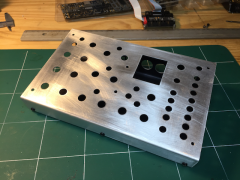
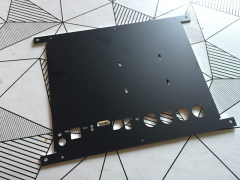
Current status is: I received permission from Wilba to use his frontpanel design.I'm in contact with Roelli figuring out the right approach to this bulk.Haven't contacted Heidenreich yet, in a week I know more. The measurements of the shipping box are 590 x 290 x 140 mm, so either shipping with:DHL Päckchen bis 2 kg International mit Service Nachweis 17.90€ (only tracking, no insurance, 35€ damage refund) CN22 custom formor DHL Paket bis 5 kg International 16.99€ - 42.99€ (full insurance with tracking) CN23 custom form case comes with blank back panel, rubber feet, uniform color black (~ 75€-90€)front panel costs: with 2 LCD windows at frontpanels.de (~ 170€, Roelli mentioned a 20-30% discount compared to Schaeffer)front panel costs: with 2 LCD windows at Schaeffer (184€ + 2 x 20,42€ excl. shipping and verifying against the CS PCB)uniform front panel design for reduced complexity (holes for screws, colored engraving, see pics)handling fee (~ 15€ gas, package, time)PayPal conversion fees: € -> € 1.9%; other currencies -> €: 5.5% on my end priceno milled back panel, only a blank one for your own design (a milled can be later purchased from Roelli with a 30% discount compared to Schaeffer)no breakout board for the MBHP_CORE_STM32F4 PCB is needed, SmashTV's MIDI_I/O Module PCB will do the job. Ethernet via MBHP_ETH.breakout board for the MBHP_CORE_LPC17 PCB is needed (either design your own or join/create a bulk for a PCB)
-
A long time ago, in a galaxy far, far away... I bought a sammichFM kit without the case (the reason was I did not like how the laser cut box was looking). I installed my machine in a Teko box, making it even uglier The poor machine was forgotten a few years in a cupboard, and thanks to the lockdown in France, I found it a few weeks ago, covered in dust. As the original case made by Wilba has disappeared from the Web a long, long time ago, I decided to make a 3D printed case for the machine. As you can see, result is not bad (and much better than this awful Teko enclosure)... The files have been created with FreeCAD, I put the STL files here if someone wants to use them. I found some possible enhancements (like having holes to reach the trimmer for contrast and backlight level), but I did not want to print the box a second time (more than 7 hours to print both parts). The source file in FreeCAD format are available, just ask me if you want them. SammichFM Bot.stl SammichFM Top.stl
-
From the album: The HAARP
it's the kind of moment that I don't like, when you have to be patient so as not to destroy a working day. Let it dry!.. ;) -
From the album: The HAARP
After bending. -
From the album: The HAARP
paint..... -
From the album: The HAARP
White paint... -
From the album: The HAARP
White paint! -
From the album: The HAARP
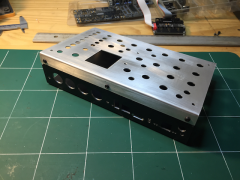
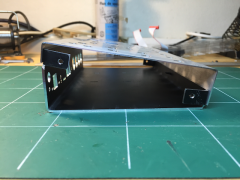
Assembly check. -
From the album: The HAARP
Assembly check. -
From the album: The HAARP
Assembly check. -
From the album: The HAARP
Assembly check. -
From the album: The HAARP
Assembly check. -
From the album: The HAARP
Assembly check. -
From the album: The HAARP
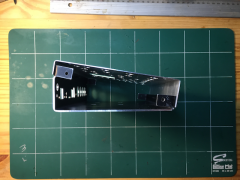
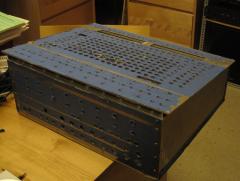
Milled bottom part 2mm thick. -
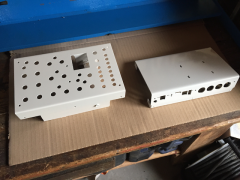
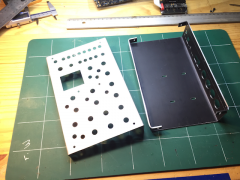
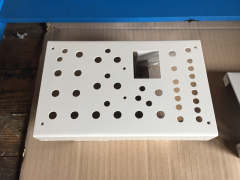
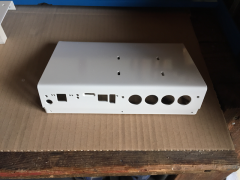
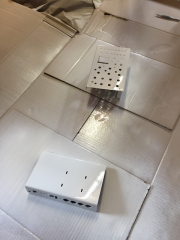
Parting ways with the ultra-rare MBSEQ Heidenreich Case and most of other built and to be built DIY audio projects. Comes straight out of my DIY audio box which seemingly have been left for far too long unattended, and life moves on at its own pace. heidenreich.de product link Not looking to profit, Shipping from Canada or US at cost. Kartoshka
-
Yesterday, I finished my MBSEQ V4 build. I decided on the following components for my version of the sequencer. STM32F4CORE MBSEQ CS: Wilba Control Surface BLM16x4: 16 x 4 button matrix TPD: Track Position Display 2 x MIDI I/O: MIDI interface, a total of 4 MIDI IN and 4 MIDI OUT DOUTX4: 4 x 8 digital outputs AOUT_NG: 8 CV outputs (1V/oct) I did think about placing the digital outs and CV out modules outside of the main sequencer using line drivers so the sequencer did not have to be near the modular synthesizer. I did test the configuration and it worked as it should. However, I decided against it as I wanted the sequencer to be a self contained unit with all functionality in one box. The diagram below shows that final configuration with connections between the modules. I started with the main panel. As I wanted to house the sequencer in a 19? rack case, all panels are compatible with the standard 19? rack dimensions. I downloaded a Front Panel Designer panel design from the Midibox forum and added studs to make mounting the control surface PCB and LCD’s a lot easier. Here is my version of the FPD file: mbseq_19in_io-v01.fpd Here is a picture of how the PCB's are mounted to the panel. The second panel contains the BLM16x4 and TPD modules. For this panel I also added studs to an existing design to make assembly of the panel much easier. And here is my version of the FPD file: TPDBLM_19_v02.fpd The third and last panel holds all input and output connectors. This is a custom panel designed by myself. All I/O PCB’s are mounted directly to the panel except for the DOUTX4 PCB which is mounted in the rack case and connected to the panel connectors with flat cables. The panel also provides 2 USB +5V connectors for connecting LED lights or other peripherals. The other 2 USB connectors connect to the core PCB and provide a way to upgrade the core board firmware and the MBSEQ firmware. If I had to do it again I would leave out the labels above the SYNC outputs. This is the FPD file for the panel: MBSEQ_IO_panel_2HE-v02.fpd For the case I ordered the Thon Rack Case 8U 12 RA from Thomann. My MBSEQ V4 fits perfectly in there. There is even about 1 HE left. I used a black panel to fill that space. On the bottom of the case I mounted the core module and the DOUTX4 digital out modules. I also installed a custom PSU (DC-DC converter) which provides +5V (for the core board and the USB ports on the I/O panel) and +12V/-12V (for the AOUT_NG module). I’m very happy with the end result. The panels fit neatly in the 19? case. The 19? rack in the case is a bit angled which improves visibilty of all display and controls. Here is the final result.
-
Hi all :) I have a build and functioning Midibox Seq V4 with front and rear aluminum panels. I have a MPCNC that I build with Wood CNC capabilities and also a laser (2.8W) which can cut opaque acrylic. I'm planning to make wood sides with profiles cut to insert the panels and curved aluminum profiles but I'm having troubles finding suitable aluminum extrusion profiles for the curved parts. I've look all over and can only seem to find the t-slot style ones in the U.S. Did anybody have any luck finding a good version to use for making the quarter round curved aluminum profiles from a supplier in the U.S.? Thanks for any help you might give :) ~Airyck
-
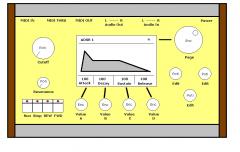 This is my first case-design for my synth "WAVE 1"
 -
From the album: MIDIbox ASIDITY
I had wanted to wait to show the case until it was all done, but after a day in the metal shop (back panel and top section of front panel), this photo was too good to pass up. :) -

Project: Bulding the case - status: Started :-D
technobreath posted a blog entry in TB's MIDIBox Adventures
EDIT: I deleted the old pics from the blog, and replaced them with lower resolution ones, so it doesn't take ages to load with internet speeds I take for granted :P hihi. Finally! :sorcerer: The case build has started! Keep in mind when looking at these pictures: The actual case is going to be cast with fibreglass, and this is only the wood model wich is gonna be used for making a mold. So this is a L O T of work! I have shot tons of pictures during the work, and some of them make it in here :thumbsup: : Drawing up some drafts with dimensions to bring with me to the workshop. Drawing up the bottom plate on a piece of 15mm plywood. A must have tool in a wood workshop - this has served my grandfather before me for many years! Another must have tool in a workshop - as the bandsaw, this has also served my grandfather for many years before me! Drawing currently in use on the wall with the ensemble of screwdrivers :). A must have tool for making stuff like this - for transfering angles. Angle transfered from one side to the other. The bottom panel under the bandsaw - yes I was already finished with it, I just had to shoot the pic of it there, because it looked cool. Sanding the sides. It isn't easy to cut to the final shape with the bandsaw, so, for not spending 10 minutes on each cut, I speed through it and sand it a little bit afterwards. Also, yet another must have tool - not only for acurate measurements (wich is not the case at all working with wood as u don't measure plywood in 1/10 of a millimeter anyway) but also great for transfering measurements quickly! A lesson in: How to cut plywood with a worn-down bandsaw blade? Short story: DON'T! Long story: My brother in law had used the bandsaw for cutting aluminum window shaders to size some days before, and left me with a totally distroyed blade. If I knew, I would have gotten a new one, but none of the shops who has them was open on saturday :angry: The "cable cave" on the back. AND - I had my head under my arm or something, because the first cave-frame wasn't high enough - fixed with yet another layer of plywood. Backside of the case taking form. Inside just thrown together - doesn't matter at all, since it's only support for the mold making process anyway! Setting up some support ribs inside. These also has the right angle for the front panel to just lay on top of them. This way I can easily make the sides and the rest of the case, without having to think about getting all the angles perfect before mounting the front panel plate. Front panel cut to shape - almost. The horn on the front is gonna have a steeper angle, see the 3D drawing. Here, the angle for the front panel is clearly showing. A carved out angle on the bottom front. Used one of those machines you sharpen knifes with to carve this out, and sanded it afterwards to final shape - in lack of a better tool I had to improvise! A final picture together with a lighter, so u guys can see the approx. size of the whole thing. Roughly 20x40x10cm. Hope you like it so far. Will post more pictures when I build more. No more work today on this, as this has taken me about 8 hours of work. A lot of sanding and making sure the 90 degree angles are correct - if they are not, the mold won't release from the model! Have a great evening / morning! Technobreath