Flemming
-
Posts
312 -
Joined
-
Last visited
Content Type
Profiles
Forums
Blogs
Gallery
Everything posted by Flemming
-
Because the core gets power through J2 instead
-
Very lovely :drool:
-
Hi b.vigo, and welcome aboard :) I am no oracle when it comes to the midi controller boxes like MIDIbox64, but i can help out a little bit anyways... The cores you're looking at is the PIC based ones. They have no USB as such. If you really want your builds to use 3 USB connections, then i think you should take a look at core32 module which has a USB connector. Another solution could be to use a MIDI interface with 3 (or more) MIDI ports - this would take up 1 USB port on your computer, but you would have 3 MIDI in/out that you could use for your 3 boxes. The good thing is that your computer easily will distinguish between the 3 MIDI ports... but you should make sure that your favorite DJ software supports multiple ports ofcourse. For a kickass 5-port MIDIcontroller look here. The bankstick is simply RAM. In a synth your sound presets are saved on the 'bankstick' for later recall. In a MIDI controller like the one you have in mind, the bankstick can be used to save different 'configurations' of your box, f.ex if you use 2 different DJ apps that maps the hardware controllers differently. Then you can just create 2 different hardware configurations and recall them whenever you want to use one app or the other - this sounded pretty messy. I hope you understand what i mean :) No, you will most likely not miss an LTC. You will find software to configure your box from a PC, but that is done via MIDI or USB. The app goes in the Core. The core is the CPU (so to say).. if you don't upload any app, then your buttons and knobs won't do anything. the app detects which control you're touching, and will send out MIDI data accordingly. It is like the OS of the box - remember that practically all the projects inhere uses the same Core module... the difference is in the app. The app also controls the LCD, menus and everything. This is by no means anything that should stop you :) it is just a file you send via MIDI from a piece of software that is very easy to use. You should always go for the PIC that is mentioned in the build guides. PIC chips are from the same 'family', but they all have different specs. Some has more internal RAM or other features that deviate from eachother. So, the apps are coded to work on a specific PIC model, and you have to use the correct one. All this was more 'general guidelines'.. it depends on your vision of the finished box, but a lot of ppl inhere has built MIDIcontrollers and DJ boxes, and i figure they will give much better advice about details than i can. But i can tell that you're in the right direction :) It takes a lot of reading to make a final idea about what parts you need, and it also means that you can order the right parts the first time! I hope you will enjoy it inhere, and maybe even get to see some pictures of your boxes in the forum gallery :drool:
-

Newbie wanna build a "analog console" midi controller
Flemming replied to Jadestar's topic in Tips & Tricks
I did, nils did and so did phil! -
Newbie wanna build a "analog console" midi controller
Flemming replied to Jadestar's topic in Tips & Tricks
How am i not helping? You asked for a place to read - you got the link for the website that is actually the main source http://www.ucapps.de Why does it HAVE to be a thread? Go to the website we linked to in the former posts http://www.ucapps.de If you don't want to argue it maybe is a bad idea to get personal like this? You asked for something to read and learn from! we gave you a link. You did not bother to read, but would rather put the blame on me :) Looking from here it seems exactly like you want to argue rather than learn anything! Just try to go to that website and read about the boxes http://www.ucapps.de You ask to get a quick recap of electronics in general, a full industry, with educations that take many years. I was not joking when i wrote: "I learn something from this community every day, because i read and try to comprehend, experiment and learns a lot from my mistakes too. Many members inhere have spent countless years doing so to reach their level of expertice... don't expect that 'a few PMs' can get you up and running in no time"... Now, please go to http://www.ucapps.de where you can read everything you ever want to know about midiboxes -
Newbie wanna build a "analog console" midi controller
Flemming replied to Jadestar's topic in Tips & Tricks
But... what questions are you asking? Oh :) if that is your question then we can easily answer - we did 2 times already. Now, go to http://www.ucapps.de and read there. So now you know where to start :thumbsup: -
Newbie wanna build a "analog console" midi controller
Flemming replied to Jadestar's topic in Tips & Tricks
No to be harsh or anything, but it kinda is the gist of your first post :blink: Maybe we just fail in seeing your real problem, and as such have a hard time giving you the answers you want to hear. Nils already gave you the link for the most important midibox-related website, http;//www.ucapps.de I learn something from this community every day, because i read and try to comprehend, experiment and learns a lot from my mistakes too. Many members inhere have spent countless years doing so to reach their level of expertice... don't expect that 'a few PMs' can get you up and running in no time... :logik: Instead of "I want to know everything. Tell me something general so i can get the bigger picture", you could maybe use smarter tactics; read about the boxes, select one you think that you can manage to build/use/understand/learn from. This will give you something concrete to ask and debate + you will definitely learn a lot during the build process. -
Hi david, And welcome to our community :thumbsup: The site http://www.ucapps.de/ is really where it's at! Here you can find details of all midibox project. Go there, locate 'MIDIbox64' in the sidebar to the left, and read to learn more about your next steps.. You box is closer to finished state than you might think, so prepare for play-time very soon :smile: This is our forum, and you should hang out here for help/questions, information and general fun! If not ucapps site gives you all the info you're looking for, you should also try searching the forum.
-
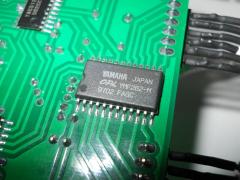
Building a new OPL3 from discrete components -- possible?
Flemming replied to Green Xenon1's topic in MIDIbox FM
In how many forums are you asking these questions?? It's just here, and at vintage-computer.com? http://www.vintage-computer.com/vcforum/showthread.php?23753-I-want-to-build-OPL3-myself.-How-do-I Or are there more?? Get a diagram of the OPL3 and start building, air gaps, silicone, copper, the whole works, submerge it in hot resin a few times and it will be ready for it's first trip in the sink. Good luck :) -
 Nice work, man!!
 -
GRrrreat :) Thanks a lot man!! Will give this a shot first thing in the morning.
-
Building a new OPL3 from discrete components -- possible?
Flemming replied to Green Xenon1's topic in MIDIbox FM
Are you asking or telling?? Honestly, it is not gonna happen. If you read about FM synthesis then you will quickly know why. -
So, it worked before or what?? And the encoder works?? I once experienced that my CS did not work at first power-up, but then i quickly remebered that i didn't solder the header pins on the CS, only for the LCD :wacko:
-
Judging from the picture, it looks like these knobs are for 'knurled shaft'.. but yes, a vendor/part-number says more than a thousand pictures :tongue:
-
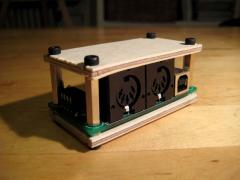
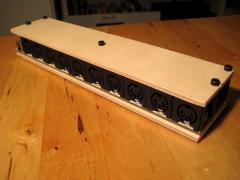
Yeah, i'm not a big fan of that glue gun thing.. it's hard to 'reverse engineer' stuff once it's plastered :) Btw, the boards are not parallel like in the Sammichs. This might turn out to be a problem? I mean with the holes in the CS being kinda 'angled' opposed to the holes in the basseboard.
-
Very happy to hear that the little sweetheart is acting like it should :) Any chance of seeing a picture of it in the forum gallery when it is finished?? But now it is indeed dance time!! /me does the "it's working"-dance :frantics:
-
Congratulations on a near-finished box :) You mean CORE J9 to DIN J1, right?? I can't remember the exact pin-layout used to connect controls to the DIN board. If you want to be sure, then you can take a look in the 'setup_6581.asm'. Inside you will find all buttons and encoders, and which pins they belong to on the DIN. So, when you turn on the box it plays a little 'arpeggio'? This lets you hear if/how many banksticks are recognised by the core. I bet you could see on the LCD that they were being formatted too, right? All good, but: formatting means that they will all sound alike - Did you upload 'vintage_bank.syx' to bank A after the format? You can easily check from any musicprogram or midi-keyboard - Connect the MBSID via midi and try to change patch from the software. You will see the patch change on the LCD, and you should be able to play notes from software/keyboard and ofcourse hear different patches.... If this works, then your new box is fully functional, besides the DIN problem :D About the DIN; on DIN J1 you see two rows of pins, right? You are supposed to use the left row (the one closest to the board edge). When that is done, you can (atleast i did) use a small piece of wire to 'short out' the pins on the DIN J3/4/5/6. When you do that, you can see on the LCD what happens, and you can identify which pins to use for your button and encoder... The easy (and correct) way is ofcourse to look in the 'setup_6581.asm'-file to see what pin numbers are set up for which controls. All in all, it sounds like you're VERY close to a full working homebuilt MBSIDv2 :) i hope you will come back and tell us when it works so we can do the "it's working"-dance together :thumbsup:
-
For now, take out the SID chip until you are absolutely sure that voltage is all good. You might fry the little darling :shocked: Black probe at pin14 (GND) and then use red probe to test around. What app are you using?? I use mbsid_interconnection_test_v2.zip And the readme says: C : Pin A0 = 5V C# : Pin A1 = 5V D : Pin A2 = 5V D# : Pin A3 = 5V E : Pin A4 = 5V F : Pin RES# = 5V F# : Pin D0 = 5V G : Pin D1 = 5V G# : Pin D2 = 5V A : Pin D3 = 5V A# : Pin D4 = 5V B : Pin D5 = 5V C (next octave): Pin D6 = 5V C# (next octave): Pin D7 = 5V D (next octave): Pin CS# = 5V RC and SC are the jumper pins on core/SID modules. The Core and SID modules should be connected like this Core:J10 SID:J2 Vd Vc Vs Vs CLK CLK MU MU RC RC MD SC SO SO But let's start all over, for safety sake: - Core and SID module are from SmashTV's shop? - It is an MBSIDv2 you are building, right? - And you use MBSIDv2 app? - And MBSIDv2 interconnection test? - Are you sure the SID chip is working? You tested it in the C64 before you took it out? Now, take out the SID chip and upload the MBSIDv2 app to the core. Check SID socket between pin14 (black probe) and pin28 (red probe); You should get 12V Check SID socket between pin14 (black probe) and pin25 (red probe); You should get 5V (If you are unsure about the pin numbers, you can use the link i put in the last post) If you get this right, the SID module is most probably okay and the problem can be the core/SID interconnection instead. Upload the interconnection app that i linked in the top of this post. Play a note and check for 5V with red probe, using black probe at pin14. You should get 5V all over the SID socket, it seems; use the schema in the top of this post to see what pins on the socket to test according to the note you play. If you don't get the right voltage at the right pins on the SID socket while testing with the interconnection app, then your core and SID module most likely is not connected the right way. Use the schema i the top of this post to see what pins from core J10 should be connected to SID J2 - Fix the connection and try the interconnection test again. If BOTH the MBSIDv2 app AND the interconnection app gives you the correct V at the correct places, then there must be an error some place else. Keep in mind that you made the testtone app work :) but the SID can still be partially dead. Atleast something is working as it should, and you will eventually find the error and have lovely SID sound :tongue:
-
You mean 5V and 12V for the SID, right? The interconnection app allows you to check with a multimeter. When you press a note (for example from MIOSstudio) a pin on the SID socket will give 5V (you do this without SID stuffed ofcourse). You can see the names of the SID pins here. Check the readme.txt in the interconnection zip for full details. I hope you will make this little baby work, so you can enjoy lovely SID sound :flowers:
-
My MB-related builds
-
-
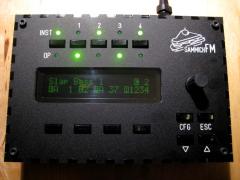
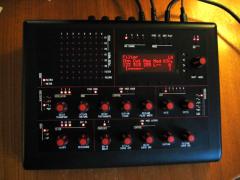
From the album: Flemming
There, all finished :) -
wanna paint his SammichFM tomorrow :D
-
As far as i know you can sell your parts if you want to, and using the forum for the sale is actually the correct way to go :) My guess is that it takes a midiboxer to finish the build afterall. About the cost, well you won't get rich or anything ;) Sellers often charge the cost of the parts.. if i were you, i wouldn't expect anyone to pay for the hours i put into the build or anything. It's really sad to see you leave though :cry: especially when the box is so close to completion. You know that you can always ask here in the forum for help/advice, and maybe finish the build. Hard part over :) then it's all about enjoying the fruit of your hard work! But i guess you know that already.
-
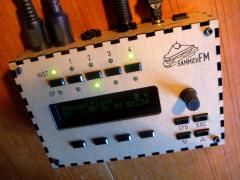
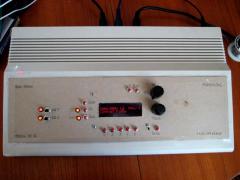
From the album: Flemming
If I can do it, you can too ;) -
Actually, it's software, online :) But yes, i also think it sounds pretty good compared to what i've heard from other alternatives. Tried to find the link, i know it is in some thread inhere, but initially no luck. Gotta leave now, but i bet TK can tell you the link to the website where the voice was made