The last few years have not been good. A wonderful offer to do a masters degree, in 2013, came unstuck in a mess involving sciatica and the death of child for whom I was 'adopted family'. Depression followed. So it took a while to get going again. I've popped back in a few times, only to find I had no time.
Now I'm making time and getting some of the stuff I began contructing into playable units.
I've bultl quite a lot for other people in the last few years, to pay bills and keep going, lik
Well it has been a learning curve alright but with help from latigid on, Antichambre , TK. , FantomXR and Zam
I have been working on replica controllers for a couple of plugins i use here all the time, Arturia Sem Filter, Mini Filter and the Matrix Filter. I am lso doing a couple of plugin synth controllers.
I am also working on the Blue Cat audio summing mixer MB7 thaty i use in my master chain, its a great plugin. As much as I love these plugins I also love being able to reach out t
Construction d'un séquenceur,
SEQ V4 midibox (2016)
http://ksir-diy.blogspot.fr/
Après la construction de 2 contrôleurs midi le modulebox et le pushbox, je décide de fabriquer un séquenceur.
Toutes les infos proviennent du site: Merci T.K.
http://www.ucapps.de/midibox_seq.html
1ere étape, construction de la BOM, liste des pièces a commander
https://docs.google.com/spreadsheets/d/1QeJV0jgEi0ly2ljBv7idEdsqg11bE0XkwrLQFL_UkEw/edit?usp
The Sequencer is finally up an running in his new Acrylic case ...
Todo's ... adding a 5 Volt external PS for the STM32F4 instead of USB-cable and building the Frontpanel for the Line-Driverstuff
I ran out of 15k resistors for the AOUT but still ...
Line Drivers connected and all works fine ... well all sockets get 5 V where they should ..
still a bit confused with the ribboncables .. hope S0 and S1 are not switched ..
Nothing earth shatteringly different from the normal happening yet. I've just got my (very lovely) boards delivered from SmashTV and soldered them up, so here sit two STM32F4 cores (sans SD card hardware because it's not here yet)
After some configbattle with the Pickit2 clone (Vdd has to be 3 or 4 volt instead of standard 5) all 4 PICs for the of the Quad IIC are programmed.
But I had to notice that at my 2 Midi IOs only 2 LEDs do blink on startup :( although 4 days ago all worked fine.
I think it might be my SD card (I took a very old one from my ) or the the slot, so the hexfile is not read completely ... mor debughing soon ..
Anogher little step further to my baby ....
had a bit of panic cause the boards didn't work at first, but the only problem was, that I connected J11E to J2 of one board instead of J1 .. had one connection cable cramped wrong ..
I always wanted to say this too ...
Still some troubles with the MBSEQ_HW.V4 file
Some functions are not supported by the MIOS .. at least that is what zhe MIOS Studio tells me.
Like LED_move, LED_JAM_LIVE, LED_LIVE and some more, plus the BUTTON too ...
The TLV for the AOUT_NG arrived some weeks ago
Today the electronic parts for the first pcbs came ... still have to get the parts for the wilba panel and the AOUT ...
hope to find some soldering time in the weekend
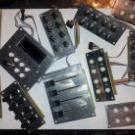
Not much time this weekend But I managed to Solder up a few NEW DIN/DOUT boards. And the complication comes in the pinning of the new boards, the arrangement of the 2x5 header does not allow me to use my old 1x5 cables to the CS as wired in V3, due to the arrangement of the SR inputs. Not a big deal, off to the HW config file to do some editing (It was bound to happen sooner or later!).....
Other observations on the New DIN/DOUT boards....It would be nice to have a bit more clearance
Some progress to report.
Needed to get new ribbon cables for the new Core. One would think crimping ribbons is a trivial task but I managed to mess up two. first one I made worked fine. next two no good (one somehow had a dead short). Finally got that sorted.
Then out to the drill press to recess the angle aluminum I had the LCD's mounted to, so they didn't end up way above the buttons. No problems.
Then to finish wiring up the encoders, which I started years ago, a
So many years ago I started an MBSEQv3. Life happened, moved a couple times, it sat on a shelf unfinished. So now I begin to upgrade it to v4 and finish it off. below are some pics of it after pulling it off the shelf:
The case is an old rackmount Altec Lansing Mixer, I will have a new panel laser cut from acrylic You can see the 4x16 BLM's i started, one is finished the other I forgot to stuff diodes.....(they were made months apart) DOH! board on the right with the cutout in the mi
The way Augmenter as a system is conceived cannot be easily explained in one sentence.
The first thing to realize is that it is a whole guitar amplification system.
It consists of several components, and this compartmentalization is what makes this doable, regardless of the size of the circuit.
So let's run down the signal chain.
Starting from the guitar and cable, we arrive in the first major building block, which is the pedalboard unit.
This consists of several analog fx pedals, a BOSS
After a longer time of absense from the forums, I'm currently in the design phase for something new.
As it happens, midibox plays a larger part in what I'm cooking up right now, and so I thought I'd share little bits and pieces along the way.
The topic of this project revolves around (guitar) amplification.
This involves a lot of analog circuitry, but nevertheless a great deal of digital control by means of midibox hardware & MIOS software,
and who knows, maybe one or two people might
Alright, another update is due.
While waiting on some other things to arrive (PICs and CS pcb) i thought it was a good idea to finish some other projects. So i removed some detents from encoders and I received 25 lego pegs, dremeled them in two, glued them on tactswitches, some more dremeling and put on my custom rubber caps.
And today i visited a good friend with a lasercutter.
And cut out the frontpanel out of triplex wood.
Sanded it down and put on somespray laquer, this is
YEEH!
Most of my Mouser order just came in.
Tact switches, which i will modify.
Dual potmeters for the feedback.
Some bolts, nuts and spacers.
And a lot of diodes.
now its only waiting on the PACTEC PT-10 case.
as for progress:
The rubber buttons i want to use on top of the tactswitched are too big. so i needed to find a solution. and i think i found one.
on top of the tactswitches fits, exactly fits, a lego connector peg.
and the rubber buttons fit e
alright, i've thought about it some more.
I'm going for a wilba design, with some minor alterations. which are mostly frontpanel related.
His design is very good, and combined with the ease of construction it makes it the better choice.
I've ordered the following from mouser:
4x 100K AUDIO POTMETERS (for the feeding the out back into the in of the SID)
Some screws, washers, and spacers.
100x 7.0 mm high 100gf buttons. which i will use with custom caps. (ordering a 100 is cheaper


.jpg.55c3fe54131031c715cb0a6a9b9fa3e8.thumb.jpg.868582cb21d263da288659a773d820db.jpg)