

tonedef
-
Posts
48 -
Joined
-
Last visited
-
Days Won
4
Content Type
Profiles
Forums
Blogs
Gallery
Posts posted by tonedef
-
-
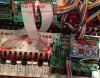
The only other question I have is can I rotate this 90 degrees instead of just 180? My current thought as a workaround is to create a font set that's rotated 90 degrees and write out lines a single letter at a time:
LCD "@(1:1:3),"
LCD "@(1:1:4)o"
LCD "@(1:1:5)l"
LCD "@(1:1:6)l"
LCD "@(1:1:7)e"
LCD "@(1:1:8)H"LCD "@(1:2:2)."
LCD "@(1:2:3)d"
LCD "@(1:2:4)n"
LCD "@(1:2:5)e"
LCD "@(1:2:6)i"
LCD "@(1:2:7)r"
LCD "@(1:2:8)f"It'd look like this, but you have to imagine all the letters are rotated counter clockwise by 90 degrees:

-
Oh, wow, I totally missed that! Thank you!!! I wasted an entire day rummaging around and didn't manage to see that :)
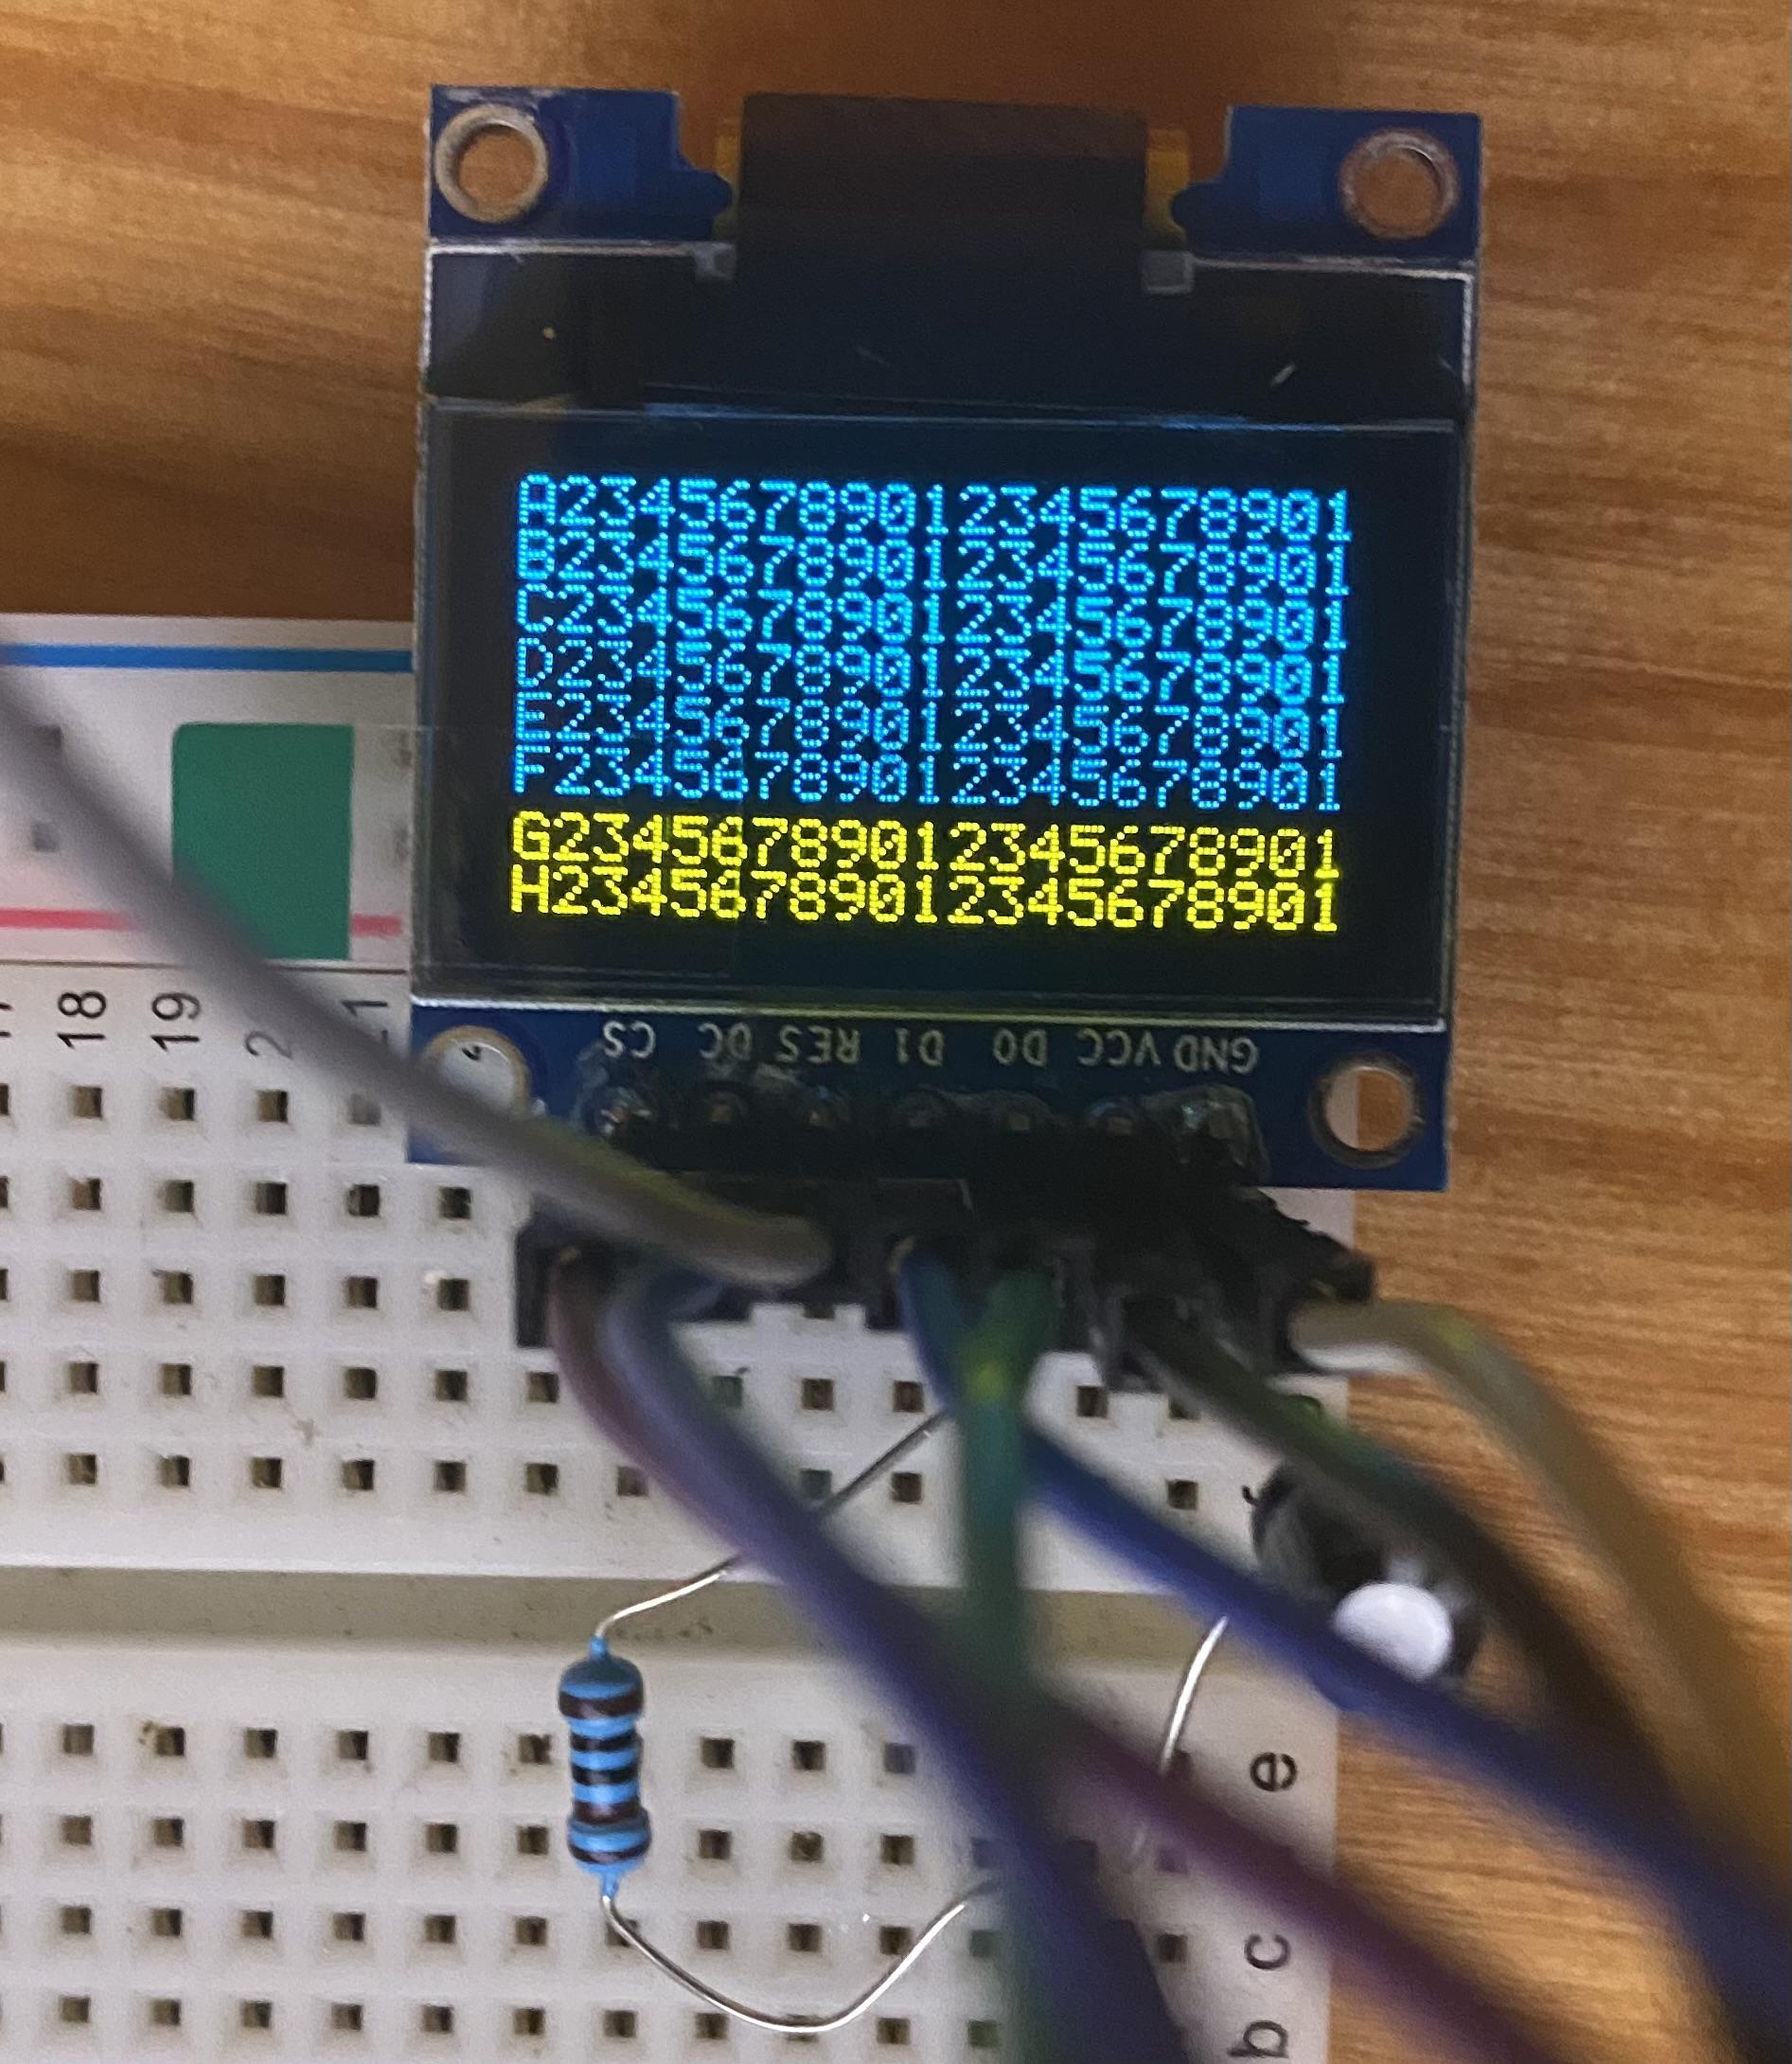
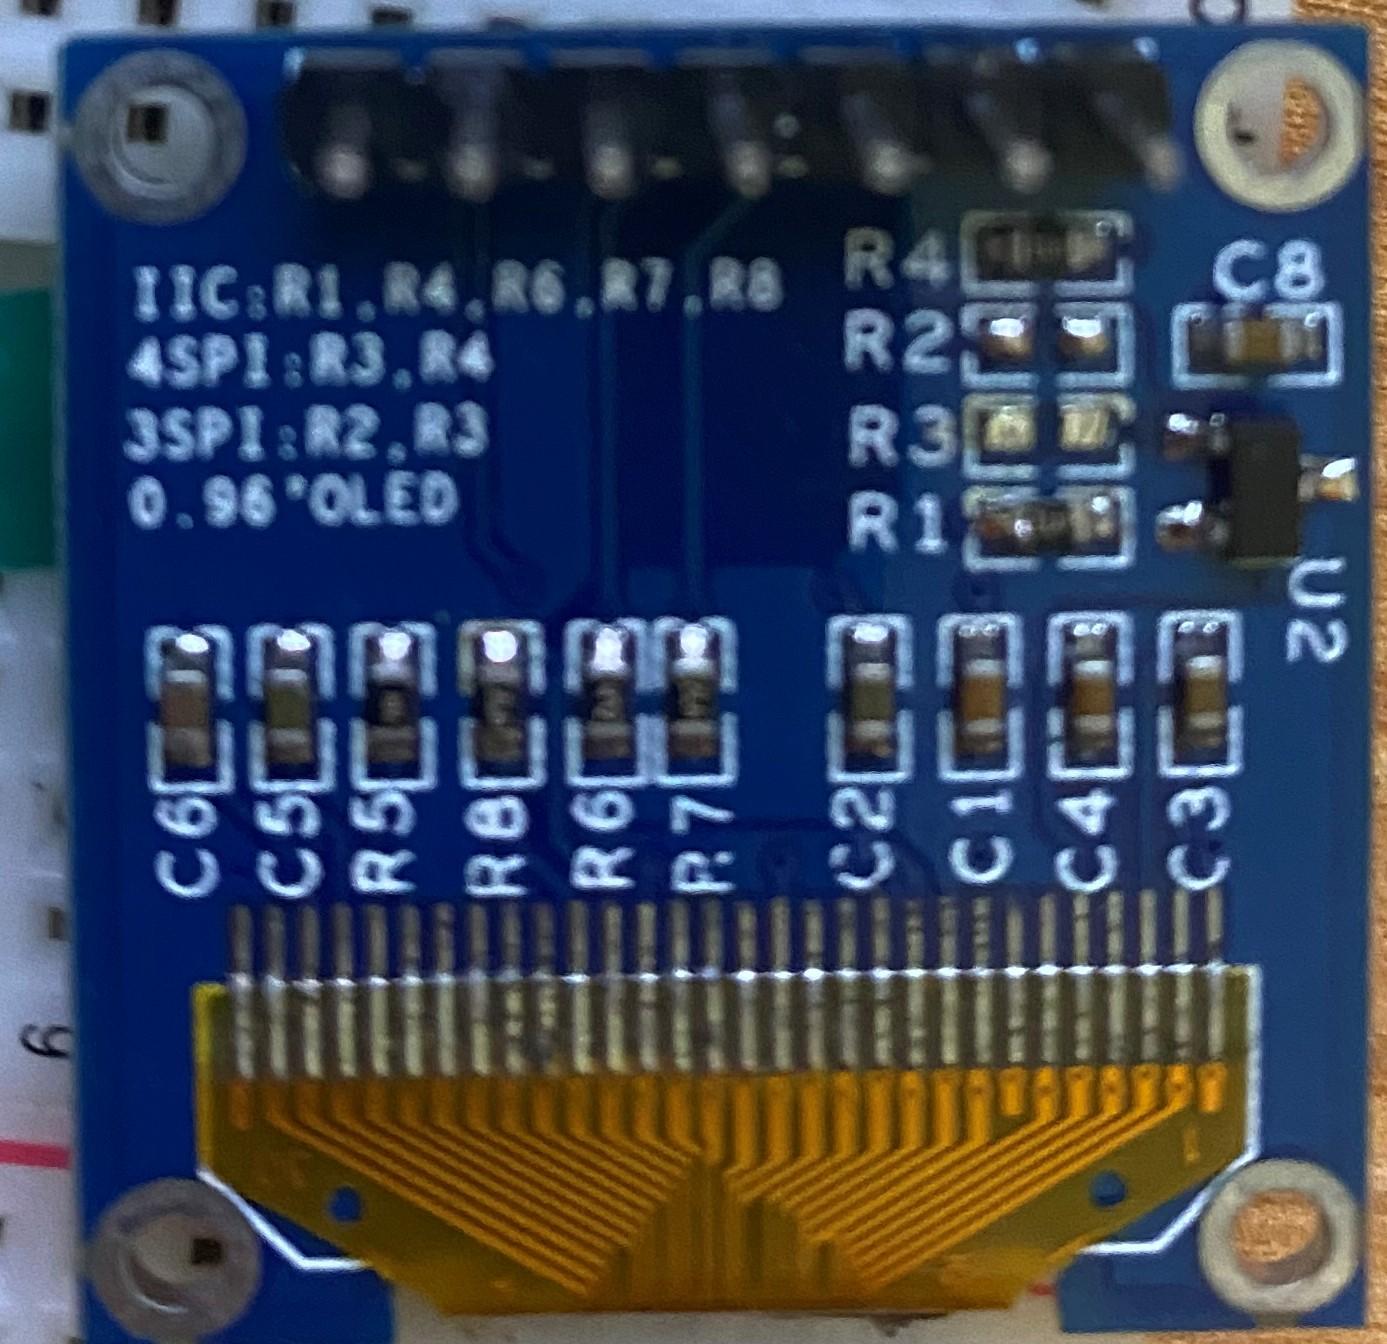
Just in case others run across this:
- You want 4SPI configuration, not IIC like I have in the pic.
- The number of screens you have must match the configuration you set in the bootloader, otherwise you get noise, and won't be able to write to all the lines/columns
- Also easy to miss, but for the 1306 RES connection, you need to wire it up like this (again, connections on your 1306 PCB): GND -> 10uf cap -> 1k resistor -> VCC. Once done, RES will be tied to where the cap and resistor meet (like this)
It wasn't clear to me how to actually use the bootloader for the STMF4 board, but it's essentially:
- Plugin your board as you normally do
- Open MIOS Studio
- Click Browse and choose the mios32_bootloader app (download here)
- Click Start. If it won't complete, try unpluging/pluging the board and trying again
- Unplug/plugin the board
- In the MIDI IN and MIDI OUT sections whatever app you had prior to all of this might be listed, but it doesn't actually exist (and it shouldn't). That's why you now see the error "No response...". The new app, MIOS32, took its place and you need to refresh to see it.
- Click Application -> Rescan MIDI Devices
- Click Understood in the pop-up (this will make your old app disappear, and the MIOS32 app show up)
- Change MIDI IN and MIDI OUT to MIOS32
-
Enter these one by one into the input box: (send a command to MIOS32 application). Keep in mind lcd_num_x must match the number you have chained:
set lcd_type GLCD_SSD1306
set lcd_num_x 1
set lcd_num_y 1
set lcd_width 128
set lcd_height 64
store
Yah. Bootloader is done. Time to restore your app in MIOS Studio:
- Click Browse and choose whatever app you want, like midibox_ng
- Click Start. Like the bootloader, if it won't complete, try unpluging/pluging the board and trying again
- Unplug/plugin the board
Now for some test display data. Lets set some values for your SSD1306 OLED's in MIOS Studio:
- Click on Tools -> MIOS32 File Browser
- Click Create File
- Create some name like LCD.NGC
- Click Update
- Click on the file you just created
-
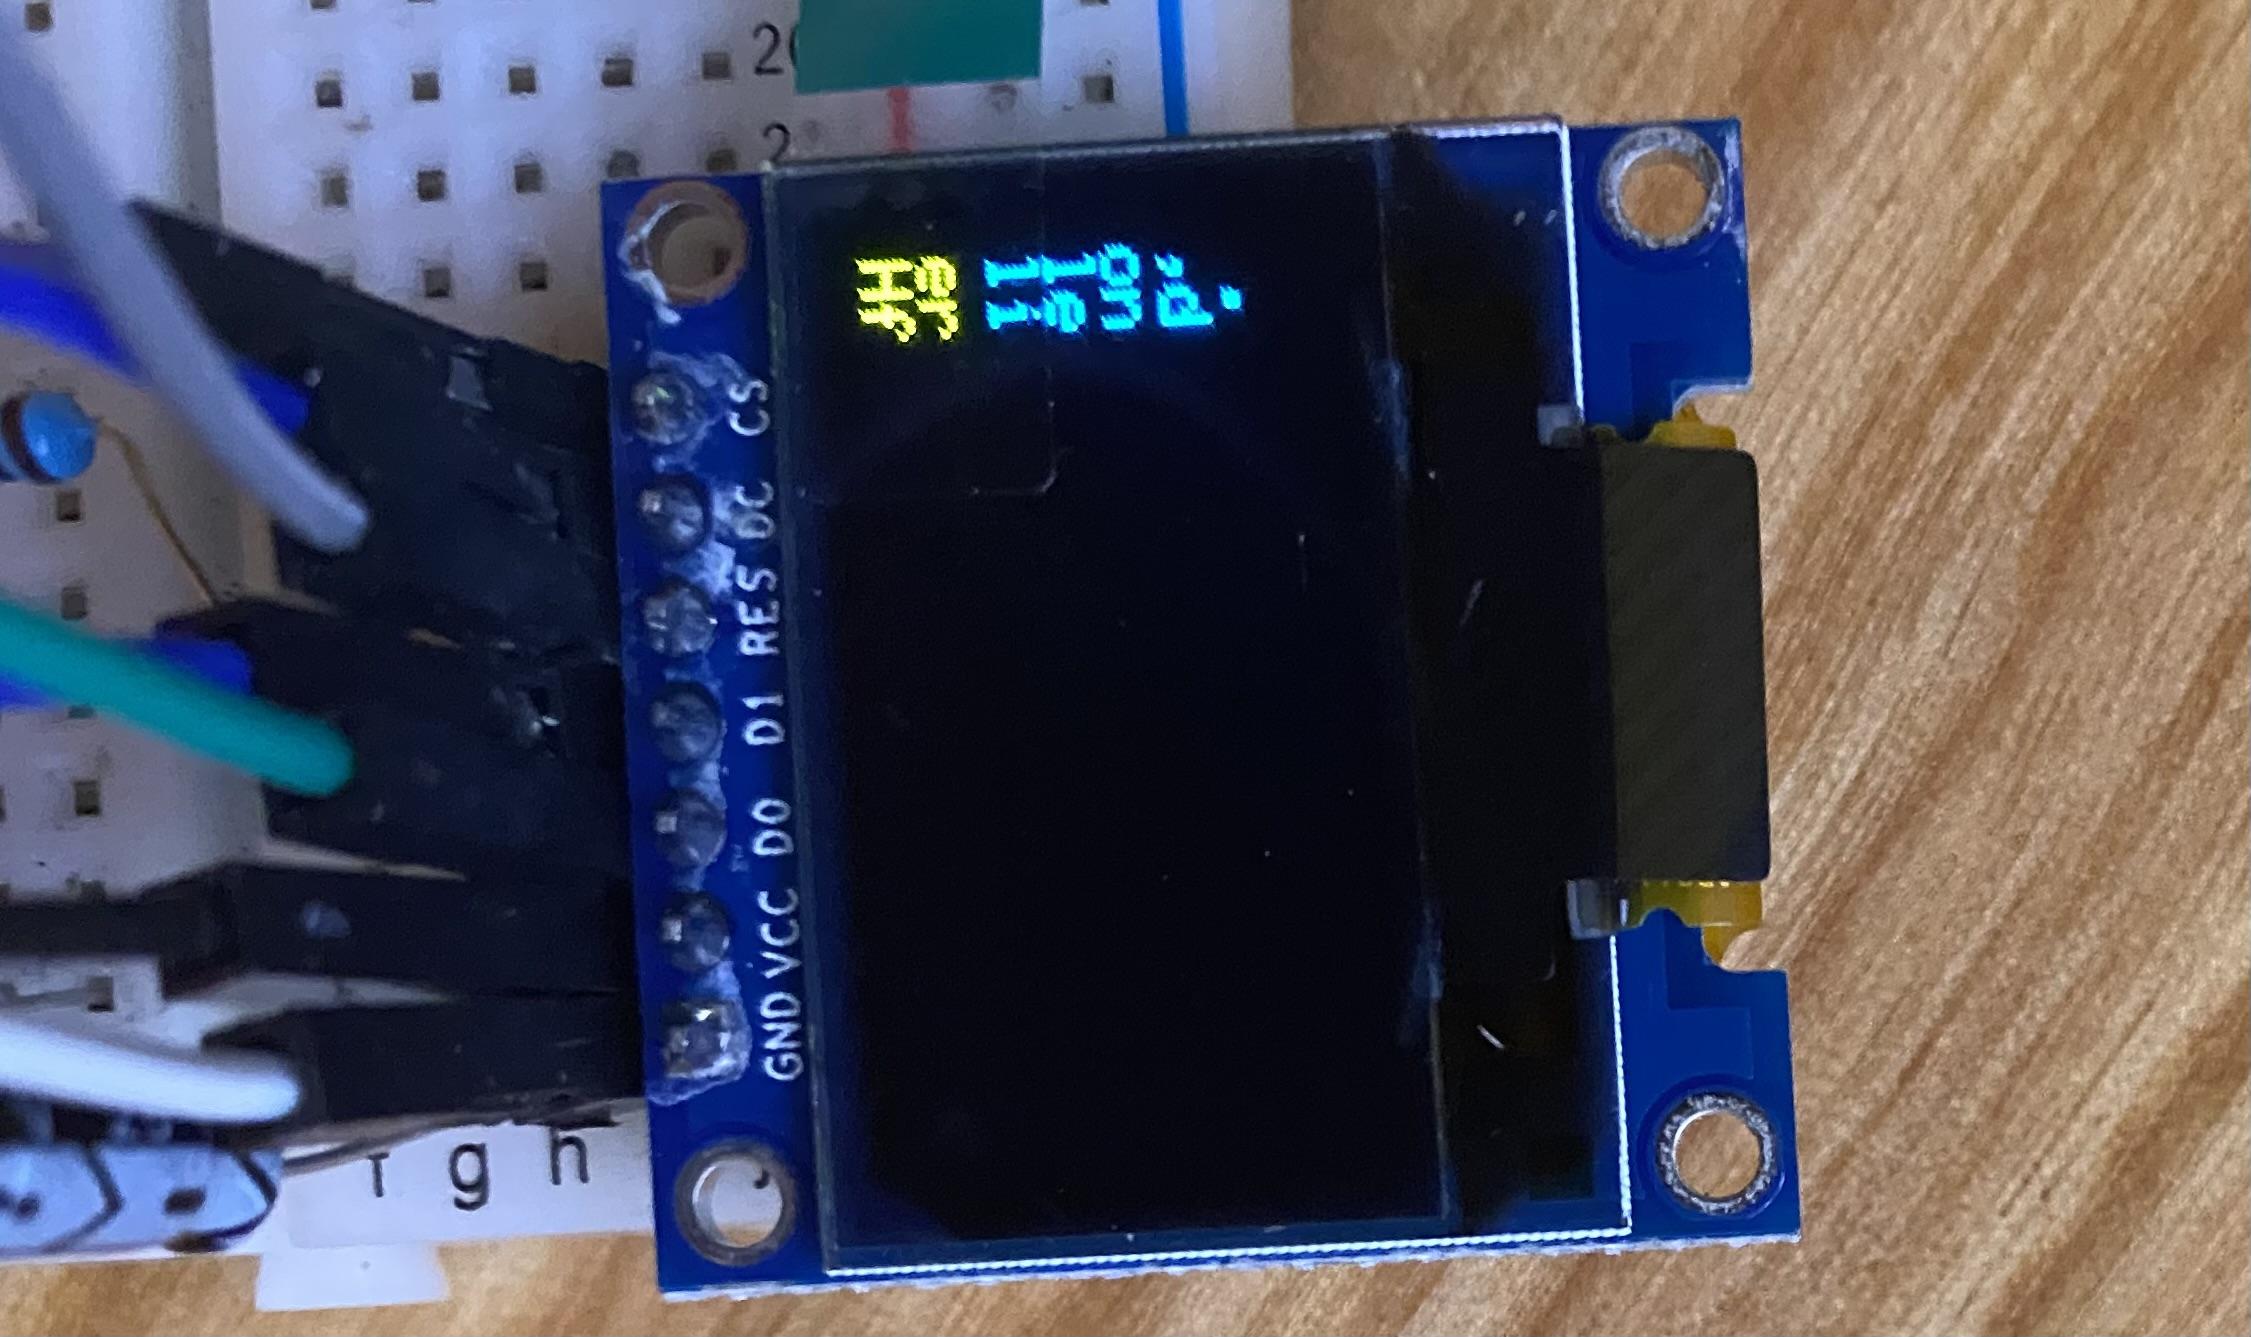
Click Edit Text and add the following test example:
RESET_HW
LCD "%C"
LCD "@(1:1:1)A23456789012345678901234567890"
LCD "@(1:1:2)B23456789012345678901234567890"
LCD "@(1:1:3)C23456789012345678901234567890"
LCD "@(1:1:4)D23456789012345678901234567890"
LCD "@(1:1:5)E23456789012345678901234567890"
LCD "@(1:1:6)F23456789012345678901234567890"
LCD "@(1:1:7)G23456789012345678901234567890"
LCD "@(1:1:8)H23456789012345678901234567890" -
Click Save
You should now have 8 rows and 21 columns of text. If you need to flip it 180 degrees, you can redo the steps above and add set lcd_type GLCD_SSD1306_ROTATED before you store.

-
 1
1
-
Finally got the dust off of my STM32F4 board to work on a project I started 3 years ago. Sad news, I cannot get these OLED displays working. They're factory wired for 4SPI, which I tried initially and no dice. Realized they might need to be I2C (IIC), so I moved/added the SMD resistors for that, but still no dice. Blank.
Also edited the DEFAULT.NGC file to add:
RESET_HW LCD "%C" LCD "@(1:1:1)OLED1" LCD "@(2:1:1)OLED2" LCD "@(3:1:1)OLED3" LCD "@(4:1:1)OLED4" LCD "@(5:1:1)OLED5" LCD "@(6:1:1)OLED6" LCD "@(7:1:1)OLED7" LCD "@(8:1:1)OLED8"Been several years since I've played around with building a MIDIBox project, and the last one was a LPC17 so I'm admittedly rusty as well as new to the STM32F4 board. What am I missing? Also, LD1/COM LED onthe STM32F4 board is red and blinks, is that normal? For what it's worth, the displays I am able to get working in Arduino projects, so it must be something I'm not doing right here.

-
Sweet thx! Very much appreciated!
-
I'm looking to build my own custom board, but I want to make sure I have the core concept down for a basic DIN, before I move on to adding more components. Totally new at doing my own circuits, so any input would be appreciated! When I'm done I'll post it all, in case it's useful for anyone. Thanks!
basic_din.pdf -
Oh, okay. That sounds good. Having the modules was just for a starting point to ensure I'm doing it right, since I've never attempted this before (want to try to squeeze everything I want in with less boards/cabling). I'll try my hand at tracing them and compare it to the files you have. Thanks Phatline & borfo!
-
Okay, my google fu is not up to par, and this is my first go at KiCad, but:
I've been trying to find schematic files I can open in KiCad (i.e. not pdf's) for the Midibox modules. How do you all do this?
I "think" it's possible to import the .brd files in KiCad, if I use the nightly build. Not sure what's an efficient work flow. -
I had trouble with the MIOS_Studio download for Linux (maybe because I have the 64 bit version of Ubuntu 14). It just didn't work for me. So here's a tutorial on how to make MIOS_Studio (actually MIOS_Studio_Debug) on Ubuntu in case anyone else has the same issue
-----------------------------------------------------------------------------------------------------------------
Open a terminal. Make a svn folder, and get the recent mios32 repo:
cd ~/
mkdir svn
svn co svn://svnmios.midibox.org/mios32/
when it's done, unpack juce:
cd ~/svn/mios32/trunk/tools/juce
unzip unpack_me.zip
Go to the mios_studio directory for linux:
cd ~/svn/mios32/trunk/tools/mios_studio/Builds/Linux
I had a bunch of missing packages that I needed to install. You can try do a make first, but I needed these:
sudo apt-get install libasound2-dev
sudo apt-get install libx11-dev
sudo apt-get install libxinerama-dev
sudo apt-get install libfreetype6-dev
sudo apt-get install libxcursor-dev
After that, do a make:
sudo make
If all went well, MIOS Studio should ready for you in the build folder:
cd build
MIOS_Studio_Debug
If it runs, go ahead and quit it, and copy it to your desktop or wherever:
cp MIOS_Studio_Debug ~/Desktop
Done! You can now double click the icon and it should just work.If Make Fails
-------------------------------------------------------
If make results in an error (e.g. missing file), you might need a package or two. To figure out which package has the file, use apt-file:
sudo apt-get install apt-file
Then update it:
apt-file update
So here's an example of an error during make:
../../../juce/modules/juce_events/juce_events.cpp:55:23: fatal error: X11/Xlib.h: No such file or directory
#include <X11/Xlib.h>
Find a package with this file by doing this:
apt-file search X11/Xlib.h
which gives you this:
emscripten: /usr/share/emscripten/system/include/X11/Xlib.h
ivtools-dev: /usr/include/IV-X11/Xlib.h
libghc-x11-dev: /usr/lib/haskell-packages/ghc/lib/X11-1.6.1.1/ghc-7.6.3/Graphics/X11/Xlib.hi
libhugs-x11-bundled: /usr/lib/hugs/packages/X11/Graphics/X11/Xlib.hs
libroot-core5.34: /usr/lib/x86_64-linux-gnu/root5.34/cint/include/X11/Xlib.h
libx11-dev: /usr/include/X11/Xlib.h
you probably want libx11-dev (libroot-core5.34 might also work), so:
sudo apt-get install libx11-dev
Before you run make again though, do a clean:
sudo make clean
and try again:
sudo make-
 2
2
-
-
Sorry I've not been on the forums in awhile, but yes! If you've got some code to share, I'd love to take a look. I've been trying to accomplish this via the NGC file, but haven't had much luck. I'm currently using the NG app which does everything else I need, just not the keyboard octave shifting... Thanks Robin!
-
Okay so I'm having a bit of trouble figuring out how to take the current keyboard range and on each successive press of a button, shift it down by one octave. It has to be relative, because I also want an increment button as well.
I'm assuming it'd be something like:
event_button id=1 kb_transpose= current_value + 12
event_button id=2 kb_transpose= current_value - 12
Sorry if this has been covered before, (I looked but maybe I didn't search for the right terms?). Thanks for any help!
-
Ah, forgot to add EVENT_KB... just when I thought I was getting the hang of things... :smile: Thanks TK!
-
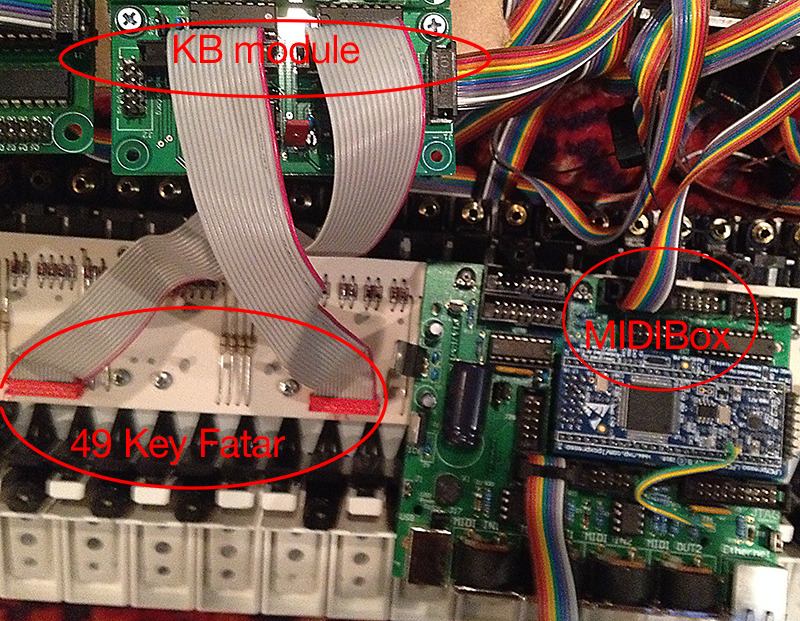
Okay. I'm getting closer. I have all the analog pots in place. Well, 64 of them. I still have the aftertouch, mod wheel, and pitch bend to deal with plus all the dio's. Right now I'm trying to figure out the fatar keyboard. I've tried swapping the connections, but for some reason I can't get the midibox to recognize it:
In MIOS, I have this:
KEYBOARD n=1 rows=8 dout_sr1=1 dout_sr2=2 din_sr1=1 din_sr2=2 din_inverted=0 break_inverted=0 din_key_offset=32 \
scan_velocity=1 scan_optimized=0 note_offset=28 \
delay_fastest=5 delay_fastest_black_keys=0 delay_slowest=10
Maybe I have the connections wrong to the KB module? All I have connected right now is just the Fatar KB -> KB module -> J8/9 of my LPC17 module.
-
Ok. Thanks to TK, I've got everything running. My core shows up in MIOS Studio, uploading .hex files works, encoders on my DIN's transmit, and my AINSER64 looks like it's working when I upload the MIDIO128 project (albeit, missing a few pots I've not attached yet).
However, when I upload the NG project, my little green LED doesn't light up at all, and nothing happens when I spin any of the pots, so it doesn't look like the AINSER64 board is being recognized. Do I need to do some programming at this point? Totally cool to dive into this, but I wanted to make sure I'm not missing something, like, the NG should see the AINSER64 board, but I've foobared it somehow.
Any hints are much appreciated... thx!
-
enjoy a cold beer on me ;)
-
Got it! JOY! Thanks TK... re-upped everything and all is well... now I just have to debug my AINSER64 and my DIN chain :)
-
No joy... fired up Logic, and it does show up there too. Plus Logic will also respond to some of the rotary encoders connected to the DIN boards (seeing midi data coming out of it, when I turn the knob).
Tried redownloading MIOS Studio again and using that. Same result... I must have borked something, but I just don't know what.
-
Yeah, I tried that yesterday... same message. Audio MIDI Setup shows MIOS32 Bootloader...
-
OSX Mavericks, and Apple's Audio MIDI Setup does show the MIDIbox NG. I was a bit erroneous, MIOS Studio does see the midibox, it just cant communicate with it. Querying just generates an error:
No response from MIOS8 or MIOS32 core!Check MIDI IN/OUT connectionsand Device ID!For debugging see alsoHelp->MIDI TroubleshootingAnd attempting any uploads to the unit, gives:
Reading project.hexproject.hex contains 69312 bytes (271 blocks).Range 0x00000000-0x00010eff (69376 bytes) - PIC Bootloader (ERROR!)ERROR: Range check failed!Thanks TK, for any input. You're always helpful... -
I was just using MIOS Studio, and was able to get it to talk to my midibox lpc17 just fine. I uploaded the new bootloader to it, all okay. Then the MIDIbox NG 1.026 project. Everything was working, DIN's where being recognized, but something was flaky with the AINSER64, so I wanted to do some debugging.
At that point I realized I had an old version of MIOS Studio (2.2.x), so I went to upgrade it first. I downloaded the current version 2.4.6, replaced my old one with it, and now... it won't recognize the midibox. Unplug/replug/restart etc. don't have any effect. MIOS Studio just won't see the midibox.
Am I doing something wrong?
-
oh... duh. man how did I miss that.... sorry :whistle:
-
Is this possible, or do I need to get another AINSER64 board?
I'm building a keyboard controller. I have 1 AINSER64 with all the 64 inputs being used, can I chain a kb module to it? In other words, can I simply connect the J1 output from a kb module to the J2 input on my AINSER64 board? -
Hi TK,
I just read the part where the MB-NG is used for a DIY keyboard. Does that mean that the planned (direct) controller-support (pots, encoders, switches..) for the MB-KB project is stopped?
If so, is there a technical reason for it or is it just an economic decision (save development resources)?
How would you link the two cores? Simply via midi (bi-directional) or is there another way?
cheers
Lars
I'm not TK but I can say that reading just a part will more often than not get you things in the wrong way. So, no, it is not stopped, in fact most of it is already there.
Maybe I read something wrong (or I'm just ignorant)... but the confusion to me is that the MB-KB appears to have a plan for functionality that overlaps the MB-NG quite a bit. So for people who just want a custom keyboard controller with a fist full of knobs and buttons, what are the limitations in the MB-KB (assuming a future ver. supports 128 pots + a bunch of DIN/DOUTs), that would necessitate building a MB-NG to go with it? Is it just fewer DIN/DOUT's, or something else?
Either way I'm stoked that the MB-NG is out soon! The news has finally got me off my ass to drill my panel. This will be the best Christmas present :) Thanks TK!
-
:whistle: oops... found my dumbass problem. all good, sorry for the post!
Very strange!
What do you mean with "won't come up" - what is missing, a LCD message?
How does it behave in Bootloader Hold Mode?
(Jumper J27 stuffed)
Best Regards, Thorsten.
-
Okay so my core isn't being recognized by MIOS Studio (or anything else). LED flashes, looks like it boots etc. but it won't come up. Bad flash?
I have the LPC Link separated. Since it's on headers, I went ahead and tried to flash it again, but now it's showing up as "Ed:02: Failed on connect: Ee(92). Unknown error" in the IDE for OSX. On windows, still can't flash, but I get "02: Failed on connect: Ep(01). Target marked as not debuggable." instead.
I tried booting into the ISP bootloader (GND the ISP pin, #51->#54) no go, even with flashmagic over ethernet (can't communicate). Any ideas?
My SEQV4 - Finished electronics !!!
in MIDIbox SEQ
Posted · Edited by tonedef
I know this is an old thread, but since I went through this, and was getting the same error:
I figured I'd mention how I got it working. The bottom line is that most of us have 64Bit Linux installs that don't support 32Bit apps out of the gate. To get that you need to add i386 support. For Ubuntu, you can check if you have it already by running this in a terminal:
dpkg --print-foreign-architecturesIn the output you should see i386. If not run this:
sudo dpkg --add-architecture i386
sudo apt-get update
And try running make again. If it still won't run, or if you're on another Linux distro, you may be missing libraries, and what you'll need will vary, but essentially you'll want to Google for running 32bit apps on a 64bit version of your distro. I also added gcc-multilib, which may or may not have been necessary:
sudo apt-get install gcc-multilibIt's weird that Linux says "not found" instead of a more informative error. I rabbit holed for awhile in the wrong direction because of it. Oh well, I suppose that's part of the journey :D