

gjvti
-
Posts
49 -
Joined
-
Last visited
Content Type
Profiles
Forums
Blogs
Gallery
Posts posted by gjvti
-
-
Hi Thorsten!
Your iPad virtual BLM looks very
intriguing and interesting.
Sad that it has the issues
with responsiveness.
I'm curious - has someone tested
virtual BLM on multitouch enabled
PC/tablet PC?
gj
-
Hi Thorsten!
First I'd like to express my adoration to your
solid sequencer aluminium case - looks really great.
I didn't notice that before :)
I've a similar project, but it's a little bit more advanced, because it supports:
- USB MIDI
- UART MIDI (up to 3 IN ports and 3 OUT ports)
- OSC (requires MBHP_ETH module)
- CV (requires MBHP_AOUT* module)
Thats already possible by using OSC
My plan is to provide such an app, but there are other higher-prio things in the queue... ;)
We could speed up this if somebody would help me with the graphics!
Btw.: OSC seems to be popular as well, e.g. Pianist Pro supports this:
http://midibox.org/forums/index.php?app=gallery&module=images§ion=viewimage&img=474
I'm able to directly control my MBSEQ with this app (w/o using a PC), and it's also possible to route key/pitch/CCs via the OSC port of MBSEQ to a physical MIDI IN/OUT by using MBSEQ
Since this is working w/o problems, and since I'm already able to send/receive OSC messages on an iPad with my own applications, this is probably the route to go.
Best Regards, Thorsten.
iConnect box, as they say, directly connects to iPhone/iPad
by wire, which also serves as a charger, but yes - it doesn't
support OSC and can't go wireless as I understand. Since I'm
just learning to work with my sequencer, when I have free time,
I haven't dwelled deep into this OSC connectivity - this
is really new for me, but possibility to build
own visual control panel for iPad or multitouch
enabled PC to have full control over MBox sequencer
and other midi gear looks very tempting and promising.
I can't 100% promise, but I think I can give a try to
help you with graphics if you can elaborate this.
Just send me an email or pm what format graphics
you need and what elements should be laid on there.
Best regards
Gunars
- USB MIDI
-
Hi there.
Just FYI
Yesterday I found this iConnect project

which obviously will be available next year and just though that probably it could
find some use with midibox sequencer as well. Probably it could be possible to make
virtual BLM for iPad/multitouch enabled PC to control Midibox hardware in a way Thorsten
did with
I think it could open may possibilitiesfor different ways to connect music gear.
gj
-
Nice! Really looks very well made - convincing.
Keep on midiboxing! :)
Best,
gj
-
Thanks for your positive responses!
I got some questions from forum members about switches/buttons and other stuff, so there is some additional info.
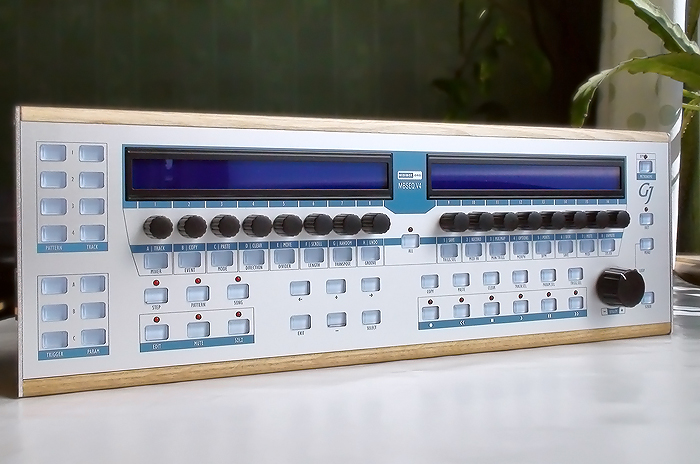
I used standard tact switches for function buttons some accompanied with leds (btw utility button is together with jog dial encoder) and illuminated Omron B3W-9000-RG2N for 16 GP, pattern and layer select buttons. Standard switches have decorative transparent plastic caps adapters, which are handmade from KömaTex (?) - very easy to cut foam plastic. Omron switches also got KömaTex adapters, but they had to be cut precisely so I ordered them at local plastics workshop. Initially I planned to stick decorative blue caps directly, but those Omron buttons suffer from insufficient illumination at bright light so I decided to remove their original milky white caps for better illumination. Transparent button caps are CNC milled/cut from PMMA FROST plastic. White KömaTex and blue PMMA FROST is not glued together so far, since I do not expect open the box frequently and also I'm bit worried about how they match to holes of aluminium panel + tolerance of holes was to mall. So far I'm satisfied with the action of those Omron buttons - they are much softer than standard tact switches, but react well.
Currently I'm also following BLM section to make decision to go for Wilbas pcb and livid buttons or make my own. I have some new ideas about custom button design, but these ideas have to be adapted to what is possible to work out painlessly. I'm very impressed about Phunk's design progress and Wilba pcb idea. Also I was absolutely amazed with - definitely worth to consider!
My DIN/DOUT pcb is single sided own design and have some flaws since I designed it taking a risk and having no any real part and without knowing exact dimensions so later I had to cut extra holes for spacers and LCD pin headers and do some rewire. Etching (ground, vdd and signal line busses for registers) was made at local seal/stamp shop where they make all kinds of signs and print works. Holes were drilled at home - that took 3 evenings. LED and button wires and also signal wires (chains) for registers are soldered with different colour wires overly. It was really hard to get coloured thin wires (white were easy with soviet MGTF(?) non-melting). Finally I got required thin wires ripping some old vga type cables. All soldering work for SmashTV kits and my PCB was around 4-5 full working days (~40h)
I decided to make my own single sided PCB because I missed Wilba pcb bulk order and had no clue where I can order such double sided pcb locally.
Panel is silk printed aluminium with specially glued aluminium L profiles at the bottom side to eliminate screws at panel front side. Silk print was done at the same seal/stamp shop where etching. Yep, that is expensive if only a single piece is ordered. If I had to build another one, I think I would opt for mill cut instead of laser cut since laser cut surfaces are rough and this doesn't go well with moving plastic parts (button caps) and also milling would allow photo-colour technique which is bit cheaper than silk print. After laser cutting I had to do some filing of rough surfaces manually - a pain in the a....
So I hope I have answered all the questions, which arose so far :)
If some more questions - let me know.
PS yes, this is my first electronics DIY project. At late teens (20+ years ago), I built RC car at soviet army sports club :) but that involved only mechanics - electronic parts were borrowed from club (I do not remember the make).
-
Hello,
To mark/celebrate my 1/2 year engagement with midibox I decided to publish some photos to illustrate my approach of sequencer building for those who may be interested.
I started on January 16 ordering main board and some other parts from avishowtech (SmashTV). Unfortunately I haven't had time to play this thing intensively since I'm still stuck on its mobile rack type integration in my setup. So for now only pictures and some details - I hope to add video later when I'll have time do it properly as intended.
Some more pictures available at forum gallery (sorry, I don't know quite well how to manage it)
http://midibox.org/forums/index.php?app=gallery&module=user&user=7180&do=view_album&album=60
and also at flickr.com
Some kind of parts list and costs of my midibox seq project - see below:
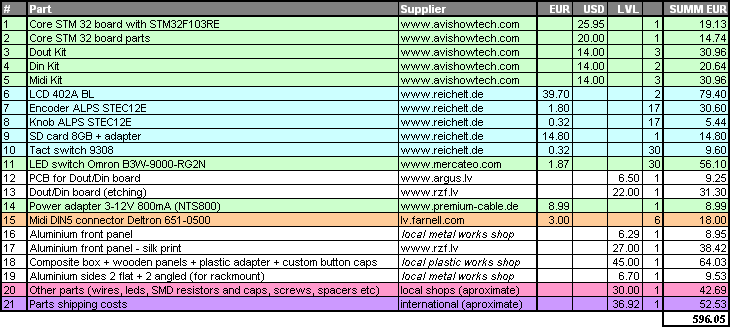
Table doesn't include ~50+ EUR for wrongly purchased parts. This is my first DYI project
and in my real life I'm quite far from electronics. Of course, normaly sequencer can be built
at least twice cheaper - for example you can pick cheaper LCD from ebay, replace Omron
buttons with standard ones + leds, replace silk printed aluminium panel with laser engraved plastic,
replace deltron midi connectors with standard ones, etc.... this will give you significant savings.
What I learned form this project - SMD are realy cool. Love to solder SMD resistors
and capacitors.
Best regards
gj
PS
Many thanks to Thorsten and also Wilba for an
idea of unified din/dout pcb. I'm looking
forward to build new blm matrix later this/next
year, but at the moment I don't quite understand
yet how it is connected. Thanks everyone for
your support!
-
Hi Thorsten,
Your enthusiasm, knowledge and ability
certainly deserve maximum respect!
Midibox has turned out to one of the
best things what happened to me :)
Thanks a lot! Will try this new version
at weekend for sure!
Yours truly,
Gunars Jansons
-
I'm sorry that I posted question about arpeggio/transpose split in wrong place in BLM section, so I'm trying to move that discussion here (I hope this will be ok):
I played with my not yet completely finished sequencer this weekend afew hours. And found one more thing I want to ask. It looks like split
for arpeggio/transpose modes is done only globally in Midi transpose
and arp page. Actually since I played from 49 key RemoteSL live I felt
this bit limiting. I thought that it probably would be nice to
consider this split option for each track separately so that you
can set split for each track this way:
LOWER ZONE | SPLIT KEY | UPPER ZONE
{silent;play-through;arpeggio/transpose} | Key # | {silent;play-through;arpeggio/transpose}
On the Korg M3 it is also possible to adjust the velocity slope for the
split zones so that zone doesn't stop hard at split point, but fades out gradually
over some notes/octaves. What others think about this, do you find this could
be useful? I understand that this needs quite a lot of programming and is
certainly not to do priority.
Replay from Thorsten:
I already considered to provide 4 transpose/arpeggiator busses routed to Bus1..Bus4, that can be loopbacked or controlled from keyboard splitzones (and now also from BLM16x16+X). And a "play through" function is planned as well.This concept is similar to your proposal, as each track can select the desired transpose or arpeggiator zone individually.
Advantage compared to your idea: it fits better with the loopback mechanisms!
I don't like the velocity option - it makes the configuration more and more complicated and especially intransparent!
I mean: you would probably know how to use it, but the next guys would think that transpose seems to be buggy if they don't remember that they activated such a strange option by fault.
Great to hear about your idea about 4 transpose/arpeggiator busses! This definitely looks more flexible than my proposal and for me 4 splits/busses seem absolutely fine. In fact my standard use on my M3 rack is one arpeggio on all keys + transposed sequence for bass + some arpeggio for melody, which is played also through on different channel. In my setup I have midi merger matrix so I can achieve zone through effect in other way, but maybe it can be useful for others.
Velocity option (slope for split zone) perhaps could be useful on small keyboard, but, of course, there is always an alternative to buy a bigger keyboard :) 61 keys is smallest comfortable size for playing split zones, but at the moment I have no space for 61 keys so I use smaller keyboard and use slope functionality on M3 quite often. Actually I don't know how many midiboxers use midi keyboard to play live arpeggios and transpose sequences, but this is the way how I prefer to use midibox sequencer :)
Best regards
Gunars
-
Continuing about led bug.
I don't know is this a problem or not, but once I accidentally
connected inappropriate midi cable to sequencer midi
in or out (I don't remember) - in other words mixed in
with out and was pretty surprised that LED for stop
button, if I remember correctly, glow also with power
cable unplugged. Could it be that I have soldered
something incorrectly? As far as I have checked
I haven't had any really obvious hardware problems.
Gunars
-
.....
Btw.: I also consider to add a (horizontal) keyboard split option. Only 8 velocity values will be available per instrument, but they can be played in parallel, resp. it won't be required to switch between the tracks.
And the mode selection buttons will be changed to the lowest "extra column" keys, so that the most important modes can be switched with a single hand.
.....
yes. And switching between the patterns can either be done immediately (the way I prefer), or synchronized to the measure.
It gives you exactly the same functions like the MBSEQ V4 Pattern page, just more direct access.
Btw.: muting is possible with the extra column by clicking a button twice (first click selects a track, second click mutes a track)
.....
It's your own choice if you prefer a traditional connection via MIDI compatible cables (with optocouplers) or a direct, digital connection.
Using optocouplers decouples the BLM circuit and allows long distances. Digital I/O over long cables could be unstable in a noisy environment.
.....
One of the 5 UARTs is available at the JTAG port J3 that you don't use yet.
This additional MIDI port will be enabled in one of the next MBSEQ releases.
.....
Best Regards, Thorsten.
Hi Thorsten,
Fantastic :w00t: ! These are next best news since I found midibox in January.
You are going to keep me busy for another 5-6 month :laugh:
This new matrix seems another must have!
Best regards
Gunars
PS
I played with my not yet completely finished sequencer this weekend a
few hours. And found one more thing I want to ask. It looks like split
for arpeggio/transpose modes is done only globally in Midi transpose
and arp page. Actually since I played from 49 key RemoteSL live I felt
this bit limiting. I thought that it probably would be nice to
consider this split option for each track separately so that you
can set split for each track this way:
LOWER ZONE | SPLIT KEY | UPPER ZONE
{silent;play-through;arpeggio/transpose} | Key # | {silent;play-through;arpeggio/transpose}
On the Korg M3 it is also possible to adjust the velocity slope for the
split zones so that zone doesn't stop hard at split point, but fades out gradually
over some notes/octaves. What others think about this, do you find this could
be useful? I understand that this needs quite a lot of programming and is
certainly not to do priority.
I tried to move this discussion to more ... thanks for your patience :blush:
Anyway, yet another beer to TK! :)
-
......
The BLM firmware is running on a dedicated PIC based core module and communicates with MBSEQ via MIDI. The optimized protocol is fast enough to achieve high refresh rates between 350 fps (if only a single line is changed) and 20 fps (if all 512 LEDs are changed).
Best Regards, Thorsten.
Hm, very interesting!
As I'm waiting for the final parts (box enclosure) for my mbox sequencer, I have 3 questions to satisfy my curiosity in this new sequencer extension development:
1) Does the pattern selection mode mean that it is possible to select/activate patterns from the pattern bank in real time in a similar way as we do it in ableton scene view?
I mean, does 16x16 matrix in this mode represents 16x16 pattern slots from bank and patterns can be played/activated with those buttons?
2) Does "communicates with MBSEQ via MIDI" mean through midi cable or this communication is done via one of MBSEQ motherboards digital I/O interfaces? In my sequencer all seem occupied with DIN, DOUT, Midi and SD card. :unsure:
3) I already had the same idea about SparkFun's rubberized led buttons. Expensive? Maybe, but not so much taking in account the fact that in my opinion there are not any competitive alternatives on the market for midibox sequencer (even genoqs, which is really expensive, doesn't convince me enough). Also my sequencer version is not cheep either with omron dual led switches and Reichelt LCDs and custom silk printed aluminium panel - most expensive parts :) So for me SparkFun's seems optimal solution - just the question - is those button sets compatible with the 'The BLM firmware is running on a dedicated PIC based core module'?
Best regards
Gunars
-
Absolutely amazing midibox demo! Somehow I didn't notice
this video before, so thanks for bringing up this tread :thumbsup:
-
I will add the possibility to assign a UNDO button in the next firmware.
But it won't be preconfigured in the standard setup, people have to decide by themself if they find a direct access to this function useful.
Personally I prefer clear before undo. Not only because I use the clear function very often, but also because a dedicated undo button could imply that it works on *any* change.
But Undo works only on a small number of functions that are listed in the utility menu.
I don't plan to provide undo for any parameter changes.
Best Regards, Thorsten.
Ok, thanks. That's fine :)
I completely accept that, if such update is possible, it is not in priority list.
Also note that I put this quick reference of midibox sequencer functions on
http://www.midibox.org/dokuwiki/doku.php?id=midibox_seq_quick_reference
so this tread can be locked I suppose.
Best regards
Gunars
-
Hello Thorsten,
Thanks a lot for your valuable comments!
I will double check the firmware version next
week and check all the issues I experienced.
I believe that they are mostly caused by
my novice status/lack of knowledge :)
Since I do not know how to deal with wiki,
I have to explore that first. I hope to
do that tomorrow or next week. I hope that
I will have enclosure box completely ready
in two weeks so I will be able to post
some photos as well.
Best regards
Gunars
PS
F1 isn't assigned to the Clear function, something seems to be wrong at your side.Yes, I could provide an UNDO button function if really required
yes, I changed MBSEQ_HW.V4 file significantly since I have custom single sided I/O board, not the one designed by Wilba. I personally think that instant access to Undo function could be more useful than instant access to Clear function. Actually I had F1 unused so most appropriate from all sequencer functions to me seems Undo, but I just put Clear there, because Copy and Paste buttons are near on my board :) Perhaps we need a poll to make sure what others think about quickly accessible Undo?
-
Hello Midiboxers!
I recently went through all (or most) :logik: midibox sequencer options and prepared a quick reference (crib) - list of functions and options. I don't know if anyone else will find this useful, but I personally always prefer studying reference rather than userguide.
Now new quick reference version is vaialable on http://www.midibox.org/dokuwiki/ so it can be updated by others.
Also I marked some my comments with red. If anyone can explain them or provide solution - your input is welcome.)
Best regards
Gunars
>>>>>>>>>>>>>>>>>>>>>>>>>>>>>>>>>>>>>>>>>>>>>>>>>>>>>>>>>>>>
MB SEQ functions - quick reference
Detailed info for options and functions of course is always available at
http://www.ucapps.de/midibox_seq_manual_m.html
# Function Description Options
Dedicated button functions (can differ depending on hardware panel layout and MBSEQ_HW.V4 file)
1 Pattern 1,2,3,4
- Select pattern/track group (G1, G2, G3, G4)
2 Track 1,2,3,4- Select track within track group (T1, T2, T3, T4) - 16 tracks total
3 Trigger layer A,B,C- Select trigger layer A and B (holding C allows to select others)
- Gate | Acc | Roll | Glide | Skip | R.G - random gate | R.V - random value | No FX
- Still not clear to me how to access for editing the values for selected trigger layer, I can only access parameter layer values
4 Parameter layer A,B,C- Select parameter layer A and B (C switches between C & D)
- Default: Note | Vel | Length | Roll (also CC, Pitch, Prob, Delay can be added via trigger selection menu)
5 Step View- View and select steps if more than 16 are used
- 1...16 | 17...32 | ...etc
6 Pattern- Select pattern/track group G1, G2, G3, G4 from SD memory location
7 Song- Select song parameters
- Song # | Position | Action (Stop, x1..x16, Jump Pos, Jump Song, Mixer, Tempo, Mutes) |||| Select patterns G1,G2,G3,G4
8 Edit- Enter edit mode to edit parameter and trigger layer steps
9 Mute- Quickly mute/unmute tracks 1...16
10 Solo- Solo current track
11 <- | -> (Left | Right)- Move cursor position
- Left doesn't work in most cases :( Left works when selecting trigger layers in other menus only right seems working
12 + | - (Inc | Dec)- Same as jog dial encoder - increases/decreases the current value
13 Exit- Quickly exit to top menu
14 Select- (Press&Hold) Select steps to be controlled by All function
15 All- Edit all selected steps according to Select function
16 Copy- Copy steps from 1 (?) to selected #
- Is there a way to select from which step to copy?
17 Paste- Paste copied steps
- Is there a way to select starting from which step to paste?
18 F1 (Clear)- (Press&Hold) to clear selected track
- I think it would be more useful if Undo could be assigned to this in MBSEQ_HW.V4 file, but seems it is not possible
19 F2 (Select track)- (Press&Hold) to select track from 1...16
20 F3 (Select parameter layer)- (Press&Hold) to select parameter layer A,B,C,D etc
21 F4 (Select trigger layer)- (Press&Hold) to select/assign (?) trigger layer 1...8
22 Rec- Opens record menu
- Track # | Record (Live, Step) | Mode (Mono, Poly) | AStart (on, off) | Step # | TglGate |||| Port # | Chn #
23 <<- Rewind (active only in song mode)
24 Stop- Stops playback and resets position to beginning
25 Play- Starts playback of patterns/song
26 Pause- Halts playback
27 >>- Forward (active only in song mode)
28 Metronome- Toggles metronome on/off
29 Fast- Activates Fast mode for quicker value selection with encoders
- Speed options for Fast can be changed in MBSEQ_HW.V4 file
30 Scrub- (Press&Hold) + jog wheel allows dynamic changing of actual position
Menu functions
31 Menu+Scrub- Toggles loop mode on/off
32 Menu+GP1 (Mixer)- Opens mixer view for 16 tracks (12 pages can be switched with +/-)
- Midi port | Midi channel | Prog change | Volume | Panorama | Reverb | Chorus | CC1 | CC2 | CC3 | CC4
- Changing midi channel didn't work (tried just once hovever);
Not clear how to change/select new map;
pages 8 to 12 holds CC1=128,CC2=128,CC3=16,CC4=50 not clear how this works and how to change assignment to other CC numbers it looks like only theese CC messages can be remaped?
33 Menu+GP2 (Event)
[*] Opens track setup editor
[*] Track # | Type (Note, Chord, CC, Drum) | Step # | ParL # | TrgL # | Port # | Chn # | Edit Name
34 Menu+GP3 (Mode)
[*] Opens track mode editor
[*] Track # | Track on/off | Normal, Transpose, Arpeggiator |||| Hold (on, off) | Sort (on, off) | Restart (on, off) | Scale (on, off) | Sustain (on, off)
35 Menu+GP4 (Direction)
[*] Opens track playback direction editor
[*] Track # | Select playback mode (Forward | Backward | PingPong | Pendulum | Rand.Dir | Rand.Step | Rand.D+S) |||| Fwd # | Back # | Replay # | Repeat # | Skip # | Itv # | SyncM (yes, no)
36 Menu+GP5 (Divider)
[*] Opens track clock divider setup editor
[*] Track # | Clock # | Divider (normal, triplet) | Sync to Measure (on, off) |||| Timebase selector (1,2,4,8 ...etc)
37 Menu+GP6 (Length)
[*] Opens track length editor
[*] Track # | Length # | Loop # |||| Quick length selection (4,8,16 etc)
38 Menu+GP7 (Transpose)
[*] Opens track transpose editor
[*] Track # | Transpose selector (-7 oct ... +7 oct) | (-7 sem ... +7 sem)
39 Menu+GP8 (Groove)
[*] Opens track groove editor
[*] Track # | Groove style (off, shuffle ... etc) | Intensity # |||| Step # | Dly # | Len # | Vel # | Num Steps #
40 Menu+GP9 (Trigger)
[*] Opens track trigger layer selection menu
[*] Track # | Gate | Acc | Roll | Glide | Skip | R.G | R.V | No FX
41 Menu+GP10 (FX)
[*] Opens FX editor
[*] Local (Echo, Hum, Limit, LFO) |||| Global (Loop, Scale)
[*] Echo (Track # | Repeats # | Delay # | Vel.Lev # |||| FB Velocity % | Note # | Gatelen % | Tcks %)
[*] Hum (Track # | Intensity # | Note [on, off] | Vel/CC [on, off] | Length [on, off])
[*] Limit (Track # | Lower # | Upper #)
[*] LFO (Track # | Wave [off, sine ... etc] | Amp # | Phs % | Steps # | Rst # | OneShot [on, off] ||||
[*] Note ([on, off] | Vel [on, off] | Len [on, off] | CC [on, off] | ExtraCC# | Offs # | PPQN #)
[*] Loop (Mode [all tracks / step view ...etc] | Offset # | Steps # | Loop [on, off])
[*] Scale (Control [global, G1, G2 ...etc] | Root [Keyb, C ...etc] | Selected scale [major, minor ...etc]
42 Menu+GP11 (ManualTrigger)
[*] Manualy triggers steps, (Press&Hold)+Select for sync to measure
[*] Not clear how to operate this function, what selected tracks in uper row of LCD mean and how to change them
43 Menu+GP12 (Morph)
[*] Opens track morphing setup
[*] Track # | Mode (on, off) | Dst.Range # | Value # |||| Morphing control (also by CC1)
44 Menu+GP13 (BPM)
[*] Opens BPM settings editor
[*] Mode (Auto, Slave, Master) | Preset # | Tempo # | Ramp #s | Fire Preset | Preset Page |||| MClk (USB1 etc) | In (?) | Out (?) | Din PPQN # | Ext.Restart | Tap Tempo
[*] Wasn't able to change valuses for In and Out, maybe some other settings have to be changed
45 Menu+GP14 (Save)
[*] Opens save menu
[*] Group # | Location # | Target # | Save |||| Category | Label
46 Menu+GP15 (Midi)
[*] Opens midi setup editor
[*] Transpose and arp (Port # | Chn # | T/A Split [on, off] | Midd.Note # | Reset Stcks)
[*] Section Control (Port # | Chn # | G1 # | G2 # | G3 # | G4 # | Fwd [port] | Reset Stcks)
[*] Midi Router (Node # | In [port)] | Chn # | Out [port] | Chn # | Default Port)
[*] Misc (BLM_Scalar port [on, off] | Midi Monitor)
47 Menu+GP16 (Sysex)
[*] Sysex directory not found on card
[*] Not all required folders are created with disk format - midi folder was also missing
Utility functions
48 Utility+GP1 (Track select)
[*] Select active track
49 Utility+GP2 (Copy)
[*] Copy steps from 1 to selected #
50 Utility+GP3 (Paste)
[*] Paste copied steps
51 Utility+GP4 (Clear)
[*] Clear selected track (No options - Wipes the track instantly!!!)
52 Utility+GP5 (Move)
[*] Moves some steps (copy and paste together)
[*] Is there a way to select step range
53 Utility+GP6 (Scroll)
[*] Scrolls the steps across
54 Utility+GP7 (Random)
[*] Generates random events
[*] Track # | Generate | Clr | Util | Undo |||| LayerA # | LayerB # | LayerC # | TrgA # | Trg B # | Trg C #
55 Utility+GP8 (Undo)
[*] Undoes last operation
56 Utility+GP9 (Save)
[*] Opens save menu
[*] Group # | Location # | Target # | Save |||| Category | Label
[*] Not sure about location - is it like copying from one momory location to other?
57 Utility+GP10 (Record)
[*] Opens record menu
[*] Track # | Record (Live, Step) | Mode (Mono, Poly) | AStart (on, off) | Step # | TglGate |||| Port # | Chn #
58 Utility+GP11 (Mixer)
[*] Opens mixer view for 16 tracks (12 pages can be switched with +/-)
[*] Midi port | Midi channel | Prog change | Volume | Panorama | Reverb | Chorus | CC1 | CC2 | CC3 | CC4
59 Utility+GP12 (Options)
[*] Opens options menu
[*] Measure # | Pattern # | SyncChange (on, off) | Paste/Clr steps |||| Remote (auto, client, server) | ID # | Port # | Request connection (no)
60 Utility+GP13 (Port Mute)
[*] Allows muting of output ports
[*] Def | USB1 | USB2 ...... AOUT | Bus1 | Bus2
61 Utility+GP14 (Disk)
[*] Opens disk menu
[*] MSD USB (disabled, enabled[Pres&Hold]) | Midi files (import, export, play)
62 Utility+GP15 (Mute)
[*] Quick mute of all tracks/channels
63 Utility+GP16 (UnMute)
[*] Quick unmute of all tracks/channels
=====================================================
- Opens mixer view for 16 tracks (12 pages can be switched with +/-)
- Toggles loop mode on/off
- (Press&Hold) + jog wheel allows dynamic changing of actual position
- Activates Fast mode for quicker value selection with encoders
- Toggles metronome on/off
- Forward (active only in song mode)
- Halts playback
- Stops playback and resets position to beginning
- Rewind (active only in song mode)
- Opens record menu
- (Press&Hold) to select/assign (?) trigger layer 1...8
- (Press&Hold) to select parameter layer A,B,C,D etc
- (Press&Hold) to select track from 1...16
- Paste copied steps
- Copy steps from 1 (?) to selected #
- Edit all selected steps according to Select function
- Quickly exit to top menu
- Move cursor position
- Solo current track
- Quickly mute/unmute tracks 1...16
- Select pattern/track group G1, G2, G3, G4 from SD memory location
- Select track within track group (T1, T2, T3, T4) - 16 tracks total
- Select pattern/track group (G1, G2, G3, G4)
-
.....
Planned additional feature for this page: pressing two GP buttons will create a loop between these buttons until they are depressed again. :)
Best Regards, Thorsten.
Wow that sounds very tempting :) something like a midi atomizer.
Perhaps with this the extended loop control from midi keyboard input could be implemented as well.
I thought that it could be something like that - you define a key range which only
changes loop range (steps) for example: with pressing any two keys within this defined
range on keyboard creates global loop between certain amount of steps: C1 and C1# loops
single step, C1 and D1 loops between two steps from current position and so on - perhaps
this could be usefull if this releases GP buttons for other tasks.
-
...I don't know a similar device in this price range with the appr. display size which supports multitouch
Best Regards, Thorsten.
BTW here is comparison chart of abailable/available soon touchpad devices
Best regards
Gunars
-
Hello Thorsten!
Thanks a lot for your answers.
Did you power-cycle your MIDIbox?
The MBSEQ_HW.V4 file will only be read during the boot phase.
A short status message will pop up after boot which displays the loaded files, is HW marked with 1 or 0?
I found the problem. It red HW file correctly, but pin order had to be reversed. Form this pdf schematic I learned that stand alone pin is 0, but in fact it is 7. but GP LEDs worked correctly because from this pdf schematic I learned that highest GP number goes to lowest pin. Ironically in reversed order my BPM led setting coincided with default setting - there was a confusion.
Btw.: mixing DIN and DOUT modules is dangerous. If you ever notice flickering LEDs, create a separate branch for DIN and DOUT modules. Keep the cables so short as possible.
If you don't notice this effect, there is no need to change the cabling.
I'm not sure :-/
All SD Cards I own will be mounted correctly under WinXP
Best Regards, Thorsten.
OK I'll keep in mind that. Currently LEDs do no flicker. In fact I planed separate lines for Dins and Douts, but due shortage of 0.5mm wires I changed my plans and soldered them in mixed way - so my wires are really as short as possible :). I hope to correct this if I get coloured 0.5 mm wires, which are hard to find here in Latvia (mailorder only seem to sell in rolls).
So my sequencer is up and running and now I have some questions about its functionality:
1) Parameter Layer C is nearly always active (led is lit) in edit mode but Trigger C is not - is this correct and, if not, could it be relater to mixed RC/SC din/dout soldering or something else in HW file.
2) How do you edit trigger layer settings? Although I can change trigger layers in upper line of display, the lower display line always show parameter layers so I can access only parameter layers for editing.
3) Roll parameter is in both Trigger layer and Parameter layer settings - is it the same thing just accessible in two ways?
4) left/right buttons work differently in different pages - for example, when selecting trigger layers C..D..E... both buttons work as intended left moves cursor left, right moves right, but in edit mode (when editing steps) I can only advance to next step with right button (left is inactive)
5) I can change midi channel routing for track in track settings, but in mixer page changing midi channel number didn't changed channel routing is that intended for incoming midi as in Menu/Midi/Routing page?
That's all so far. I had not time to dwell any deep in to this wonderful beast yet
(just made this little sunday night test jam :) - mbox is driving m3 synth ~20mb flashvideo)
and need to build a normal case for it first.
Thank you once again for developing this
fantastic midibox projects!
Best regards
Gunars
-
Hello there! It looks like a busy day today :)
Great news about ipad/midiboxing - Thorsten, you are forcing me to think that I need an ipad :) in which i'm not interested otherwise :) But I think it has no other connections than wireless (its usb is for its cam only I suppose), how you think you will connect it to midibox - through PC?
OK, down to topic
Today I finally launched my mbox sequencer. It looks like main board functions OK
- I uploaded os4.2
- sequencer restarted
- screens are also functioning and it said it found SD card
- buttons and encoders seem to work fine
but the problem is with leds - only GP leds function as I intended, others behave odly despite I edited MBSEQ_HW.V4 file on SD card and then uploaded sequencer os hex file once again.
for example:
- in standard V4 config file it says LED_BEAT 1 7
- in my V4 config file it is LED_BEAT 1 0
however sequencer still uses as it is written into standard file and beat led functions on SR 1 pin 7 not on SR 1 pin 0 as I stated in my config file, so it looks like it ignores my led settings (except GP which are fine) and used default ones.
Is this a software problem, or my settings file problem, or hardware problem?
My Din/Dout board is soldered as follows:
1. SI and SO are chained accordingly
2. RC and SC has two branches:
A is connected to In2 and In5,Out3 (and there are two 100pF caps in the branch between SC and VS, and RC and vs)
B is connected to In1,Out2 and Out1 and In3 and In4 and In7,Out4,In6 and In8,Out5 and Out6 and In9 and In10,Out7,In11 and Out8,In12 (and there are two 100pF caps in the branch between SC and VS, and RC and vs)
3. there is polarized 100uF cap between VS and VD,
4. pins for DOUT are soldered as follows:
SR1 0 - BPM (responds to forward)
SR1 1 - fast (responds to pause)
SR1 2 - loop (?)
SR1 3 - rew (responds to pattern)
SR1 4 - stop (responds to rewind)
SR1 5 - play (responds to loop)
SR1 6 - pause (responds to parameterA/C)
SR1 7 - fwd (responds ?)
SR2 0..7 - GP right (work fine)
SR3 0..7 - GP right dual colour (work fine)
SR4 0..7 - GP left (work fine)
SR5 0..7 - GP left dual colour (work fine)
SR6 0 - not used
SR6 1 - not used
SR6 2 - record (responds to stop)
SR6 3 - all (responds to song)
SR6 4 - song (responds ?)
SR6 5 - pattern (responds ?)
SR6 6 - mute (responds ?)
SR6 7 - solo (responds ?)
SR7 0 - edit (responds to parameterB/C
SR7 1 - step (also responds to parameterB/C)
SR7 2 - triggerA (responds ?)
SR7 3 - triggerB (responds ?)
SR7 4 - triggerC (responds ?)
SR7 5 - parameterA (responds ?)
SR7 6 - parameterB (responds ?)
SR7 7 - parameterC (responds ?)
SR8 0 - track4 (responds to gropup1)
SR8 1 - track3 (responds to gropup2)
SR8 2 - track2 (responds to gropup3)
SR8 3 - track1 (responds to gropup4)
SR8 4 - group4 (responds to track1)
SR8 5 - group3 (responds to track2)
SR8 6 - group2 (responds to track3)
SR8 7 - group1 (responds to track4)
My configuration file is attached (zippped)
And yet another issue
My laptop WinXP finds sequencer SD via USB and mounts it, but it says it can not open this SD card. When I remove it and open on PC with card reader windows opens it fine. Is this a windows problem or sequencer?
Best regards,
Gunars
-
Hi, Gunars !
In digital schematics bypass caps 100nF are placed between Vdd and ground (Vss) of each chip as close as possible always .
Adding some polarised capacitors are recomended too.
http://en.wikipedia....pling_capacitor
Using 100pF terminators for din and dout chains I understand as high frequency filters.
Regards,
Janis
Hi Janis,
and thanks a lot for replay!
Thats is clear now. Then I need to
squeeze them among wires:)
Gunars
-
Hello electronics gurus!
I am nearly done with soldering my midibox seq. Only still to solder are 20 capacitors between VS and VD on my version of integrated in/out PCB (I have 8 out shift registers and 12 in shift registers so 20 total). It my look a funny question for experienced, but should these 20 100nF capacitors be placed near shift register as documented here and here and also how it is implemented in SmashTV in/out kits and wilba PCB version or perhaps I can make a parallel array of them anywhere in the in/out chain between VD (+5V) and VS (ground) or, if I can make an array, perhaps I can replace them all with appropriate single capacitor. What should be appropriate value then for this single capacitor for 20 shift registers?
Also dout schematic shows additional polarized 100 uF (micro?) capacitor between VD and VS (It is not showed in Din schematic although both they share same VD and VS), so I guess I should add this one too in parallel with those 20 100nF or their single replacement? And also 100pF terminators are for din and dout - so four in total?
And yet another question. This schematic says that additional 1kOhm resistor is required between SC and VD, however this one doesn't mention this. Does it mean this resistor is required only in versions older than 4 and starting from version 4 it is not required anymore?
Best regards
Gunars
-
Thanks for replays Thorsten and Wilba!
Yes, looks quite many seqs have hatched this spring, but mine is still to nest - that's it...
Led for loop is already intended in my design, but about follow I must explore more. When I first replied I meant dual led for step view, but I now see that probably it is really not a priority. On the other hand color-changing beat led also sounds interesting, but as I understand the software must be changed to support this. Anyway I can always leave blank those two pins for some updated features.
Have guys a nice holydays with your machines or without :)
Gunars
-
Amazing! it is third update since January when I started collecting my seq pats (I hope I'll finish it this month).
Only I'd like to note that in downloads page I still see v18. I had to hack link changing it manually to download v19
Best regards and one beer from me
Gunars
-
Dear guys
i just finished the assembly of this so perfect wilba control surface (very pleasant to tweak, more than the majority of my others machines) and noticed that the step view led has a 4 leads footprint ; why ?
i plan to put the core32, the CV/Gate jacks, the midi sockets, the ethernet on a 2 U rack and use a DB25 cable to connect this "tower" to the LCD + J8/9 , control surface sitting on my desk, so that all the cables stay in the backyard of the studio. What's your opinion ?
Best regards :)
From what I have red step led can have two colour option, I just don't know how to configure this two-colour option in configuration file. I think it mentions only two colour option for 16 GP leds. I built my own simplified (single sided) in/out pcb since I missed wilba pcb bulk order and I have two free pins on third out SR, so I also would like to use this step led dual colour option if possible. Can anyone comment how to configure this in MBSEQ_HW.V4?
Also while I'm waiting for 1/8w 220 ohm resistors (I suppose I can use them since led current is around 13 mA and I don't have room in my pcb version for resistor arrays from Smash TV kit) to complete parts collection I have a question - for what purpose are the diodes in wilba pcb? Smash TV in/out kits don't have diodes and they aren't also found in sequencer in/out pdf layouts.
Best regards,
Gunars.
MBBLM on iPad via Lemur
in MIDIbox BLM
Posted
Wowww, Ableton style functionality on MBSEQ -
this looks very, very, very interesting!
To sum up:
To drive MBSEQ from Lemur app
there are several options:
1) iPad(with Lemur) => wifi => PC(with Lemur Daemon) => USB cable => MBSEQ
2) iPad(with Lemur) => wifi => wireless router => Ethernet cable => MBSEQ
3) iPad(with Lemur) => Camera Connection kit => USB Midi interface (M-audio Uno, others???) => MBSEQ (obviously both midi in and out cables should be used for bidirectional communication???)
4) Can iPad(with Lemur) be directly connected to MBSEQ USB with Camera Connection kit for USB-midi or OSC communication???
This last (4) option would be optimal solution for me if it worked.
Can it work theoretically? Has anyone tested this?
PS.
I recently thought about possible merger of
iPad Genome sequencer app and Midibox functionality.
Genome has nice concept and clear layout. Midibox
has nice real-time sequencing/arpeggio functionality.
I even wrote a concept what features I'd like
to be implemented and how, and sent that to
Genome developer, but the replied that despite
he would love to see most of my suggestions that
would require a total rewrite of Genome app -
so I throw that concept into trash as I do not
anything about programming for iPads and also
do not own Mac what is required to program for iPad.
Now it is nice to see that something similar can
be emulated connecting midibox and lemur together.