

jjonas
-
Posts
422 -
Joined
-
Last visited
-
Days Won
24
Content Type
Profiles
Forums
Blogs
Gallery
Everything posted by jjonas
-
From the album: Tetra CS
-
From the album: Tetra CS
-
Hi, thanks for the answer, now I got it working! I also found this useful conversion tool, I'll put the link here should anyone else ever need one.
-
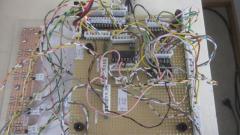
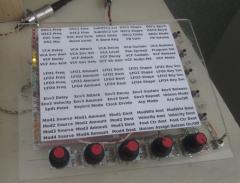
Hi, I'm programming an Arduino-based five-encoder, five-button matrix controller, inspired by Waldorf Blofeld's control surface and to be used with a DSI Tetra (the control surface of which is kind of awkward), to control 95 parameters. Tetra has two layers per patch (A and B), and the parameters of both layers have their own NRPNs. So far I've succeeded in sending the right NRPNs for layer A parameters (which go up to number 119), but I haven't managed to send ones to edit layer B parameters (beginning from number 200). I might not understand MIDI well enough on this level just yet, so I thought I'll ask here first. Here's what I'm sending for layer A at the moment (and what works): MIDI.sendControlChange(99, NRPN_MSB, TETRA_CH); // CC, value, channel MIDI.sendControlChange(98, NRPN_LSB, TETRA_CH); // CC, value, channel MIDI.sendControlChange(CC, 1, TETRA_CH); // "CC" is either 97 or 96, to send one point decrement or increment So it's CCs 99 and 98 to choose the NRPN, and then sending either an increment or decrement command depending which way the encoder was turned. So far MSB has always been 0, and LSB has been what the Tetra manual has given as the number for each layer A parameter, and this has worked. For example, if in the above NRPN_MSB = 0 and NRPN_LSB = 33, the resulting NRPN controls VCA Envelope Attack for layer A. For layer B, the parameter number for VCA Env Attack given in the Tetra manual is 233, but I haven't managed to send anything that would control a single parameter for layer B. So what I want to ask is: if I wanted to control parameter 233, what are the correct MSB and LSB (in decimals)? I intend this as a general MIDI (no pun intended) related question, but in case someone wants to look at Tetra's parameter list, here's the link to the manual (beginning from p. 52).
-
I had the same problem a few years ago, check out this thread:
-
This thread should be pinned, along with the newer one! Either here on in the Tips & Tricks forum.
-
Following up on Peter's post: I've built three of these, 5x MIDI thru boards. It might be the IIC modules offer stuff which people need that is not available with these, but they're simple enough to build on a proto board. They do require a PSU (or a battery), but one could probably equip the back of the SEQ4 enclosure with a few extra DC out sockets which just route out what's going into the enclosure (given that you're feeding DC into it). This way all you need is a cable to connect to the thru board (which has its own 5V regulator).
-
MB6582 demo tune sequenced with MBSEQv4. Includes also Waldorf Blofeld (from on). Bassline is played by four slightly detuned sids (2x8580 + 2x6581), each filtered through a dedicated SSM2044 based VCF (aka Seppoman filter). http://youtu.be/U-Ed4CsJem0
-
Re case, check out It's been a while since I ordered, but I bought both the MB6582 front & rear panel and pactec plastic case from Julian.
-
The tutorials are for MBSID version 1, so wavetables behave somewhat differently in v2. E.g. there's no Play and Goto commands. Also, I cannot help you with creating a Sync lead, but I hope can give you a better understanding on how the wavetables work in general. This might have some mistakes in it, hopefully someone more qualified will correct me if that is the case, but anyway based on this understanding I have been able to make something useful with wavetables :-) In the tutorial you have quoted in your mail, the column STEP equals the column POS (position) in the actual wavetable on the synth (MBSID v2). The four next columns in the wavetable ($00–$60) are entries for the position that's visible on the synth screen (=first column). The second column (above beginning with $00), starts from $00 and goes down to $1F. This is wavetable 1. Next column (above, starting with $20) is wavetable 2, and it starts from $20 and goes down to $2F – and so on. (I'm not sure if you can extent wavetable one beyond 1F at the expense of the other wavetables, I haven't tried, but you would seem to be able to set wavetable length in the WTC screen.) Let's suppose you want to use only wavetable 1. You want to enter stuff into two columns, the POS column and the second column that begins with $00. Let's make a simple arpeggio style sound. In the wavetable configuration you first choose the parameter (PAR) that you want (they're in the parameter chart); in this example we'll select wavetable one (WT column), use parameter 32, which selects oscillator 1 waveform. Let's also set the wavetable length and looping: dial 00 in BEG column and 01 in END column. On LOP column you select the POS where the wavetable will jump when it reaches its end (if LOP is set to ---, the wavetable will play only once). Let's set LOP to 00. Now we go to the wavetable editor, and for POS 00 we enter some value to select the waveform which will be selected the moment you press a key on your midi controller. Let's select 04 (NB: 01 is different than +01), and for POS 01 let's select value 02. What we have now is a wavetable which is two steps long, and when it reaches the end, it will loop from the beginning. What it does is it will switch between two waveforms. This didn't quite answer your question, at least not all of it, but I hope it helps at least somewhat. (And I hope I didn't make too many mistakes :-)
-
Two beers sent!
-
I don't remember where I ordered my components anymore, but according to the test you suggested, all GP buttons work without problems, i.e. only one entry for each press and each depress (I tried each GP button several times). I think I'll manage with the SELECT option. (But if something else comes to your mind, I can do further tests etc.) Thanks!
-
Yes. (Press+hold GP, enter notes on keyboard, release GP.) This works much better. But using the GP method still seems to behave erratically. I have attached another session with four tracks on G1 (ch. 1-4), all with the chord sequence C-Am-C-Am. T1 is recorded using the SELECT button and data wheel, and T2-T4 using GP press+hold. T1 turned out well, T2 and T3 didn't, but T4 again did. I'm sure I have performed the key presses (GP + keyboard) carefully. I tested this for a longer time than just what it takes to record these four tracks, and SELECT button produced consistent results, whereas the GP press sometimes did but often didn't. It would be great if someone else could try recording some chords too, if only to prove that what's at fault is me :o) EXAMPLE3.zip
-
Hi, and thanks for looking into this! The chord change seems to work now, but recording the steps has some extra problems that I don't think were there before. Even though there was some glitch sometimes in the recording of a chord also previously, now there seems to be more problems, or the problem has changed somewhat. The problem is that when I press a GP button to record something into that step, it often happens that the chord won't be recorded correctly. Sometimes only one note is recorded, even though I'm 100% sure I have carefully pressed three keys. I'm not sure, but somehow the problem seems to be connected to the fact that when I press (and hold) a GP button and get the {curly brackets} around the step to be recorded, often the pressing+holding the GP button also gives you some note (e.g. C-3), which doesn't always get erased when you push the keyboard keys. So for example if you try to record C-2, E-2 and G-2 (=C major), you might get these, but also the note that you got when you first pressed+held a GP button to record something, before pressing anything on the keyboard for that step (the note seems to be the same as the one the right hand side LCD's upper row). Or you might get only one note. Sometimes when you press+hold a GP button to record, you don't get a note (this is when the right LCD's upper row has "...." instead of a note), but only the curly brackets; in these instances the chord recording seems to work. In case it's useful, I have attached another session, where I have recorded four chords (C-Dm-F-G) on all tracks in G1 (ch. 1-4). In all cases I've followed the same procedure: I've pressed+held a GP button and then pressed three keys on the keyboard. The outcome is not what one expects: sometimes notes are missing, sometimes there is an extra note. EXAMPLE2.zip
-
Hi, sessions files attached. There's two tracks (both on channel 1), one with chords (G1T1) and one with a slow melody (G1T2), best perhaps with some organ type sound. As for the problematic Dm–F chord change, the notes are there in the layers for F major, and if you press Parameter Layer button C while the session is playing, you can see activity in the 2nd and 3rd note layers when the sequencer advances to the step with F major – but only the note C comes out of the synth. (I've tried this on two different synths with the same results.) EXAMPLE1.zip
-
Hi, I tried some chord recording today, with the New Improved Recording Procedure :-) on a note track with enough note layers, as opposed to using a chord track and a transposer track. What I noticed is that if you have e.g. a Dm and an F (played in this order), the sequencer will first play the notes of the D minor (D-F-A), but when it should play the notes of the F major (F-A-C), it will play only C. I suspect this has to do with F and A being shared notes in these chords. My overall chord progression was C-Dm-F-G, and all other chord changes worked fine, only the Dm -> F didn't work properly. Also tests with other chords, e.g. C-E-G -> C-E-A give the same results, in this case the latter chord will play only A. EDIT: I'm using the latest firmware (v4.086) EDIT2: Plus all the notes of all the chords are in the note layers, so recording works ok, but they're just not playing correctly.
-
I don't remember having used the Sync/Ring button, and anyway the setting can be done just as well in the menus. The SID select buttons are much more useful (if you're running several cores), but that can be done in the menus, too. If you're planning several cores, it might be useful to keep the SID select button(s). I've built a two-core MBSID inside a MIDI keyboard controller (it started out as one-core), and after a while I added buttons for selecting core1 and core2, because I found it annoying to switch the cores via the menus. But it's a matter of taste, and of what you're planning. Based on your first post in this thread you seem to be planning only one core, in which case SID select is redundant. Another option could be leaving out the filter resonance pot, because the SID filter resonance is pretty lame, especially with a 6581. Resonance can be set in the menus as well.
-
Hi, if I recall correctly, you can use a Multi Engine patch and assign each of the six oscillators to a separate midi channel via the Ensemble menu. See here under the subsection 'INStrument menu': http://ucapps.de/midibox_sid_manual_e.html
-
Nice :-) Depending on how easy or difficult it is to implement (and perhaps other considerations I don't notice), offhand I'd suggest that either: 1) Live recording in Mono mode records on the Note layer that was last selected (or is active); Poly mode starts always from layer A and continues to the Note Layers "below" it (i.e. to Note layers E, F, G etc.) 2) Recording in Mono mode as above, and in Poly mode recording starts from the Layer that was last selected (or is active), e.g. Note Layer E, and continues to those "below" it. In case Note Layers below the active layer (say, Note Layer F) run out because of too many simultaneous notes, I don't know if in that case it's better to "go around" and record on the Note Layers "above" the active layer, or just leave the "extra" notes unrecorded. I'm talking only of Note layers, because this far I haven't experimented with other kinds of layers, and can't really say what's good from that perspective. Maybe more experienced users have other ideas.
-
Hi, using live recording, I recorded bass and snare drum on a Note track layer A, and then chose layer E (i.e. the next available note layer) to record open & closed hihat. However, the hihat notes were recorded on layer A as well. Is it possible to choose some other layer than A for live recording? It didn't make any difference whether recording mode was set to Poly or Mono on the REC page.
-

MIDIdocs: What the Hell is a Mixer Map? (discussion thread)
jjonas replied to borfo's topic in MIDIbox Documentation Project
I tried different stuff re dumping mixer maps with CCs, but I didn't succeed (didn't try any bus things though); however I guess dumping mixer maps with Song mode commands (Actions) is flexible enough for my purposes (probably simpler as well than with CCs). -
MIDIdocs: What the Hell is a Mixer Map? (discussion thread)
jjonas replied to borfo's topic in MIDIbox Documentation Project
Again, very useful! I feel like a new world has opened in front of my eyes :-) A few comments: "In firmware v.87, each Mixer Map Column has 12 control pages"... Isn't the current firmware 086..? You can set an external control CC that triggers Mixer Mode dumps. Configure this from the MIDI Page's (MENU+GP#15) External Control subpage. It would be good if this was elaborated with an example. But if I've understood this function correctly (just by reading your wiki entry and a little bit of TK's Menu Pages manual), it works like this: Let's say I have arranged Mixer Map #1 for a few Program Changes, and I want to dump the Map at a certain point in my song to effect those PCs. I would go to the MIDI setup page's Ext. Ctrl page (MENU+GP15 -> GP7), and let's say I have initialised a track on MIDI Channel 13 as a CC track. In the Ext. Ctrl page I would set Chn. to #13, designate the function as "Mixer Map", and choose a CC# number which will send the Mixer Map dump command (let's say I set it at 111) . When I now use my mentioned CC track to send a CC#111, it will dump Mixer Map #1 and effect the Program Changes I planned. Was this correct? I would suggest one addition (in bold): In firmware v.87, each Mixer Map Column has 12 control pages (more may be added in the future). You can scroll through the pages by using the data wheel. Currently, the 12 controls are: -
MIDIdocs: Trigger and Parameter Layers (discussion thread)
jjonas replied to borfo's topic in MIDIbox Documentation Project
Very useful! I have a few clarifiying questions: Skip: Steps with skip set to “on†will be skipped. The sequencer will jump immediately from the previous step to the next step with a skip Trigger Layer set to “offâ€. Does this mean that if the track length is 16 steps, with one step skipped the actual length is 15 steps? I.e. skipping doesn't mean only that a step is not played, it's jumped over altogether? So skipping a step affects the rhythm as well? Random Value (R.V.): The step's note value (pitch) will be randomized within +/- 1 octave. Does force-to-scale affect this setting? CC: Sends a MIDI CC message with the selected value each time the step is played. Each CC Parameter Layer allows you to send values to only one CC number - select the CC number for the layer in the Event Menu Page. You can have multiple CC Parameter Layers in a single track, each one sending values on a different CC Number. Maybe a few short examples of what you can do with sending CCs in this manner..? --- On the editing of the trigger layer values, you have the following formulation: In the SEQ's Edit View you can use the general purpose (GP) buttons to toggle the selected trigger layer on or off for each step, and the current value for each step is indicated by the LEDs above the GP buttons. I would like to suggest a bit more detailed description: If you're using Wilba's front panel, you can select the trigger layer by pressing one of the three buttons (labelled A, B and C) in the lower left corner of the panel. Button A selects Gate and button B selects Accent; by holding button C you can select any of the trigger layers with GP buttons. The selected trigger layer will be visible in the upper right corner of the left display (e.g. TA:Gate, TB:Acc., TC:Roll etc.). In the SEQ's Edit View you can use the general purpose (GP) buttons to toggle the selected trigger layer on or off for each step, and the current value for each step is indicated by the LEDs above the GP buttons. The Parameter Layers can be selected in the same manner, and the active layer is visible in the left display's upper row; in Wilba's front panel the Parameter Layer buttons are located immediately to the right of the Trigger Layer buttons. -
I second this!
-
Step recording on the EDIT page is much handier than step recording on the RECORD page! I didn't like that step recording via the RECORD page stayed only a while on the EDIT page before flashing back to the RECORD page. For a non-keyboard player like me (one that has stickers on the keyboard keys to tell me which is which) it can take a while to find the right key, and by that time the screen has usually flashed back to the RECORD page, which disturbs the workflow. So definetely an improvement. BTW also the SMS-like pattern naming and changing the MENU pages works well! I cannot comment on other changes, because new features keep cropping up faster than I can learn old ones... so the following might already have a solution, which I didn't find with searching "clear" in the menu pages section of the manual, but I noticed that even when you have several tracks of one group selected, pressing CLEAR will clear only the active track (the one that's on the screen). To me it would have made sense that it had cleared all selected tracks. But maybe there's a reason for this, or there's something I've missed..?
