Leaderboard

Popular Content
Showing content with the highest reputation on 03/18/2016 in Posts
-
This is the final section of the draft beginner's user manual: the appendices 1–4 on various topics. No issues came up, so I have no questions. Easy last lesson :-) However, with 4.091 coming out sometime soon, there's already a few details in the appendices that are not up to date for 4.091. I'll publish the text as it is, nevertheless, and update it later for the so-called "final" version. Looking back at the whole manual draft, there was nothing or very little on a number of functions. They can be divided into two groups: 1. Ones I could possibly write about at some point, and add it to the manual later. FX page (only scale mentioned this far) options (only partially covered) TRANSPOSE page (would be easy) MIDI section control metronome BPM (very little mentioned) GROOVE DIRECTION MANUAL MORPH 2. Ones that I'm unlikely to write anything about, now or later, because I don't have the hardware, or otherwise never use USB, DAW, etc. MIDI Ext. ctrl CV configuration ethernet (osc) USB and IIC ports ---------------------------8<-------------------------------------------------- Appendix 1. Customising some button functions --------------------------------------------- Function buttons F1–F4 ---------------------- In the root of the SD card there is a file named MBSEQ_HW.V4. This is the hardware setup file. Most of the settings there don't need changing, and are anyway beyond the scope of this manual. However, on the Wilba frontpanel there are four buttons labelled F1, F2, F3 and F4, which can be customised relatively easily (and are meant to be so). The default functions for the buttons are: F1: Quick access to the Bookmark page F2: Quick access to the Jam page F3: Quick access to Tap tempo F4: Save the complete session In the HW setup file they appear like this: # F1 is located at SR M3 Pin 3 # F2 is located at SR M2 Pin 2 # F3 is located at SR M2 Pin 3 # F4 is located at SR M1 Pin 2 # SR Pin <-- this line begins with a #, so it's "commented out" (not part of the settings) BUTTON_BOOKMARK M3 3 <-- this line defines button F1 as the bookmark page button BUTTON_RECORD M2 2 <-- this line defines button F2 as the Jam page button BUTTON_TAP_TEMPO M2 3 <-- etc. BUTTON_SAVE_ALL M1 2 If you want to change the default functions, all you need to do is keep the "BUTTON_" in the start of the line, add your preferred function after it, and leave the SR and Pin columns unchanged. The possible button functions are listed in HW setup file, and are of the form: # SR Pin BUTTON_STOP M3 5 BUTTON_PAUSE M2 4 BUTTON_PLAY M2 5 BUTTON_MUTE_ALL_TRACKS 0 0 BUTTON_MUTE_TRACK_LAYERS 0 0 BUTTON_MUTE_ALL_TRACKS_AND_LAYERS 0 0 BUTTON_UNMUTE_ALL_TRACKS 0 0 BUTTON_UNMUTE_TRACK_LAYERS 0 0 BUTTON_UNMUTE_ALL_TRACKS_AND_LAYERS 0 0 Lines that have a non-zero entry for the SR and Pin columns are already assigned somewhere (like stop, pause and play above), so there is no need to assign them to another button. However, entries with zeros in the SR and Pin columns (like "mute all tracks" and "unmute all tracks" above) are potential candidates for F1–F4 button functions. For example, if you want to to have a dedicated button for "mute all tracks", you should change one of the F1–F4 button entries to contain "BUTTON_MUTE_ALL_TRACKS". You could replace "BUTTON_BOOKMARK", for example, as bookmarks are easily available with MENU + SELECT as well. It is important to note that if you enable e.g. "mute all tracks" for one of the F1–F4 buttons, *you must "comment out"* the line where "mute all tracks" is set to SR 0 Pin 0. If the "zero address" setting is not "commented out" in the file, it will have the effect of disabling the setting. "Commenting out" is done by placing a # in front of the line, so that BUTTON_MUTE_ALL_TRACKS 0 0 becomes #BUTTON_MUTE_ALL_TRACKS 0 0 Button behaviour (momentary/toggle) ------------------------------------ In the HW setup file it is possible to change the behaviour of a number of buttons, so that they do their function while the button is pressed & held, or the button function is toggled 'on' and 'off' with a single press. For example, momentary pressing & holding the MENU button shows the MENU page only as long as the button is pressed & held, and you have to press another button while pressing & holding the MENU button in order to choose a menu page. If you've set the MENU button to toggle, you can just press MENU once and then press another button to choose a menu (or press MENU again to return to the current page). This allows you to make menu page selections with one hand. This is the relevant section of the HW setup file for configuring button behaviour: ################################################## # Button behaviour # 0: active mode as long as button pressed # 1: pressing button toggles the mode ################################################## BUTTON_BEH_FAST 1 BUTTON_BEH_FAST2 0 BUTTON_BEH_ALL 1 BUTTON_BEH_SOLO 1 BUTTON_BEH_METRONOME 1 BUTTON_BEH_LOOP 1 BUTTON_BEH_FOLLOW 1 BUTTON_BEH_SCRUB 0 BUTTON_BEH_MENU 1 BUTTON_BEH_BOOKMARK 1 BUTTON_BEH_STEP_VIEW 0 BUTTON_BEH_TRG_LAYER 1 BUTTON_BEH_PAR_LAYER 1 BUTTON_BEH_TRACK_SEL 0 BUTTON_BEH_TEMPO_PRESET 0 Appendix 2. Bookmarks --------------------- The Bookmarks menu is available in the main menu (press EXIT once or a few times, depending on where you are), or by pressing MENU + SELECT. Bookmarks allow you to store frequently used pages and settings to be recalled at the push of a button. There are two kinds of bookmarks: global and local (session dependent) bookmarks, eight each. In the Bookmarks menu the global bookmarks are available in the left LCD, and the local ones in the right LCD. Global bookmarks are available in all sessions, while local bookmarks are particular to each session. However, it is possible to copy local bookmarks across sessions in the Sessions Import/Export menu (UTILITY -> Disk -> Sessions Import). Choose the source session in the right LCD and turn GPK9 to select 'Bookmarks' as the imported type. Pressing 'IMPORT' will replace the current session's local bookmarks with the imported ones. A bookmark can be recalled by going to the Bookmark page and pressing a button to select the bookmark you want. A bookmark can be stored by going to the Bookmarks page and pressing & holding a GP button for 3 seconds. The page that was selected before entering the Bookmarks page is stored, along with a number of settings. (See the example below.) Bookmark names can be changed only by editing the global or local bookmark files, both called MBSEQ_BM.V4. The maximum length for a name is five characters. If you absolutely must have more than five characters for the name, you could save the same bookmark on two adjacent slots and edit their names in the bookmark file so that the one on the left in the pair has five characters and the one the the right has up to four characters. The global bookmarks file is at the root of the SD card, and the local ones are in the same folder as the session which the bookmarks belong to. Besides the bookmark name, it is possible to edit also the other bookmark parameters by hand in the bookmark files. The example below also lists the settings which are stored in a bookmark. #################### Slot 1 <- slot name, do not edit! Slots 1-8 = global bookmarks, 9-16 local bookmarks Name Def. <- replace "Def." for custom bookmark name (max. five characters) #################### +Page EDIT <- name of selected page +Group 1 <- selected group number, 1–4 +Tracks 1000000000000000 <- selected tracks, 1 = track selected, 0 = track not selected +Mutes 0000000000000000 <- selected mutes, 1 = track muted, 0 = track not muted +ParLayer A <- selected parameter layer, A-P +TrgLayer A <- selected trigger layer, A-G +Instrument 1 <- selected instrument (useful only for drum tracks)*** +StepView 1 <- Step View mode on or off +Step 1 <- selected step (cursor position) +EditView 0 <- Edit view mode, 0 = step view, 1 = layer view, 2 = trigger view, 3 = 303 view +Solo 0 <- solo button mode on or off +All 0 <- ALL button mode on or off +Fast 0 <- FAST button mode on or off +Metronome 0 <- metronome on or off +LoopMode 0 <- loop mode on of off +FollowMode 0 <- follow mode on or off The plus or minus sign in the beginning of each line can be used to prevent the setting from being overwritten by a bookmark, when you store it on the bookmark page. Plus allows overwriting, minus prevents it. For example, the line -Tracks 1111000000000000 would mean that if you save a bookmark in the same location, the track selection won't be stored, but it will always be what's written in the bookmark file – in this case, this bookmark will always select tracks 1–4, no matter what the track selection status happens to be at the moment you save the bookmark in this slot. Appendix 3. The MIDI Router --------------------------- You can access the MIDI Router page from the main menu, or with MENU + MIDI -> MIDI Router (GPB5–6). The MIDI Router allows you to route incoming MIDI messages from any of the input ports to any of the output ports. *It is independent from the other MIDI settings of the sequencer*, and in some instances you have to pay attention so as not to have parallel in/out settings – this can lead to e.g. notes getting forwarded twice. The router has a maximum 16 nodes, each of which governs the routing from *one input port to one output port*, with further optional channel limitations. All the nodes are in effect simultaneously. On the input side, GPK9 selects the node to be edited, GPK10 selects the physical input port on which the messages are coming in, and GPK11 selects the MIDI channel that is allowed through. The channel setting (GPK11) can be: a) 1 to 16, for allowing messages on single MIDI channel; b) 'All' for allowing messages on all channels; or c) '---', which effectively disables the node, as no MIDI channel is allowed through. On the output side, GPK12 selects the output port where the node's input port's MIDI messages are routed to. GPK13 selects the MIDI channel which the outgoing message is sent on. The outgoing channel doesn't have to be the same as the original incoming channel, so you can e.g. transform incoming channel 1 to outgoing channel 13. Channel options are: a) 1 to 16 for a single MIDI channel. All incoming MIDI messages, regardless of their original channel, are sent out on this channel; b) 'All' for sending the message on its original channel; or c) two special options: Track and Selected Track (Sel.Trk). If the output port/channel option is 'Track', the router will direct the incoming messages to the track whose *ordinal number* matches the incoming MIDI channel (provided that the input port/channel options allow the message through). For example, if you have a MIDI controller that's sending MIDI data on channel 7, 'Track' option will send the message out on the port and MIDI channel set on track 7's (G2T3) EVENT page. MIDI channel 10 will get sent out on track 10 (G3T2), etc. If the output channel option is 'Sel.Trk' (Selected Track), the router will direct the incoming messages to the sequencer track that is *currently active* (provided that the input port/channel options allow the message through). If you have several tracks selected, the MIDI message will go out on the channel with the lowest ordinal number (track 1 before track 2, track 5 before track 6 etc.) The final option on the MIDI Router page is DefaultPort. The tracks' EVENT page and a few other pages allow you to select 'Def.' as one of the Port options. If you select 'Def.' as the Port, it will refer to the Default Port setting on the MIDI Router page. Note that the router settings might overlap with the Jam page note live forwarding option ('Fwd'). If you have Fwd 'on', it will forward incoming MIDI messages on the 'Jam' bus (see section 4.1.1.) to the active track's output port, set on the track's EVENT page. This is done regardless of any MIDI Router settings. However, if Fwd is 'on', and at the same time you have a MIDI Router node routing MIDI messages to the same port and channel as Fwd is forwarding them, MIDI messages like notes will get triggered twice, almost simultaneously. This most likely alters how the note will sound, and perhaps causes hanging notes. If you are using the MIDI Router to forward MIDI messages from one or several MIDI controllers to output ports, you might want to make sure that Fwd on the Jam page is 'off'. On the other hand, note that the Live Patterns function depends on Fwd being on. (See section 4.1.5.) Example: If you have two MIDI keyboards, one in IN1 (a plain MIDI controller) and the other in IN2 (a keyboard synthesizer that's sending on, and listening to, channel 1), you could set them up so that one of them always plays the channel it is set to send on, and the other always plays the currently selected (active) sequencer track. Let's say you want to set your keyboard synth to play the active track (selectable on the group and track selection buttons on the sequencer), and the plain MIDI controller to play the channel you've selected on the controller. For this to work optimally, you need to turn the Jam page Fwd option 'off' to avoid forwarding messages twice. Also, you want to set your keyboard synthesizer's 'local' function off, so that the synth is triggered only via MIDI. On the MIDI Router page, set Node 1 like this for the plain MIDI controller: IN Chn./P OUT Chn./P Node 1 IN1 All OUT1 All This lets through all messages coming in at IN1 on all channels, and directs them to OUT1 on the same channel it came in on. In other words, if the incoming message at IN1 is on channel 11, it is forwarded to OUT1 on channel 11. This setup is very useful if you have a multitimbral synthesizer that can be played on several MIDI channels, or you have several synths connected to OUT1, either with MIDI Thru boxes or by daisy-chaining equipment with their MIDI Thru (soft or hard) ports. However, if you're using only one synth in each output port, you can make a dedicated node for each output port: IN Chn./P OUT Chn./P Node 2 IN1 All OUT1 All Node 3 IN1 All OUT2 All Node 4 IN1 All OUT3 All Node 5 IN1 All OUT4 All With these settings, everything coming in on IN1 will be routed simultaneously to output ports OUT1–4. This way you can control the synths at each output port with a single MIDI controller at IN1, just by changing the sending channel on the MIDI controller. Node 2, for the keyboard synthesizer, is set up like this: IN Chn./P OUT Chn./P Node 2 IN2 #1 Sel.Trk Node 2 contains the settings for the keyboard synthesizer, which is connected to IN1, and set to send on, and listen to, exclusively channel 1. This way you can use the keyboard synth to play itself via the sequencer (remember to turn the synth's 'local' setting 'off'), but also any other synth that you have connected to the sequencer, just by using the group and track selection buttons to select the right track on the sequencer. Appendix 4. MBSEQv4 CC implementation ------------------------------------- The following is a simplified list of what a track's configuration consists of. The full information can be found below. – FX settings – MODE settings – TRANSPOSE settings – DIRECTION settings – DIVIDER settings – Loop points – LENGTH – GROOVE styles – MORPH settings [list of MBSEQv4 CC implementation follows]1 point
-
The LiveSend on/off option in the menu that's available on the MIXER page, by pressing SELECT, works only with the MIXER page settings. It doesn't work on the EDIT page (if that is what you mean). LiveSend 'on' means that the changes you make to the different parameters on the MIXER page get sent immediately to the Port and Channel that are set for that slot on mixer map pages 1 and 2 (there are 16 slots per page). If LiveSend is 'off', changing e.g. the program change or volume page value has no immediate effect (you have to 'Dump' the mixer map with the SELECT menu if you want them to have effect), but if LiveSend is 'on', the changes to the values on the MIXER page will be sent immediately.1 point
-
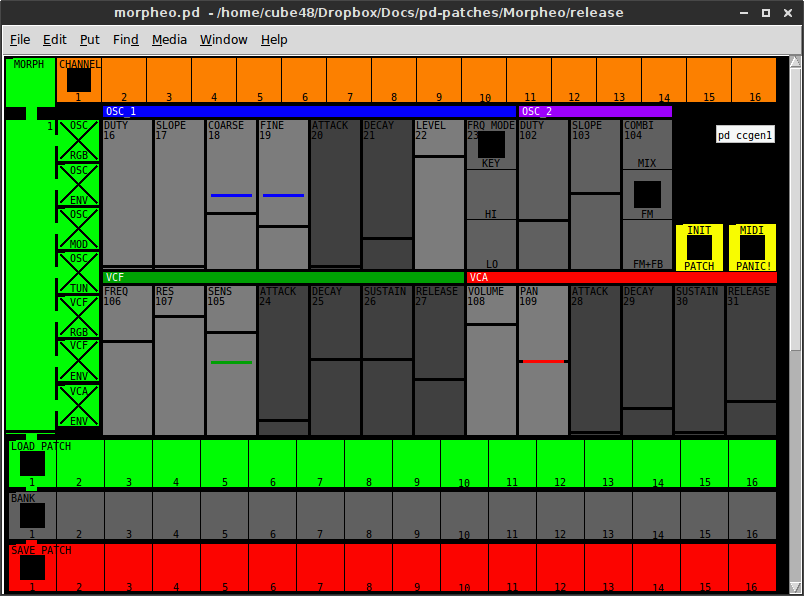
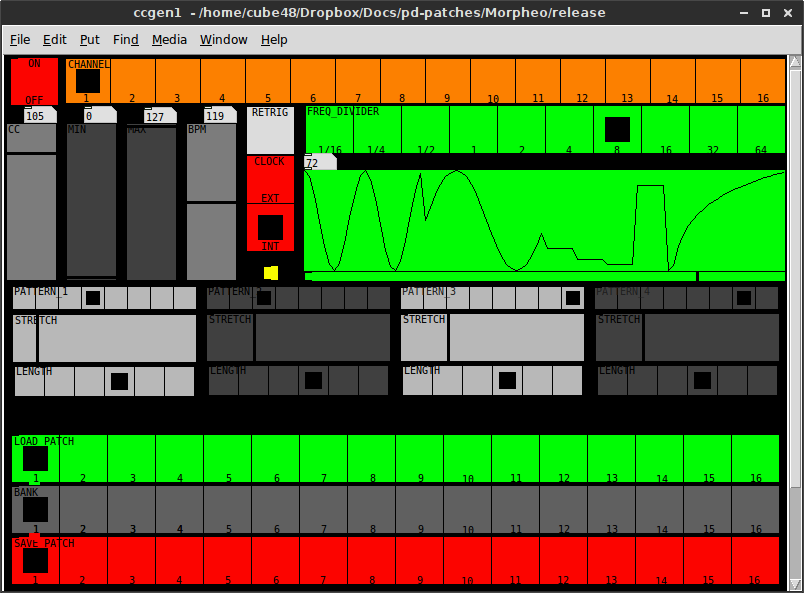
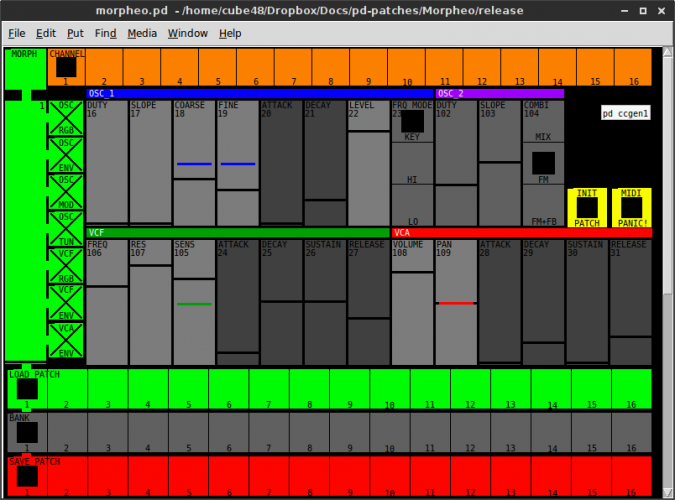
The polyphony is allocated dynamically. So you can play 16 different monophonic sounds or 16 voices in one sound/channel or anything in between. I didn't encounter it yet but there will be some voice stealing going on when you reach the limit. I intend to publish my Pure Data control surface soon. I'm debugging the extra CC generator and have to update the documentation but it's very close. It's called Morpheo and will give you: ability to edit all Goom synth params from the control surface ... well ... except Sustain which you can feed into it from your controller with Sustain switch switch between MIDI channels and edit the channel patches separately - switching the channels will store the current edits into 'channel patch' and is saved within PD file store up to 256 different sounds/patches (16 banks x 16 patches) with quick access to load and store functions morph (or interpolate if you want) dynamically between current patch and one chosen from the library with Morph fader (mapped to CC1 - ModWheel); you can exclude some parameter groups from the morphing so you avoid drastic changes in the sound (i.e. switching the OSC interaction mode) if you wish so apply 4-segment flexible envelope/lfo to one parameter on one channel only from the separate MIDI CC Generator (modified version of cc gen PD patch I found on the net) - cc gen will have it's own patch library of shapes/envelopes will come with 64 patches I made during the development will come with documentation but it should be easy to grasp Screenshots are attached. I hope to release it very soon. I never used Git but want to publish it on GitHub so anyone can improve or modify it.
 1 point