

yogi
-
Posts
218 -
Joined
-
Last visited
-
Days Won
5
Content Type
Profiles
Forums
Blogs
Gallery
Posts posted by yogi
-
-
Hi Antichambre, looking over the schema and had a parts question. The serial EEPROMS are 256x8 devices, is there any advantage to using a larger device such as the ' MB standard' 32Kx8 or 64Kx8 mems.
Yogi
-
Just now, Psykhaze said:
Great compilation work,enjoy your beer :)
Bests,
JeromeThanks. Actually, I was a little wrong above- the window IS resizable. I was trying to 'pull' the frame (bad MSWin habit). But there is a resize handle in the lower right corner. Works but a bit laggy but does work.
Yogi
-
So just got MIOS Studio to build on RPi2 B+ with latest Raspbian Jessie
Found Borfo's thread;
and this on the JUCE forum:
https://forum.juce.com/t/juce-on-the-raspberry-pi-opengl/9921
Following these for the most part, I installed:
	sudo apt-get -y install libfreetype6-dev
	sudo apt-get -y install libx11-dev
	sudo apt-get -y install libxinerama-dev
	sudo apt-get -y install libxcursor-dev
	sudo apt-get -y install mesa-common-dev
	sudo apt-get -y install libasound2-dev
	sudo apt-get -y install freeglut3-dev
	sudo apt-get -y install libxcomposite-dev
	sudo apt-get -y install libjack-jackd2-dev
The libjack-dev that was originally listed will not install under Jessie, so found libjack-jackd2-dev which includes the first.
Then installed Gcc 4.7
sudo apt-get install gcc-4.7 g++-4.7I ended up with both the /juce folder (from the SVN Repo) and the /mios_studio source folder in the /home/pi/tools folder. I had tried with /mios_studio and /tools in /home/pi and with /tools in the /home/pi/mios_studio folder; it might work fine with the /juce and the /mios_studio folders in /home/pi but I got this working so...
At this point 'plan A' was to download JUCE and use Projucer to edit the mios_studio project but could not run it on both an XP and Win8 machine. So 'plan B' it is.
Using the notes from the JUCE fourm above,
Edited the Makefile in two places
First here:
	ifndef CONFIG
		CONFIG=Release
	endif
And then changed TARGET_ARCH here:
	ifeq ($(TARGET_ARCH),)
	# TK: leads to segfault if the processor is older than the one the program was compiled with
	# I got this info from forum user Musical
	TARGET_ARCH := -march=armv6
	endif
Then in /mios_studio/JuceLibraryCode/modules/juce_gui_basics/ juce_gui_basics.h I added this #define:
	// This is an auto-generated file to redirect any included
	// module headers to the correct external folder.

	#include "../../../../juce/modules/juce_gui_basics/juce_gui_basics.h"

	#define JUCE_USE_XINERAMA 0
And last, in /mios_studio/JuceLibraryCode/AppConfig.h I added the last two #defines.
	//==============================================================================
	#define JUCE_MODULE_AVAILABLE_juce_audio_basics          1
	#define JUCE_MODULE_AVAILABLE_juce_audio_devices         1
	#define JUCE_MODULE_AVAILABLE_juce_audio_formats         1
	#define JUCE_MODULE_AVAILABLE_juce_audio_processors      1
	#define JUCE_MODULE_AVAILABLE_juce_audio_utils           1
	#define JUCE_MODULE_AVAILABLE_juce_core                  1
	#define JUCE_MODULE_AVAILABLE_juce_data_structures       1
	#define JUCE_MODULE_AVAILABLE_juce_events                1
	#define JUCE_MODULE_AVAILABLE_juce_graphics              1
	#define JUCE_MODULE_AVAILABLE_juce_gui_basics            1
	#define JUCE_MODULE_AVAILABLE_juce_gui_extra             1
	#define JUCE_USE_XSHM 0
	#define JUCE_USE_XINERAMA 0

	//==============================================================================
Finally, with these changes in place cd into ~/mios_studio/Builds/Linux and run make
The build took ~20mins (forgot to enable mulit cores). It threw this Warning on a lot of the packages.
"warning: ‘void juce::ResizableWindow::setContentComponent(juce
::Component*, bool, bool)’ is deprecated (declared at ...."
Finished and launches fine, but the window isn't resizable :)) The Studio detects all my midi interfaces and sends note messages fine. I haven't tested much else, just opened the other tools and they seem fine so far. Added a shortcut to the desktop and cracked a beer!
Yogi
-
I would recommend Eagle, the free version is size limited, about 3"x4", but if you are just starting you should start small anyway. Far easier to complete a limited design. There are lots of learning resources to help get you up to speed, so Google is your friend.
As stated, there are lots of fab houses; I've been using OSH Park lately. Easy order process, just upload your Eagle file and they process the Gerbers and drill files. It's good for small runs and the price isn't too high. The cost is $5 per sq" of design, and you receive 3 copies. I.E. a 1" x 2" BRD design would cost $10 and free shipping for 3 boards. If you use the regular service, 10 copies, the cost goes down about 30% I think.
Yogi
-
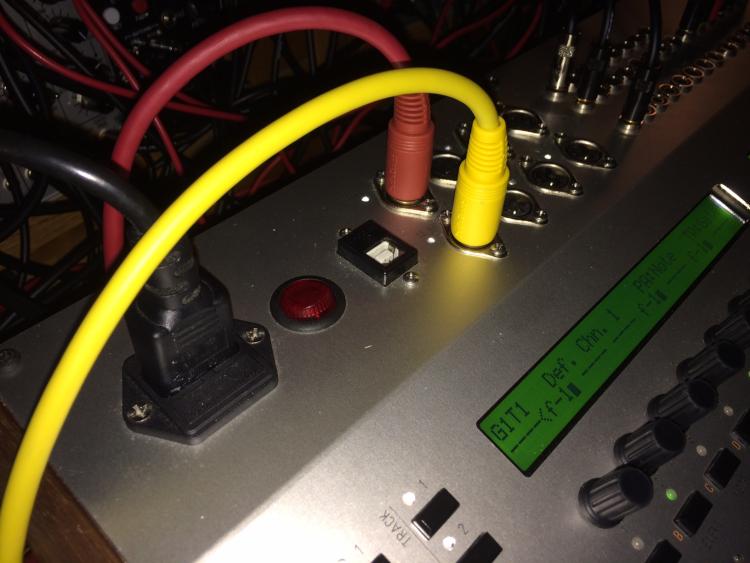
So I looked at a Disco board and it looks like CN5 pin 4 goes to R59 0 Onms, you should be able to solder to one end of it with some 30awg 'wire wrap' and test with it pulled to GND (any convenient board GND).
Your case looks really handy for accessing the IO. With sockets on the back it is a neater look if everything is static; but if you have to play with cables often, you end up having to pick it up and turn everything. Like it.
Good luck, Yogi
-
1 hour ago, k-rAd MB6401 said:
This is true. For safety reasons j17 should be open when powering the core externally to prevent frying your computer when you plug in the usb. However, when you need to power a midi controller through the usb and you are using external power for your core, j17 must be closed to give 5v to the midi controller. So now you have to be carefull and never plug the midibox into the computer with the external power supply connected.
I still need a solution for a usb otg cable with a usb b jack on the end. ;)
If i make this cable will it also work when the midibox is not a host? Or will i have to switch the cable for a normal usb when doing a sysex dump.
This would be not cool as i would have to open up my seq every time i wanted to switch from otg to normal usb
.
I hope this makes sense. Thanks for any insights.
Maybe all i need to do is short pins 4 and 5 on the micro end of the cable inside my box.????
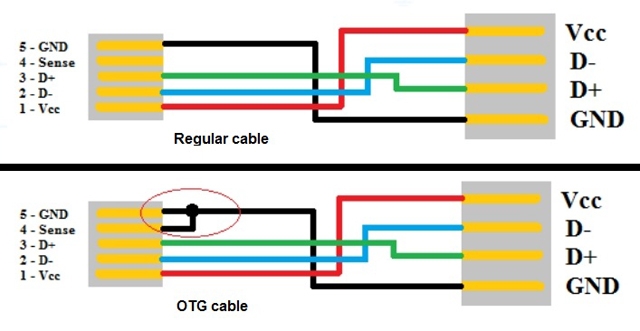
Yea, there isn't really a switchable cable as far as I see. Problem is for an OTG cable you need a reg USB A socket on the other end, by spec, and for a reg microUSB B cable you have a USB A plug or mini A. About all you can do is like you say, mod the Disco board with a switch to GND pin 4 and use a USB B to xxUSB on your Akai. You could put a panel mount DPDT switch in to connect the GND to pin 4 and the other half to close J17. Wouldn't switch it with the power applied :(
Yogi
BTW nice case, like the sockets on the top :)
-
C10 is exposed to the external input voltage, rule of thumb is 4 X voltage max. 50V chip caps are very common and would be fine for inputs up to up to 12V (and more then likely to be fine with inputs as large as 24V). A greater V rating has little impact, it's just harder to mount a large 200V :) Lead spacing is a more important issue, do check the drawing of the part before ordering.
Yogi
-
Hey jjonas, I was 'talking' with Swinsid Ultimate on his FB page https://www.facebook.com/swinsidultimate/?fref=nf After some (language?) confusion, I found the default settings in the manual http://www52.zippyshare.com/v/OLcZSuqW/file.html
By default:
8580, Audio In disabled, PAL timing, Start Beep on, LED normal.
The Audio In is disabled by default to improve the noise floor. Beware that the Audio In isn't pure analog, rather it's in to an ADC. Then it can be mixed with the DCO outs before the PWM DAC or read by the C64. So some of the Audio In filter tricks aren't going to work as expected.
The LED stuff is really not much of a useful feature, to me, but if you like blinkin' panel lights it either pull the LED high or sinks the LED.
BUT I've been pondering the timing settings. Seeing as the SSU isn't tied to the CLK (either from the C64 or the MB), what setting would be best for MBSid tuning? In other words, does the MB sim a NTSC or a PAL clock? Or somewhere in the middle?
And I got the impression that Swinsid Ultimate would/might accommodate requests for changes to the defaults before shipping.
Yogi
-
Getting close to shipping so will let you know. As far as the setup, it does have some options meant to be changed via C64.
http://csdb.dk/release/?id=149816
For use in a MBsid, would either have to pre-configure it on C64 (would be a bit of a pain) or add extensions to the PIC firmware. Would like to be able to choose SID type and channel muting at runtime. Not sure the default config, so have to work that out when I get them in hand :)
Yogi
-
 1
1
-
-
Oh Nice 8-)
-
Was searching for another RPi idea and found this thread, but have thought about a similar idea in the last weeks. So with no first hand experience, I would say that it could be do-able. Look into the WiringPi libs, these include an extension for 'HC595s; so it seems easy to use that for the SID Module. The only hitch is the 1MHz clock needed at the SID chip, but a PWM out from the RPi might work. Think you would need 5 GPIO pins- 3 for the SRs and 2 more for /CS and CLK on the SID.
I'm not sure how to integrate the WiringPi code with PD but think it would involve an external.
OTOH, the easiest would be a larger build, as outlined above by Digineural, USB to midi <-> core8 -> SID. In this case, the SID is a full synth so you don't need to code a synth engine on the Pi; just send midi messages. You could do away with the USB-midi if you setup the GPIO Uart for 31,250 (and add the Midi circuits for In and Out) and use the comport lib in PD. You would have to build the midi messages with-in PD, or use an external maybe.
Sorry I'm not much help but really new with Pi; would like to hear how you get on with your project.
Yogi
-
Just amazing. This is brilliant, using the VGM file format as the patch struct. Still trying to wrap my head around this but on the fly ripping of instruments! Just amazing :)
Yogi
-
3 hours ago, Hawkeye said:
Hola,
I also really like the effort, it is probably really hard work to develop a faithful emulation on these small microcontrollers!
How is the noise level compared to the original? Is it lower? That would be a unique selling point - otherwise, for now, at least in Germany you can still get 8580s without going bankrupt! :-) (But it is true, the price will only rise - when i build my MB6582 some six years ago, the price was around 20€ each, now it is at least 25€ :-)).Many greets!
PeterFrom the recordings at this blog http://kompjut0r.blogspot.fi/2016/04/c64-sid-shootout-part-4-sid-8580-vs.html Beyound the diffrences in volume, the SSU is slightly less 'punchy' but not really bad.
Looking at the scope trace over there-
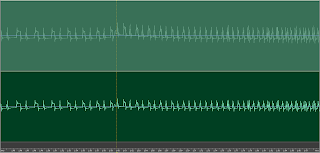
Some of the SSU peaks are not as sharp. The other trace for the Lazy Jones clip shows a little more differences in sub harmonics but again listening (my ear and interweb recording) the differences are hardly detectable.
As you point out, the cost is about the same to a real SID, so yea it's a bit of a toss up. Either risk buying 40 year old chips or give up a (very?) small amount of quality.
Yogi
-
1
-
-
22 hours ago, Altitude said:
In a mixed sid/swinsid, yeah, deal breaker. Unless the level issue is specifically addressed in this rev, i wouldn't bother. Waveforms/resolution/whatever make no difference if it's half the volume of the real thing
I see your point with a SSU and a real SID in a stereo pair. In my case a pair of SSUs on one of the MB-6582 stereo channels, seems like just adjusting the passive mixing resistors or a simple pre amp would do. And if I were to mix external it's just setting the levels different on one of the mixer channels.
Finding a tested pair of SIDs is a challenge that's only getting harder and the SSU is a faithful emulation for the most part. It's not 100% but it's close and allows you to build a 'SID inspired' synth using the MIOS code base :)
Yogi
-
Thanks for the post, had been watching the swinSID for awhile, off and on, but hadn't seen this before. The comparisons on kompjut0r's blog are very interesting and sound good. I went ahead and ordered a pair for some empty sockets on my MB-6582 :)
The 'downside' - the cost is about the same as a SID so if you want 100% SID sound you should hunt up some tested pulls. Also, some of the added improvements are not needed for Midibox use so added complexity with little return for this sub-set community.
The 'upside' - modern parts and active FW development; should be available for awhile. Tuning is improved so should sound better alongside real SIDs.
Yogi
-
Love it :) The best part is the time spent with your wee one, before long she'll be wanting to jam along with daddy.
yogi
-
On 5/13/2016 at 9:10 AM, Sauraen said:
Okay, that answers that question, thanks! I don't know how you dug this up, but that's very helpful.
Cool, glad it helps. Yea lots of Little Scale's projects are buried on his lengthy blog. Most are open source except for the GenMDM.
yogi
-
3 hours ago, Sauraen said:
It all depends on if people start using MIDIbox Genesis Tracker with FMDrive--if they do, I'm sure we'll get bug reports that things don't sound the same, and then go from there.
I do have that file, that's what I based the implementation on. It still has issues (CC 92+93 are assigned to two different things, not to mention the whole velocity problem), but there's also one major thing I couldn't figure out. For a parameter that's let's say 4 bits, does it use the lower 4 bits of the CC value or the upper 4 bits? If the lower ones, does the range clamp or repeat? I have it set up now with a macro that can be defined either way, but I will obviously need it to be the right way for a MIDI to work.
I don't know if this will help, here is the Arduino code for another LS project, the Sega Master Sys Midi. Though it's apples to oranges, the void doCC() function does illustrate how LS handled the different bit ranges of CC values.
Here he is moving CC 23, modulator mul, into shadow[0x00]'s lower nibble from the CC's higher 4 bits (bit6- bit3)
case 23: // mul (m)
        shadow[0x00] = (shadow[0x00] & B11110000) | (ccvalue >> 3);
        writeYM2413(0x00, shadow[0x00]);
        break;
And here doing the same for CC 24, carrier mul into shadow[0x01]
    case 24: // mul (c)
        shadow[0x01] = (shadow[0x01] & B11110000) | (ccvalue >> 3);
        writeYM2413(0x01, shadow[0x01]);
        break;
So for both these, the 4bit values are scaled across the full 7bit CC value range. Again this doesn't mean that he followed the same style with the GenMDM code but...
yogi
-
Both Tom and Aly had been active over at Chipmusic.org in the past but for diffierent reasons both have been silient for a while. I'll help anyway I can and Aly is a good guy but busy, building a boutique pedal and VSTi shop.
I agree that emus are limited compared to actual HW, sometimes in major ways. Choices have to be made based on what is known and what can be done by softs. The GenMDM interface does kind of suffer from this in a reverse way, I think, because of the limits of the YM info when Tom started the design. There were some updates based on Aly's suggestions as newer info came to light over at Spritesmind, but improvements slowed/stopped as outside issues clouded development. So with the GenMDM project being basically dead and limited by the 8 bit AVR, I tend to look at it as a starting point and not a definitive solution.
As I understand, FMDrive supports flexible midi IO mapping, so midi output CCs can be reassigned as needed. Of course this wouldn't help if there are errors with how the GUI handles a controller's value...
yogi
You probably already have this but it's the last release changes from LS
-
Littlescale may be a little hard to get ahold of but his facebook page is most likely. I sent Aly an email inviting him into this thread. I had talked with him a long while ago about a simular (arduino base board) subject; at that time he was interested but busy with other projects. He does have a wealth of ref material on alyjameslab.com in the DL section.
http://www.alyjameslab.com/download.html#collapseOne
I'll see if I can find a GenMDM test file for you, do you have Ableton Max4live? Other DAW?
yogi
-
11 hours ago, Sauraen said:
Thanks everyone! Now I'm getting down to programming the actual functional modes.
Regarding MIDIbox Genesis Tracker, the idea was that it would be a GENMDM-compatible backend that you could stream MIDI commands into to play the sound chips (like the GENMDM cartridge for the actual Genesis). The code for this is actually written and partially tested. However, I actually don't know anything about Genesis trackers and other PC software, so I don't know what software would be used to play into GENMDM or MIDIbox Genesis Tracker. I also don't know where to find GENMDM-compatible MIDI files that I could play into the synth. Anyone know about this?
For Littlescales' GenMDM the best cross platform tool would be Aly James' FMDrive VST, though not a tracker it could be used with any DAW, such as Renoise, or as a standalone GUI. It simplifies the use and creation of instruments and with multiple instances may support a number of YMs. FMDrive is for just the YM chip but there is also a PSG VST that could be used alongside it for full Saga support.
http://www.alyjameslab.com/alyjameslabfmdrive.html
The downside is it is Win only, but works under Wine I think. He has a Controller only version that doesn't load the synth engine, which would be great for the MB Quad Genesis. He may be open to the idea of expanding support, time permitting.
Also Littlescale has a set of Max4Live patches supporting the GenMDM for Ableton Live users. They look pretty useful but I don't have Live so...
As to other tools, most current Sega trackers like Deflemask, will output a native ROM or a VGM file but not direct control via midi. There are of course native sound engines and tools for building ROMs but little use here.
Yogi
-
Nice demo, the FP is so awesome (and the song is great too). It's amazing work you're doing, very exciting.
Yogi
-
Cool, glad to help a little. Getting to know MIOS will really be worth the time. It's a very mature package for doing these types of projects. Unlike the close to bare metal of the Arduino, MIOS is a real time OS with built in tasks for midi/synth use. This allows the user to concentrate on programming just the functions that are needed for the specific application.
Have fun, yogi
-
Welcome Redial. It should be possible to add to the basic port, as there are all the MIOS hooks in the port and the Cpu is only loaded to ~40%. I don't think the FP code from the original LPC Groom is ported as it wouldn't work at all on the STM board. If you wanted to dig into MIOS programming and add to the hooks for knobs or switches, work through the examples on the wiki http://ucapps.de/mios32_c.html ; they cover the full range of tasks needed for a basic panel and are all C. You would need some DIn and DOut boards and add the code to tie them into the synth code
The idea of using an Arduino as a midi input is useable. It could be done also with Midibox HW but if you are more comfortable with the AVR, go with that. The way I would try is to connect the Arduino via a direct TTL level serial midi link to one of the MIOS midi ports (no need for opto couplers, just Tx to Rx/ Rx to Tx connections). This would allow a USB keyboard as well as a knob panel. It should be OK with a +5V Arduino as the STM is +5 tolerant. You would still need to add some MIOS code linking the serial midi in (or is serial midi already supported in the port?) the same way the USB midi is handled, but it should be straight forward. At this point you could also add the other serial midi ports of the STM, allowing more external midi sources :)
EDIT: Took a look at the Groom synth app.c scr-
/////////////////////////////////////////////////////////////////////////////
// This hook is called when a MIDI package has been received
/////////////////////////////////////////////////////////////////////////////
void APP_MIDI_NotifyPackage(mios32_midi_port_t port, mios32_midi_package_t midi_package)
{
// -> synth
SYNTH_MIDI_NotifyPackage(port, midi_package);
}
So this seem to pass any incoming midi, both USB and serial, to the synth. Looks like you will only have to worry about the connections to get things running :)EDIT2: Just to confirm, the UART Midi default ports are indeed working. Any midi events on USB0, UART0 or UART1 are forwarded to the synth engine.
Yogi

MIDIbox TIA - Atari 2600 Synth
in MIDIbox User Projects
Posted
Oh very good :) we're all Human. Just contemplating the use of removable bankstick. Is there support for more than two?
Yogi