Nexus
-
Posts
28 -
Joined
-
Last visited
Content Type
Profiles
Forums
Blogs
Gallery
Everything posted by Nexus
-
Hi Thorsten, thank you for your help. A 'virtual' encoder sounds great, but I want to clarify what I want to do: I want to select Banks of independent hw_ids with 2 seperate Inc/Dec Buttons for the hw_ids 1-4 and 5-8. I have 6 Banks. The Banks 1-3 are assigned to the hw_ids 1-4 and the Banks 4-6 are assigned to the hw_ids 5-8. The following works, but I can only "cycle" with one button... ...but I need it like this, but only the buttons 9 an 10 (for the hw_ids 1-4) work. Same problem with CycleBankOfHwId: With an Encoder it works lisk this: Maybe there is an easier solution, but I did not found one... I'm curious about it. Best Regards, Markus
-
I have a short question. Is it possible to dec/inc the value of a map-range with two buttons (one inc, one dec)? Example: Lets say the map is "MAP1 1 2 3 4 5 6 7 8 9 10" an we are on value 5. When I press the "dec-button" it should jump to 4,3,2... When I press the "inc-button" it should jump to 6,7,8... I know this works with an encoder or a single button. But an encoder is no option and the single button only "cycles" the value in on direction... Maybe someone can help me?
-
I have found a workaround with Bomes Midi Translator. For the Encoder I use the enc_mode=Inc01_Dec7F and Bomes translates it to 2 diffrent CCs. Now it works, but it would be great to see the planned feature for diffrent Notes/CCs with Encoders in the future.
-
I have tried the example, but unfortunately it does not work. The Encoder sends both CCs at the same time with vel. 1 when moved cw and both with vel. 127 when moved ccw. It seems the "if_equal" and "range" command has no effect in the EVENT_SENDER lines. I have played around with the "inc/dec" enc_modes but it does not work in my case. The Encoder should replace 2 buttons which must have different CCs or Notes.
-
Hi Thorsten, is it possible to assign diffrent CCs or Notes to a Rotary Encoder (e.g. CC 10 when moved cw and CC 11 when moved acw) ?
-
That´s great! Thank you for yor help, Thorsten.
-
Hi Thorsten, please ignore my last post - now it works! :rolleyes: Usually MIDI events will not be forwarded in the DAW (Ableton Live) (to avoid MIDI Feddback Loops?). Now I have forwarded all incomming MIDI at chn 11 back to the MIDIBox - an it works! But isnt this a Feedback-Loop? I wonder how this can work. The Box receives the same event as it sends.
-
Hi Thorsten, I think you misunderstand me a little bit ;-) The radio grouping works correctly - I try to explain what I want to do. Normally when I press a bankselect-button no MIDI event will be sent = nothing happens in the DAW. But when I select a bank the DAW should "jump" to the first clip of the selected bank and the corresponding LED:7 should turn on. Currently I additionally have to press the hw_id=7 button every time I change the bank to achieve this. BTW: The DAW sends no feedback in this case. With the sender which listens to the radio group of the bankselect-buttons these buttons now send the correct MIDI event (like hw_id=7 button was pressed) to select the first clip in the DAW when the bank is changed - perfect! But the LED:7 will not light up as when I press the hw_id=7 button. And because of the - correct working - radio group it remembers the last state of the LED wich is not correct in most cases and therefor more confusing than useful. Only LED:7 should turn on (and the others of the radio group off) when a bank was selected. That´s the problem. Principally when I press a bankselect-button it should additionally "press" the hw_id=7 button - but with only one button press. Maybe it´s possible to "combine" two commands (The bankselect and the "press" on button 7) at one button? BTW: I can not use diffrent CCs or channels, because the sender sends only one CC / channel. And I have tried it with one radio group over multiple banks wich also does not work. Also other things like a fwd_id=LED:7 ln the EVENT_SENDER line - but nothnig works. I understand if you can not help me if the solution is to time consuming - but if you have an idea it would be great.
-
Hi Thorsten, thank you for your help... it works! :phone: But there is one problem left with the LEDs. To explain it I must post the code: EVENT_BUTTON id= 1 hw_id = 1 fwd_id=LED:1 fwd_to_lcd=1 radio_group=1 \ type=Meta meta=SetBank button_mode=OnOnly range= 1:1 lcd_pos=1:1:1 label="%CBank %-3q" EVENT_BUTTON id= 2 hw_id = 2 fwd_id=LED:2 fwd_to_lcd=1 radio_group=1 \ type=Meta meta=SetBank button_mode=OnOnly range= 2:2 lcd_pos=1:1:1 label="%CBank %-3q" EVENT_BUTTON id= 3 hw_id = 3 fwd_id=LED:3 fwd_to_lcd=1 radio_group=1 \ type=Meta meta=SetBank button_mode=OnOnly range= 3:3 lcd_pos=1:1:1 label="%CBank %-3q" EVENT_BUTTON id= 4 hw_id = 4 fwd_id=LED:4 fwd_to_lcd=1 radio_group=1 \ type=Meta meta=SetBank button_mode=OnOnly range= 4:4 lcd_pos=1:1:1 label="%CBank %-3q" MAP1 0 0 4 8 12 EVENT_SENDER id= 1 radio_group=1 type=CC cc=16 range=map1 chn=11 ports=1110100000001000 # Bank 1 EVENT_BUTTON id= 5 hw_id=5 bank= 1 fwd_id=LED:5 type=CC chn= 1 cc= 21 range= 0:127 offset= 0 button_mode=OnOnly ports=1110100000001000 lcd_pos=1:1:2 label="Play - Clip 1/1 " EVENT_BUTTON id= 6 hw_id=6 bank= 1 fwd_id=LED:6 type=CC chn= 1 cc= 26 range= 0:127 offset= 0 button_mode=OnOnly ports=1110100000001000 lcd_pos=1:1:2 label="Play - Clip 2/1 " EVENT_BUTTON id= 7 hw_id=7 bank= 1 fwd_id=LED:7 type=CC chn=11 cc= 16 range= 0:0 offset= 0 button_mode=OnOnly ports=1110100000001000 lcd_pos=1:1:2 label="Select - Clip 1/1 " radio_group=2 EVENT_BUTTON id= 8 hw_id=8 bank= 1 fwd_id=LED:8 type=CC chn=11 cc= 16 range= 1:1 offset= 0 button_mode=OnOnly ports=1110100000001000 lcd_pos=1:1:2 label="Select - Clip 2/1 " radio_group=2 # Bank 2 EVENT_BUTTON id= 9 hw_id=5 bank= 2 fwd_id=LED:5 type=CC chn= 2 cc= 21 range= 0:127 offset= 0 button_mode=OnOnly ports=1110100000001000 lcd_pos=1:1:2 label="Play - Clip 3/1 " EVENT_BUTTON id= 10 hw_id=6 bank= 2 fwd_id=LED:6 type=CC chn= 2 cc= 26 range= 0:127 offset= 0 button_mode=OnOnly ports=1110100000001000 lcd_pos=1:1:2 label="Play - Clip 4/1 " EVENT_BUTTON id= 11 hw_id=7 bank= 2 fwd_id=LED:7 type=CC chn=11 cc= 16 range= 4:4 offset= 0 button_mode=OnOnly ports=1110100000001000 lcd_pos=1:1:2 label="Select - Clip 3/1 " radio_group=3 EVENT_BUTTON id= 12 hw_id=8 bank= 2 fwd_id=LED:8 type=CC chn=11 cc= 16 range= 5:5 offset= 0 button_mode=OnOnly ports=1110100000001000 lcd_pos=1:1:2 label="Select - Clip 4/1 " radio_group=3 # Bank 3 EVENT_BUTTON id= 13 hw_id=5 bank= 3 fwd_id=LED:5 type=CC chn= 3 cc= 21 range= 0:127 offset= 0 button_mode=OnOnly ports=1110100000001000 lcd_pos=1:1:2 label="Play - Clip 5/1 " EVENT_BUTTON id= 14 hw_id=6 bank= 3 fwd_id=LED:6 type=CC chn= 3 cc= 26 range= 0:127 offset= 0 button_mode=OnOnly ports=1110100000001000 lcd_pos=1:1:2 label="Play - Clip 6/1 " EVENT_BUTTON id= 15 hw_id=7 bank= 3 fwd_id=LED:7 type=CC chn=11 cc= 16 range= 8:8 offset= 0 button_mode=OnOnly ports=1110100000001000 lcd_pos=1:1:2 label="Select - Clip 5/1 " radio_group=4 EVENT_BUTTON id= 16 hw_id=8 bank= 3 fwd_id=LED:8 type=CC chn=11 cc= 16 range= 9:9 offset= 0 button_mode=OnOnly ports=1110100000001000 lcd_pos=1:1:2 label="Select - Clip 6/1 " radio_group=4 # Bank 4 EVENT_BUTTON id= 17 hw_id=5 bank= 4 fwd_id=LED:5 type=CC chn= 4 cc= 21 range= 0:127 offset= 0 button_mode=OnOnly ports=1110100000001000 lcd_pos=1:1:2 label="Play - Clip 7/1 " EVENT_BUTTON id= 18 hw_id=6 bank= 4 fwd_id=LED:6 type=CC chn= 4 cc= 26 range= 0:127 offset= 0 button_mode=OnOnly ports=1110100000001000 lcd_pos=1:1:2 label="Play - Clip 8/1 " EVENT_BUTTON id= 19 hw_id=7 bank= 4 fwd_id=LED:7 type=CC chn=11 cc= 16 range= 12:12 offset= 0 button_mode=OnOnly ports=1110100000001000 lcd_pos=1:1:2 label="Select - Clip 7/1 " radio_group=5 EVENT_BUTTON id= 20 hw_id=8 bank= 4 fwd_id=LED:8 type=CC chn=11 cc= 16 range= 13:13 offset= 0 button_mode=OnOnly ports=1110100000001000 lcd_pos=1:1:2 label="Select - Clip 8/1 " radio_group=5 When I press one of the four bankselect-buttons the correct cc-value will be sent like it should. Perfect! As you can see in the code this cc-value is equal to the value of the 3rd button in each bank (the button with hw_id=7). When I press this button (hw_id=7) the cc-value will be sent AND the LED (LED:7) will be selected / go on (all other LEDs off) in the corresponding radiogroup. But when I press one of the bankselect-buttons the LED-Status would not be changed in the corresponding radiogroup. It should be like I press the button (hw_id=7) after I select the bank so the LED-Status jumps to the correct LED:7 within the radiogroup. BTW: Sorry for this complicated stuff but it wold be great you could help me angain... :rolleyes:
-
Hi Thorsten... another question: Is it possible to send an additional midi event when I select a bank with a button? Example: EVENT_BUTTON id= 1 hw_id = 1 fwd_id=LED:1 fwd_to_lcd=1 type=Meta meta=SetBank \ button_mode=OnOnly range= 1:1 lcd_pos=1:17:1 label="Bnk%d" radio_group=1 EVENT_BUTTON id= 2 hw_id = 2 fwd_id=LED:2 fwd_to_lcd=1 type=Meta meta=SetBank \ button_mode=OnOnly range= 2:2 lcd_pos=1:17:1 label="Bnk%d" radio_group=1 EVENT_BUTTON id= 3 hw_id = 3 fwd_id=LED:3 fwd_to_lcd=1 type=Meta meta=SetBank \ button_mode=OnOnly range= 3:3 lcd_pos=1:17:1 label="Bnk%d" radio_group=1 EVENT_BUTTON id= 4 hw_id = 4 fwd_id=LED:4 fwd_to_lcd=1 type=Meta meta=SetBank \ button_mode=OnOnly range= 4:4 lcd_pos=1:17:1 label="Bnk%d" radio_group=1 This works but now I want to send an additional cc=16 at chn=11 with: range=0:0 for Button1 range=4:4 for Button2 range=8:8 for Button3 range=12:12 for Button4 So when select Bank1 an additional cc=16 chn=11 range=0:0 should be sent an so on... I played around with the sender / receiver commands but nothing works correctly. EVENT_BUTTON id= 1 hw_id = 1 fwd_id=SENDER:1 fwd_to_lcd=1 type=Meta meta=SetBank button_mode=OnOnly range= 1:1 lcd_pos=1:17:1 label="Bnk%d" radio_group=1 EVENT_SENDER id= 1 fwd_id=LED:1 fwd_to_lcd=1 type=CC chn=11 cc= 16 range= 0:0 offset= 0 ports=1000100000001000 lcd_pos=1:1:2 label="Sender%3i: %e" EVENT_BUTTON id= 2 hw_id = 2 fwd_id=SENDER:2 fwd_to_lcd=1 type=Meta meta=SetBank button_mode=OnOnly range= 2:2 lcd_pos=1:17:1 label="Bnk%d" radio_group=1 EVENT_SENDER id= 2 fwd_id=LED:2 fwd_to_lcd=1 type=CC chn=11 cc= 16 range= 4:4 offset= 0 ports=1000100000001000 lcd_pos=1:1:2 label="Sender%3i: %e" EVENT_BUTTON id= 3 hw_id = 3 fwd_id=SENDER:3 fwd_to_lcd=1 type=Meta meta=SetBank button_mode=OnOnly range= 3:3 lcd_pos=1:17:1 label="Bnk%d" radio_group=1 EVENT_SENDER id= 3 fwd_id=LED:3 fwd_to_lcd=1 type=CC chn=11 cc= 16 range= 8:8 offset= 0 ports=1000100000001000 lcd_pos=1:1:2 label="Sender%3i: %e" EVENT_BUTTON id= 4 hw_id = 4 fwd_id=SENDER:4 fwd_to_lcd=1 type=Meta meta=SetBank button_mode=OnOnly range= 4:4 lcd_pos=1:17:1 label="Bnk%d" radio_group=1 EVENT_SENDER id= 4 fwd_id=LED:4 fwd_to_lcd=1 type=CC chn=11 cc= 16 range= 12:12 offset= 0 ports=1000100000001000 lcd_pos=1:1:2 label="Sender%3i: %e" This selects the banks correctly but not the LEDs and sends multiple times the cc=16 / chn=11 value with the range of the bank instead of the defined ranges... Maybe i am thinking to complicated, but until now I found no solution.
-
Thanks TK for the advice - it works perfectly!
-
Hi TK, I have a question. Is it possible to "group" banks or define "sub-banks"? Example: In "group 1" 25 HW-Buttons + LEDs are assigned with the banks 1-5. In "group 2" another 16 HW-Buttons + LEDs are assigned with the banks 6-12. Let´s say bank 2 (from group 1) is selected. Now when I selct bank 8 (from group 2) bank 2 should stay controllable. Currently the Buttons are deactivated when the bank changes (of course). So the idea was to "group" the banks, but maybe this could be achived with another command-combination?
-
Hallo Thorsten, vielen Dank für deinen Patch, aber leider ging es nicht so, wie erhofft. Ich konnte auch die alte Version nicht mehr zurückspielen, weil es im MIOS Studio einen "Sysex upload error #14" gab. Aber dank des "Bootloader Hold Jumpers" gehts jetzt wieder. Mach Dir aber bitte keine Mühe mehr, ich wollte die MIDIbox NG eh gleich testen, sobald sie verfügbar ist. Und das schon in 2 Wochen... :frantics: Ich hatte auch vergessen hier den genauen Befehl zu schreiben, den Live sendet. Beim einschalten des entsprechenden Buttons sendet Live 90 10 7F (NoteOn), beim aussschalten dann 80 10 40 (NoteOff)... Irgendwie völlig idiotisch :bug: "It´s not a bug - it´s a feature!" passt hier wohl ganz gut. Live´s MIDI-Mapping ist geldinde gesagt: :sick: Wenn man z.B. den Loop bei einem Clip aktiviert geht die LED aus, weil Live dann alle 3 Sekunden den Velocity Wert 1 sendet?! Wenn wenigstens der Loop-Taster z.B. eine (evtl. andere) LED aktivieren würde... der sendet allerdings gar nix zurück, genauso wie der Solo-Button. So kann man dann nur staunen und sich wundern, was sich die dabei "gedacht" haben. Wie gesagt - Du brauchst Dir keine Mühe mehr zu machen. Ich warte gerne noch auf die MIDIbox NG. VG, Markus
-
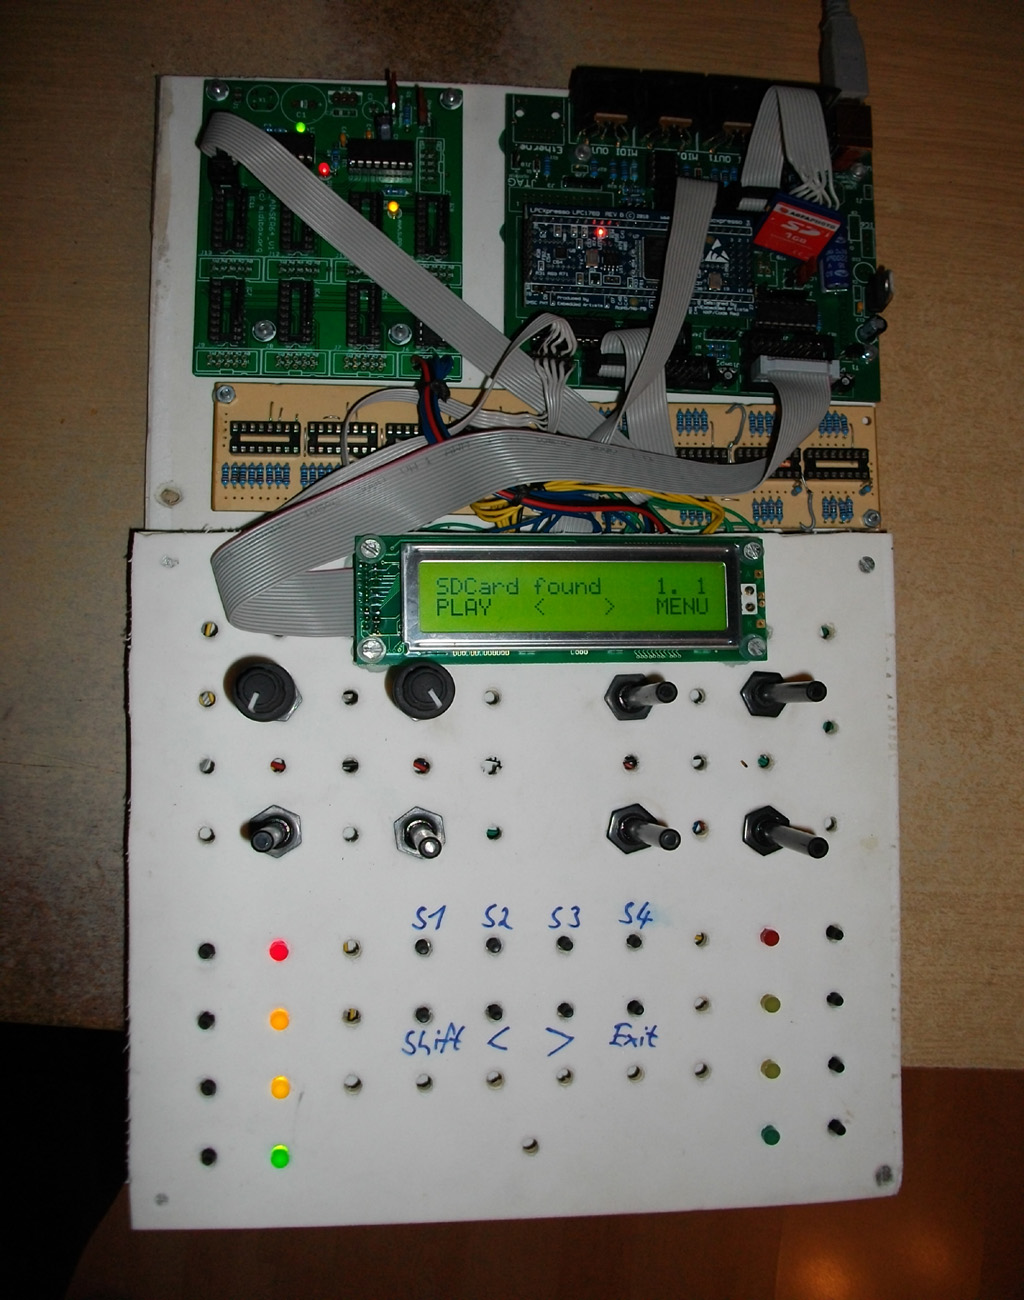
Ich habe nun einen Testaufbau mit LPC17-Core und MIDIO128 V3 fertig. Läuft soweit alles wie es soll (vielen Dank nochmal für die Tipps an ilmenator :thumbsup:). Im Anhang ist ein Foto. Ich will damit Ableton Live steuern. Das geht soweit ganz gut, bis auf das "Feedback" von Live. Die LEDs gehen nicht aus, wenn ich in Live die entsprechenden Buttons ausschalte. Mit Midiox habe ich auch den Grund dafür gefunden: Live sendet (leider nicht veränderbar) beim "auschalten" eines Buttons den Wert 0x40 - bei MIDIO128 V3 geht die LED aber nur bei Werten zwischen 0x00 bis 0x3F aus. Kann man das in MIDIO128 V3 ändern, so dass auch bei dem Wert 0x40 die LED aus geht?

-
Sehr gut, dann kann ich es so machen wie geplant. Ich werde für die Verbindung zwischen dem DIN/DOUT und dem Core jeweils ein eigenes 5-Pol Flachbandkabel mit Stiftleisten/buchsen verwenden. Mit dem 10-Pol Pfostenstecker gehen die einzelnen Kabel ja abwechselnd zum DIN und DOUT, was meiner Meinung nach nicht sehr sinnvoll ist... :question: Da wirst du wohl recht haben... :rolleyes: Fürs erste ist nun aber alles klar. Die Platinen bei smashtv sind bestellt - jetz heißt es warten :sad: Vielen Dank nochmal für deine ausführliche Hilfe!
-
Jetzt hab ich doch noch eine Frage: Gelten die 40 cm vom Core bis zum ersten DIN/DOUT/AINSER64 Modul oder bis zum letzten in der Kette? Ich hatte eigentlich geplant, die DIN/DOUT/AINSER64 Module auf der Rückseite der Frontplatte zu montieren. Dadurch wären dann nur 5 schmale Flachbandkabel zur Gehäuseunterseite nötig, was wesentlich übersichtlicher wäre. Allerdings ist meine Frontplatte recht groß (60x45cm)... Wenn die 40 cm vom ersten Modul bis zum Core gelten, geht es. Falls es bis zum letzten Modul nur 40 cm sein dürfen, gehts nicht. Deshalb die Frage.
-
Die LEDs sind überwiegend an, werden vermutlich ca. 60 Stück. Ich mach das dann mit 2 normalen DOUT-Modulen - war eh ursprünglich so gepalnt. Ich brauch natürlich auch eine zusätzliche Stromversorgung - dafür habe ich ein stabilisiertes 5V-Netzteil von einem USB-Hub. Das bringt bis zu 2A, was locker reichen sollte. Danke für die Tipps bzgl. der Kabel bei DIN / DOUT, aber wie sieht es mit den analogen Leitungen von den Potis zum AINSER64 aus? Zumindest beim alten AIN gab es glaub ich Jitter-Probleme, wenn die Leitungen unterschiedlich lang sind. Weißt du da noch näheres oder ist es mitllerweile egal? PS: Vielen Dank für deine Hilfe, aber das dürfte dann wirklich die letzte Frage sein ;-)
-
Ich hab mir das mal genauer angesehen mit der Matrix, aber ich werde es wohl doch mit normalen DIN / DOUT Modulen machen. Meine LEDs haben z.B. pro Stück 12.7 mA Strom - bei 4 Stück pro DOUT ist das zuviel, da ein Ausgang blos 35mA schafft. Soweit ist jetzt fast alles klar, nur eine Frage hätte ich noch: Müssen die Kabel (Signalleitungen) vom DIN und dem AINSER64 Modul zu den Tastern / Potis gleich lang sein bzw. gibt es bestimmte Anforderungen an das Kabel (z.B. Midestquerschnitt)? Ich würde gerne normales Flachbandkabel nehmen, wenn das geht. Ich frage nur, weil ich noch was im Hinterkopf habe über Signalstörungen - zumindest bei den alten AIN-Modulen.
-
Gibt es eine Möglichkeit, den Tastern aus der Matrix einzeln LEDs zuzuordnen so wie bei den DIN / DOUT Moldulen?
-
Vielen Dank für deine Antwort. MIOS Studio habe ich runtergeladen - jetzt wirds auch klarer... nur bei der Scan-Matrix noch nicht ganz. Sind die "Dioden" in dieser Übersicht die LEDs für die jeweiligen Taster? Loigisch wärs, aber das Schaltzeichen für LEDs ist ja normalerweise mit 2 Pfeilen neben dem Diodensymbol - deshalb die Frage. Außerdem ist mir noch nicht so ganz klar, für was man den "MagJack" braucht. Laut Beitreag braucht man ihn nicht wirklich. MIDI over Ethernet nutze ich nicht, da ich MIDI über den USB-Anschluss verwenden will. Gibt es dann noch einen Grund, einen MagJack zu verlöten?
-
Vielleicht habe ich die Frage falsch formuliert: Kann ich mit MIDIO128 V3 jeweils bis zu 128 Taster und Potis verwenden, die unabhängige MIDI-Befehle an Live senden? Für einen Hinweis wäre ich dankbar!
-
Hallo miteinander, ursprünglich wollte ich eine MidiBox64 bauen, hatte aber wegen Zeitmangel das Projekt "eingefroren". Mittlerweile hat sich ja einiges getan was die Hardware betrifft... :rolleyes: Muss erst mal wieder in die ganze Thematik einsteigen... Ich will mir nun einen (etwas größeren) Controller (mit dem neuen MBHP_CORE_LPC17) für Ableton Live bauen. Er sollte so ca. 100 Potis und 100 Taster (mit LED) haben, die unabhängig belegbar sind. Dann noch ein Display - mehr brauch ich eigentlich nicht. Mit der MidiBox64 geht das ja nicht. Ich bin deshalb bei MIDIO128 V3 "gelandet". Wäre MIDIO128 V3 dafür geeignet oder würdet ihr mir was anderes empfehlen?
-
Hallo zusammen, ich kommen nun endlich wieder dazu, meine Midibox 64 fertig zu bauen. Die Elektronik dafür habe ich schon vor einiger Zeit zusammengelötet. Ursprünglich war die MIDI-Anbindung an den PC über das LTC-Modul per RS232 geplant. Im Forum habe ich nun z.B. gelesen, dass die Anbindung über COM nur Probleme macht. MIOS kann man anscheinend auch nicht über das LTC-Modul hochladen - stimmt das? Ich würde mir deshalb den M-AUDIO USB UNO Adapter kaufen. Hat da schon jemand Erfahrungen mit dem Adapter bzw. ist der empfehlenswert? Steht zumindest auf der Whitelist. Markus
-
Ok, danke! Hat funktioniert... :)
-
Danke für die Antworten! Für die PIC ID brauche ich also nur die mios_bootstrap_loader_v1_1b.hex in IC-Prog laden, und dann unten rechts in meinem Fall die ID:0000000000000100 eintippen und wieder speichern? Ist das alles? Nexus