

dstamand
-
Posts
241 -
Joined
-
Last visited
Content Type
Profiles
Forums
Blogs
Gallery
Posts posted by dstamand
-
-
In my tiny controller i'm planning to use TQFP 18f452. It is 44 pins surface mount. What tools i need to program the pic ? i can't find the infos how to install the Bootstrap Loader
Anyone here can do this ?
Thanks!
-
Nice work!
"Tripling the cost". 3x $30 is still nothing for a case including a cut panel ;-)
[me=nILS Podewski]sings: "It's a looong way from the render, if you wanna rock and roooooooll...." ;D[/me]
Maybe yes but steel parts are heavy to ship...
Send me an autocad .dxf unbended. Contour, holes and cutouts. We will see.
Scale 1:1
Thickness in gauge or mm or inches
From my point of view, i'm 50% done. The most is yet to come like soldering 200 SMD parts!! :-(
-
I'm adding another DIY project to this one. A Midibox Seq and + matrix extension!
Pics are next.
-
So... can we use you ;)
Yes but the shipping cost will triple your cost and even more. Try to find a machine shop near your location that has the tools.
-
Uhm... I think that left me with more questions than answers :D
I mean... like who's gonna do it? (the cutting/bending/paiting) how are you hiding the screws?
I have access to precision laser cutting tools made by Trumpf. Cost 30$ to do all steel parts. Laser rocks!
I'll bend it myself on an Amada press brake.
Powder painting or Aluminum anodized finish will be made by a shop that only do this kind of job.
No screw, it snap. :-*
I'll post more construction details asap.
Thanks!
-
also what program did you use to design the panel?
I use Solid Edge - http://en.wikipedia.org/wiki/Solid_Edge
-
can you provide a hi-res topo view?
Take a look at this PDF document i've made:
-
Looks sweet! How are you making the case?
I'll try this for now: 4 parts, front plate is steel 1.5mm or 1.9mm, hi precision Laser cutting, finish is hi gloss powder paint. Side are 5 mm CNC machined. Bottom plate is 1.9 mm.
Later i'll try aluminum for the front plate and side. ~2mm front plate. Anodized natural finish. I'll need to have a stronger bottom base plate for structure. 18mm total thin will become more like 20mm.
-
Perfect shot, was smooth. clap clap clap!!!
-
Hi,
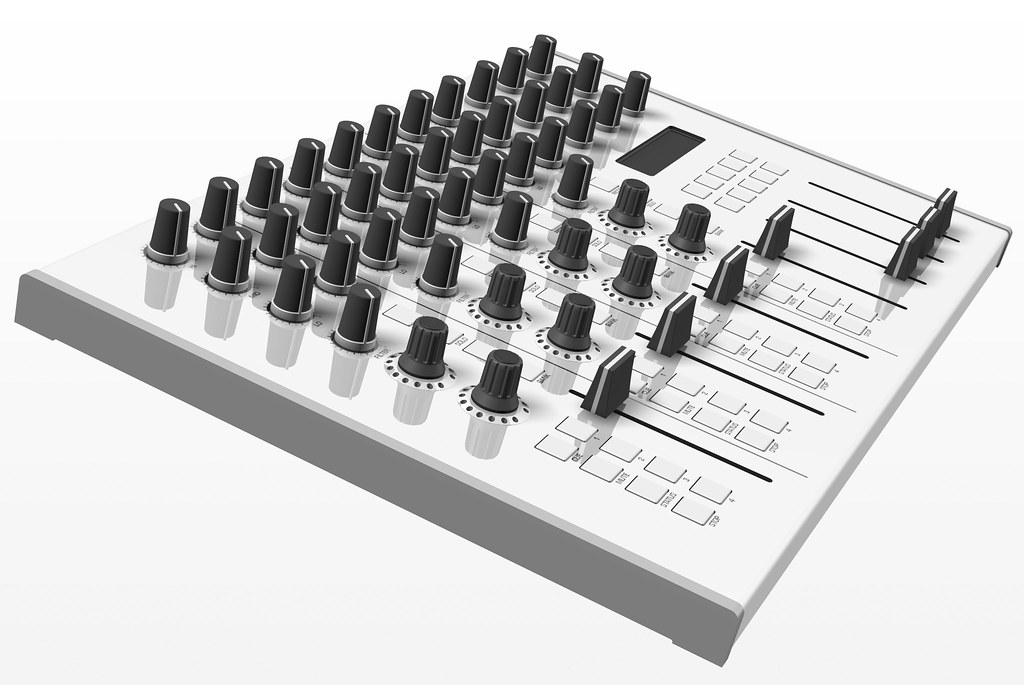
This is my very first serious project that i'm doing under MIOS platform. I'm 2 months behind schedule with this project because of healt problems. But, i've took time to re-think the project and now i'm please with the 3D model result. I always do everything in 3D and when i'm ready i'll built it for real. The 3D model include all steps: mechanical, electronics and style. The software is almost 80% done and works perfectly for the controller. The rendering you see, is the last step of the whole process, it is about 1% of the work but the most spectacular for sure.
The controller enclosure is 375 mm x 242.5 mm X 18 mm
No screw visible from any place, even under. ::)
It has:
58 illuminated square 10mm buttons (3 colors + white when off)
37 illuminated potentiometers (base illuminated)
8 encoders, ledrings 15 leds
7 ALPS 60mm faders
8 channels
Mackie Control protocol
Larger images here :

-
Nebula where are you located in Canada ? i could maybe get my knobs directly. I'm in Montreal, Quebec.
-- Edit
Ok, you are located in Brampton, Ontario. Too far from here.
Btw, my name isn't on the P-401 Wiki order list but the paypal payment done since April 10.
-
I'm in !!
40 ~ 80. I'm waiting for the Wiki order page.
-
-
For those who don't know, Solid Edge 2D Drafting is free.
http://www.plm.automation.siemens.com/en_us/products/velocity/solidedge/index.shtml
I am using the full 3D package since 1996. I can tell you that this is a very powefull 3D CAD parametric feature solid modeling software for the price.
Download here the Free 2D drafting package :
http://www.plm.automation.siemens.com/en_us/products/velocity/solidedge/free2d/new_user.shtml
-
Looks great. But these thinks are usually pretty expensive. :-\
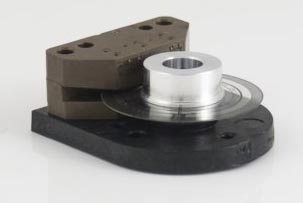
I have a couple of these, i bought them in 1999-2000 when i was working on a precision remote control PTZ camera. It cost around 65$ each. I'm gonna try this sometime with the scratch wheel :)
-
http://www.usdigital.com/products/e2/body_index#description
Take a look into this miniature hollow shaft optical encoders.
-
I just tried a white bright led under the knob, i can see the glowing at the knob base. It works. Tomorrow i'll try with a 3mm led inside the shaft. We can adjust the led position inside the shaft.
The knobs are nice, soft touch like Re-an. But only S type shaft available.
-
So, what you think of it? Can you post some close-up pictures on flickr? I`m interested how it looks at bottom. If you can do some illumination tests and wright a report it would be great.
I just received the knobs, the grey base is not translucent at all, neither the pointer. The light effect goes true the clear shaft et bounce back under the knobs, this is what we see in the video or on pictures or they photoshop it. I'll take pics later.
-
I did have this problem before, just re-upload MIOS again a few times, should fix the mess.
-
Here's one, not so bad at all but at the same time, it is terrible. Giorgio Moroder Live performance @ ~2:00 in the video.
<object width="425" height="344"><param name="movie" value="
name="allowFullScreen" value="true"></param><embed src="type="application/x-shockwave-flash" allowfullscreen="true" width="425" height="344"></embed></object> -
So, what you think of it? Can you post some close-up pictures on flickr? I`m interested how it looks at bottom. If you can do some illumination tests and wright a report it would be great.
I should have them today via FedEx.
-
You know what, i bought those Alpha Taiwan Clear Shaft Potentiometers last week and i didn't know wich knobs to use with it. I found it now ;D
Anyway, i have another knobs in my mind for those pots.
-
Hey hey! Congrats :o :o

http://www.skratchworx.com/news3/comments.php?id=991
The coolest thing you'll see this yearManufacturers around the world are pumping squillions into R&D labs trying to make the perfect MIDI controller. I'm sure there are shelves full of almost but not quite platters of all shapes and sizes littering the vaults of the big boys and many a frustrated Product Manager still searching for the perfect platter for their next generation of bandwagon hopping product. So imagine my glee when some guy in the UK armed with an open source project, a cardboard box and some gaffer tape serves the manufacturers their arses on a MIDI platter. All hail Rasteri - king of the controllers.
-
@madox
Thanks for the hints !
Which flux and solder (easy to buy online in the US or Canada) do you recommend to use for regulars SMD cap/resitors/ICs on home made pcb ?
MIOS programming platform released
in Latest News
Posted
Wow great news!!
Good job TK. :)