

fussylizard
-
Posts
280 -
Joined
-
Last visited
Content Type
Profiles
Forums
Blogs
Gallery
Posts posted by fussylizard
-
-
Update: All international orders are packed and boxed with address labels affixed. I still have to fill out the customs forms and print / attach invoices to the outside of the boxes and then I'm ready to go! Still looking good for Saturday shipping.
BTW I tested each display before packing each in an anti-static bag and wrapping each individually in bubble wrap. I found one display of the 70 I've tested so far that had a very, very minor defect (part of one pixel always stays on). It's very minor (I'll probably use that display myself on my MB-SEQ) but I'm glad I caught it. Anyway, each display I'm shipping should work 100%. If it doesn't it was either damaged in shipping somehow, you soldered it wrong, or you left in R12 without an IIC module. :-)
-
My knobs arrived today - woohoo! (I'm in the U.S.)
Thanks Goblinz for setting this up. Hope all is well. As I'm currently running the 40x2 display bulk order I have a better appreciation now for how much work it is to run a bulk order. :-)
Regards,
C
-
Thanks everyone for the fast payments, I appreciate it! For those who have paid so far, I plan to ship your orders on Saturday.
Thanks,
Chris
-
thanks for the info on R12!
i'm soldering my FM core atm
:D
Ah, good timing!
BTW As Wilba discovered you need to keep the leads from the core to the FM board short, preferably under 10cm, or things get unreliable.
The interconnection from the Core to the FM module is a bit complex to do with headers. I tried this approach and then fried my LCD so I had to cut it off. When I went to solder a new LCD on (I've got plenty of replacements now :-) it was making my head hurt to figuring out which wires went where so I decided to just make a "normal" LCD cable and solder the FM module ribbon cables to the bottom of the core as recommended by TK (so one end was soldered directly to the core pins on the bottom of the PCB and the other side has 2 female SIL headers). Having tried both methods, I'd recommend soldering directly to the core as in my second attempt.
I'll have to post a pic of my FM module. Once I finish up the bulk order I plan on making a control surface PCB (unless I decide to just do it on perfboard). It would be my first PCB so we'll see how that goes...
-
A nicely packed box of LCD goodness was waiting for me when I got home today. :) Thanks, fussylizard!
Glad to hear they made it safely. Hope you like them, they look pretty good to me!
-
IMPORTANT!
When using this display you should not stuff resistor R12 on your core module unless you have an IIC module attached to your core.
Details
I was doing some work on my MB-FM Sunday night and noticed that my display was a bit unreliable with the current core (version 3 schematic - Smash TV board R4d). The problem was it would sometimes turn on but no characters would display. It worked perfectly on a version 2 schematic core module (which I have been using to test each LCD before I pack it - I have Smash TV board R3).
Investigation showed that the pull-up resistor R12 added in revision 3 of the core made the display somewhat unreliable. According to the core docs this is used if you have an IIC module attached. I don't have an IIC module to test with (I have some on order from SmashTV now). Ultra's MB-SEQ used this exact display with his Ultracore module that includes this pull up when used with IIC modules so this should not be a problem for MB-SEQ. For MB-FM you don't need IIC modules so don't stuff R12 for MB-FM.
So when you first test your display with a bare core module (you *are* testing as you go, right?) you should not stuff R12 to ensure the display is working with your core and your cable is wired correctly, etc. When you add in an IIC module then you should solder in R12.
I'll report further details when I get my IIC modules for MB-SEQ.
-
I just sent out invoices for all the international orders (except one- sent email instead confirming shipping charges are OK).
Please check your email inbox and if you did not get a PayPal request from me or if there is a problem with it, please email or send me a message via the forum.
Remaining stock: 7 displays
-
It's *so* cute!
Way to go Wilba!
-
I just got chips from TK so I hope we'll get some additional interest!
-
Thanks for everyone's understanding!
All this international mailing stuff is incredibly tedious to sort through. Part of the problem is that some (many?) post office workers here don't really know the regulations for international mail and give out incorrect information. For example, I was told by the post office that the boxes I have were too big to be shipped via the cheaper "First Class Mail International" and had to be sent via the much more expensive "Priority Mail International". After reading the rules myself and discussions with SmashTV, my boxes are fine. So I will have to print out the regulations and take them with me to the post office to show them in case they refuse to use my boxes for first class. Ugh.
-
All,
Quick update:
1) I've nearly sorted through all the international shipping details. The only remaining item is to calculate insurance costs for the international orders (I have to call U-PIC tomorrow since I can't figure out how to get a quote from their website), then I'll be ready to issue the international invoices. I've already shipped the domestic orders since I've sent tons of mail within the U.S. and understand how that works. :-)
2) About customs fees: As I stated in the bulk order terms and conditions, I will not provide incorrect information on customs declaration forms for orders. Shipments will have a CN-22 customs form attached to the outside of the box and will show the shipped value ($26 x number of LCDs ordered). I will also include a PayPal invoice inside a plastic "Invoice Enclosed" pouch that will show the LCD cost + shipping/insurance/PayPal fees (on separate lines if I can figure out how to make PayPal do that). I understand that everyone wants to save money and avoid customs fees, but I must follow the rules to avoid problems. Please inform me via PM if this is a problem and I will cancel your order. Sorry!
Thanks to everyone, especially the international buyers (most of you!) for your patience while I do my best to make this bulk order go smoothly.
Regards,
Chris
-
Yes, I'm still sorting out all the international shipping procedures and expenses so I can do the international invoices. Just about there, sorry for the delay! (These shipping regulations are a bit confusing!)
Thx,
C
-
All, the deadline for reserved LCDs has passed. All remaining LCDs will be sold on a first-come, first served basis so order now!
Stock remaining: 10
BTW SmashTV gave me a ton of tips on shipping internationally from the U.S. - Thanks Tim!
-
Check out these pictures from my build: http://picasaweb.google.com/fussylizard/MB6582?authkey=Gv1sRgCM7npqbPgvbfYA&feat=directlink#
I have a few dedicated to how I mounted the LCD. I also have one that shows the wires soldered to the bottom of the LCD (though I should probably show a more detailed version of this). I should probably get around to posting a link to these pictures somewhere... :-)
I have lots of notes and such I still need to post from my build, such as an "additional" parts list for all the extra nuts, bolts, female DIL headers, etc. that I need to post since it took me (IIRC) 2 orders from SmashTV, 3 or 4 orders from McMaster-Carr, and 2 or 3 orders from Mouser to get everything. I could have probably figured it all out had I thought about it more, but there were some things that I just wasn't sure about or forgot about. It would probably be helpful to others to see all this extra stuff to augment Wilba's already excellent instructions.
Hopefully I'll get to that after I finish up running the 40x2 LCD bulk order...
-
Any recommendations on aluminum panel thickness for rack-mounted gear? I noted that TK's MB-FM panel for FPE is only 2mm thick which seems a bit thin. If you're putting back-side blind holes (threaded or otherwise) you'll certainly need some depth.
-
Well, it's a nice tray and all, but the tray shipping means that I have to insert each display into an anti-static bag, tape it, wrap it in bubble wrap, and tape it. That box 'o LCDs in bubble wrap is sounding pretty good! :-)
BTW I did a quick test of the first tray of LCDs and they look fantastic. Maybe it's all in my head but the right side of the sample I got from Mouser seems to be just barely brighter than the left. Very trivial, but the new ones look perfect. I ended up writing a simple MIOS app that fills all 80 chars with letters and used a male DIL header pressed into the solder-plated holes like you suggested for testing and it works great. Thanks again for the advice!
-
Current stock: 18 reserved, 1 unreserved.
Thanks to everyone for their interest!
People who reserved LCDs on the earlier thread have until the end-of-day Friday to get me their orders. If you did not reserve LCDs but still want some, go ahead and send me your order per the instructions and on Saturday I will let you know if I have enough available to fill your order based on reserved LCDs that were not claimed. I *may* have a few extras available later if no shipments are lost, so email me your order to secure your place in line for any extras. If there is a lot of continued interest I *may* be willing to do another carton (80 pieces) based on how shipping the first carton-worth works out (and if Optrex still has stock available at the sale price).
To those who have ordered already I will send out PayPal invoices later this week and will pack orders this weekend. Shipments should go out sometime next week.
Thanks,
Chris
@Wilba - Let me know if you want two more for a full tray, but a box that big will probably scream "INSPECT ME!" to your customs office. :-)
-
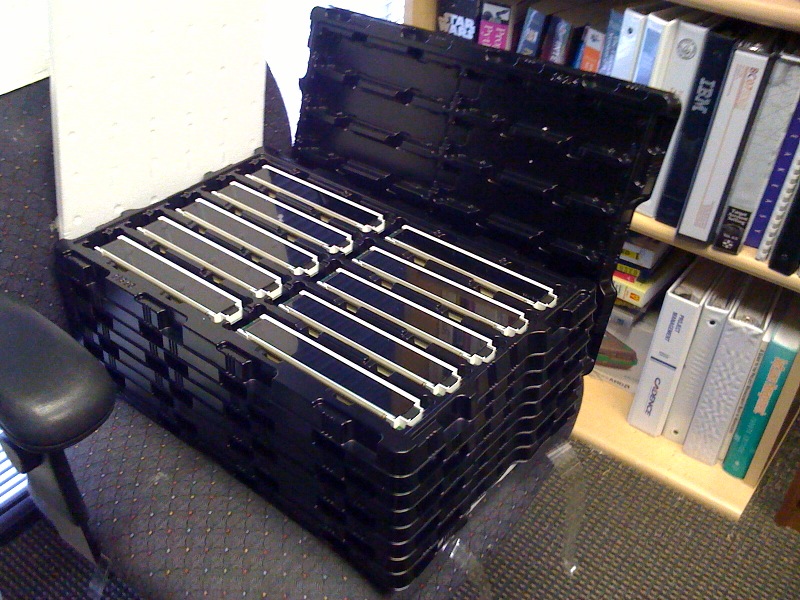
Update - Just got the LCDs from Optrex (see pic!). I need to order some anti-static bags (good thing it is one day shipping from Mouser to me) then I can do a final weight check and send out invoices later this week.
Current stock: 25 total, 7 unreserved
-
Stock remaining: 32
(Assuming everyone who expressed interest on the earlier list buys there are only 12 units still available.)
-
To answer a question posed to me in email - these displays work "out of the box" with the MIDIbox core module. I've tested it on both R4 and R3 revisions from SmashTV with success.
-
You forgot to include an email due date.
THIS IS NOT WILBA STYLE ;)
LOL, what can I say, Wilba's a tough act to follow! :-)
For the record, rosch wins eternal glory for getting in the first official order (thanks!). All hail rosch the nimble!
Stock remaining: 71
-
To correct fussylizard: J4 is just inline with the power supply, it can be used to connect an external PSU (see PSU Option D) or to power other things (if using PSU Option A or B). So testing voltages at J4 is fine, and the same as testing at J1_SIDx
Ah, right. I remembered the jumpers on J71 and J72, but forgot that J4 was open. Sorry for the confusion!
-
@rosch - Thx for starting the list on this thread. I think once you have a list going, it sort of makes it "official" and ensures it will happen. :-)
-
All, I just posted the ordering instructions at http://www.midibox.org/forum/index.php/topic,14045.0.html. Come and get'em!
What You Need to Do Now
If you've already added yourself to the informal list in this thread, (thanks!!) you need to follow the instructions in the new post to get your order to me. I'll reserve the requested number of displays for you for a week (until Sept. 18). After that, it's first-come, first served!
If you are not already on the informal list, just send me your order as described in the order thread.
---
BTW The boxes for shipping just arrived...I wasn't expecting them until next week. Displays will probably be here Monday (I'll post pics!) and I hope to start shipping orders next week.
Thanks for everyone's interest and support!
Regards,
Chris
40x2 Green-on-Black Optrex Displays - ORDERING INSTRUCTIONS
in Bulk Orders
Posted
I shipped all the international orders today! We filled a whole cart - see the pic for the "work in progress" at the post office. Boops, I think the top box is yours. :)
I will send out an email to each of you with the customs # for your shipment later today or tomorrow.
Thanks again for everyone being so patient. I hope the displays bring lots of green goodness to your MB projects!
I still have 11 left so tell your friends!