Phattline Posted June 21, 2007 Report Share Posted June 21, 2007 Before I plan my midiboxes, I search in the I-net for cheap good parts, and download the datasheets.After this I draw a 3D drawing of the Parts. The Drawing supplys all information, on different LAYER´s, like- chematic, drill holes for pcb, holes for the frontplate, soldering points, and of course the high of the part.The rest is Drag and Drop (copy and paste- or if you have a programable gamer mouse- click and click)The following file have following parts in it:3D DWG, Autocad 2004:Switch "DTL2" (Reichelt.de)POT "ALPS-RK11K113" (Reichelt.de)Fader "ALPS-RSAON1211" (Reichelt.de)3mm LED (reichelt.de)5x2.5 LED (reichelt.de)FADER - Manufactur unknown - "C0021N" (Voti.nl)LED-SWITCH "RJS - PB6156L1 - 202"SMD-4051 (conrad.de)2D DWGTact switch "omron" (voti.nl...conrad...reichelt...)Encoder (voti.nl)You have quite fast a Design, you have the measurements the high you can plan it perfectly, and when work is done.You disable all layers you dont need to make a pcb or a frontplate....Have fun...phatlineMidiboxparts.rarMidiboxparts.rar Quote Link to comment Share on other sites More sharing options...
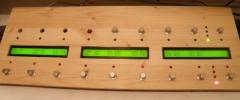
Phattline Posted June 21, 2007 Author Report Share Posted June 21, 2007 3D midiboxPCB design Quote Link to comment Share on other sites More sharing options...
stryd_one Posted June 22, 2007 Report Share Posted June 22, 2007 I like this method but autocad is way expensive :( Quote Link to comment Share on other sites More sharing options...
Phattline Posted June 22, 2007 Author Report Share Posted June 22, 2007 I have the software of my company-laptop...I´m a cad drawer/planer... so for me it cost nothing.And for the others there is a lot of medicine out there ;) - wright? ;D Quote Link to comment Share on other sites More sharing options...
runinit Posted January 19, 2010 Report Share Posted January 19, 2010 Can you upload those files again? I'm using autocad and they look very useful. Quote Link to comment Share on other sites More sharing options...
SuburbanBoy Posted October 25, 2011 Report Share Posted October 25, 2011 i haven't worked with it yet, but Google's SketchUp should also be suitable for virtual prototyping. though i'm not sure how far you can go into details with it. Quote Link to comment Share on other sites More sharing options...
Recommended Posts
Join the conversation
You can post now and register later. If you have an account, sign in now to post with your account.