
Jidis
-
Posts
838 -
Joined
-
Last visited
Content Type
Profiles
Forums
Blogs
Gallery
Posts posted by Jidis
-
-
Hey again Scube,
I think there's one of the example apps in the MIOS download section pertaining to the SID LED display or something. Been meaning to look into that myself (been holding a handful of 4x4 red matrix displays).
Never did see an answer to that motorpot thing. :'(
George
-
I just want a custom drum machine/sampler box that isn't an Akai. I bought a Peavey DPM SP Plus a while back for that, but it was D.O.A. :'( :'( :'(
George
-
Man, I wish that whole thing was open source and had board files for that daughterboard thing. :'(
Make one heck of a DIY project. I can't really see that stopping most of the people who would ultimately have bought an actual Receptor either. It has to be a tiny percentage of musicians who are into DIY on that level. I guess the idea of someone cloning their addons and mass producing a cheaper one sort of sucks though.
George
I could see people modding it into an all-in-one rackmount DVD/MP3 player, hard disk multitrack recorder and who knows what else. :o
-
Just realized the "mist" from that acid seems to have put an orange/brown film on a whole box of router bits and a dovetail saw which were sitting near where I used it the other night. I had it a couple feet inside my shed with the doors open. I guess "outside" means completely outside from now on. :-[
-
Simone,
Thanks! Yeah, these are just regular pots. I was wondering about the consequences of digging around in this stuff too, like if any of the "detent removers" here have ended up with poorly functioning pots/encoders afterward (or over time)?
George
PS- I think these particular detents suck anyway. Some of them already feel sort of "wide" and less distinct. Maybe if I just twisted the pots back and forth for a while, while watching TV or something, the detents would disappear on their own. ;D
-
I guess it's this guy:
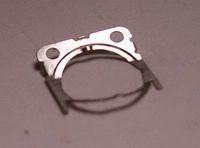
Sort of gooey in there isn't it? So, does it operate fine without that thing or does it do something other than just the detent?
George
-
Robin,
No, haven't tried Comet yet. I got to thinking on the metal and there may be a way I can mix flashing with regular aluminum plate for the panel part, which might be better for the panel anyway. The flashing would've gone on a substrate. I'd still like to see what flashing looks like etched anyway (if that's possible). If removing the coating kills the look, it probably wouldn't be worth messing with though.
I'll let you know if it turns out anything decent.
Thanks for that McMaster link too. That main home page full of links is insane. They probably do have lots of stuff I need from time to time. Do they actually stock all that stuff or are they like that electronics house where the parts get shipped directly from manufacturers all over the place? (that's a heck of a lot of stuff)
Take Care,
George
-
Thanks guys,
I'm going to try to find one I can open in a bit.
@Doc- These probably aren't considered "good", so maybe I've got a chance. Here's a picture where you can see one-
Take Care,
George
-
FWIW, I just dunked a scrap of aluminum flashing into a container of the acid mix and it had no effect whatsoever.???
I figured maybe they've coated it with something (it does have sort of a "greasy" feel to it), so I lightly rubbed a spot on another piece with fine sandpaper. That one bubbled a bit, and now has some dark speckled scratches in the center of the rubbed area, but the stuff is already so thin, I'm not sure that's a solution. Maybe try acetone or something next.
I'd like to see if it could actually take a deep enough etch to make for readable labels. It's flexibility would lend to some interesting corner options for panels. Worst case, I guess straight toner would work (no etch). I've also tried it on plastic laminate and gotten a good print (that stuff can also wrap around a corner to some degree).
Take Care,
George
-
I've seen that mentioned for encoders here. Is it also usually possible for center detented pots, and how much of a pain in the a$$ are we talking about? ;D
Thanks,
George
-
Scube,
Much thanks! :)
That's the type of "cheap" I was thinking of ($4). I was afraid they were like $50 each. :o
Yes, you need the "linear" taper, as they're actually controlling digital circuitry. The normal pots and faders here are 10k, but there have been many threads on using higher values. I think people talk about using 50k and stuff once in a while, so I think 20 is OK.
** Get a second opinion from someone who knows the motor parts here before you buy any though.
Anybody here that can verify that for him?
Take Care,
George
edit---- "Dual" (stereo) shouldn't be necessary for most stuff either.
-
Hey again.
Sorry I sometimes forget we're speaking to people from all over the world. :)
No, your post was fine. I just didn't want to come in and turn it into something else without having an answer to your question. I guess neither of us know where to get the cheap motor pots. ;)
George
PS- Your English is fine too. I couldn't even tell that wasn't your main language.
-
Not to change the subject Scube, but where exactly is that thing "low cost". I remember looking at the stuff when that thread was up, and couldn't even find dealers for any of it (I'm in the US).The low cost model MPH22A7FCP22EGeorge
PS- I think I've asked before, but has anyone ever done a "pot/fader set" mode, like on the non-motorized JLCooper stuff? On those, you hold the shift key and move a fader, and instead of sending fader messages, it compares the current (received) value with the fader's value, and lights either of a pair of LEDs inside two directional arrows, to tell you which way the pot/fader needs to be moved to synchronize with the current values. It doesn't take but a minute to set the whole box (8 faders and 6 knobs)
-
Good call Stryd. ;D
I just checked it and the "e" comes out to 2.43mm (give or take some). Yeah the camera really magnified everything. The bumpy look is indeed the texture of the etch, but you only see that in a large etched area like shapes and graphics. Regular text doesn't really show it, and as Artesia mentioned, I'd guess paint could also cover it. I want to be able to do black panels as well, but was initially thinking of starting with a black panel and doing the labels with toner and white TRF. I'm not sure how you could etch and leave the black, unless maybe you could do an anodized panel or something (if the etchant will still eat it).
And yes- That's the same tutorial. Thanks for the link!
I just shot the thing again along with some familiar faces to get a better idea of the size:
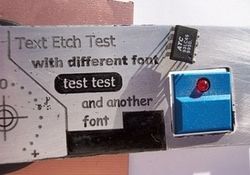
That's sort of a bad picture as far as the clarity of the text goes. Keep in mind also, that this particular etch was a pretty sloppy first run. The semi-gloss black spray was done after a couple other trials, which also included sanding and burning down more metal. The paint doesn't look good either. It came out splotchy looking, as you can still see some of the duller parts. The specks and crap are my fault. I tinkered around with it a bunch, as I wasn't really sure about the etch time. The etchant makes a thick bubbly goo on the metal, which I brushed off a couple times to check the progress. I may have scratched into the paint doing that or flipping the piece around with something, but I didn't think I'd be taking pictures of the thing afterward anyway. ;)
Take Care,
George
-
Ultra,
If you've done no PIC work, the "Easy Microcontrol'n" book from Square One (http://www.sq-1.com/) is pretty easy to get through. It will only take you through some 16F84 stuff, and some of it is probably dated, but I still like it. ;)
I like Predko's "Digital Electronics Demystified" book a lot too (very inexpensive), but don't care for the Programming & Customizing PIC Microcontrollers one I bought. It's poorly organized and hard to navigate (also a bit dated now).
George
-
Yeah, painting the whole thing and then sanding it down lightly (leaving the paint in the recess) was what I ultimately did on that test piece. The original guitar pedal tutorial I read just used the sanded sludge from the masked areas. It ends up going into the recess anyway. That didn't turn out dark enough for my liking. With the deep etched areas, you barely even need color in them to read them, but the sludge was sort of a really dark, flat gray, rather than solid black. Still looks good. Sort of industrial looking though.
Be careful with the sanding part. It's easy for the sandpaper,etc. to rub away at the darkened areas if they're wide enough (not generally a problem with regular text). On my test, I rubbed it across a flat sharpening block. Sticking the panel to a work surface with some double-sided tape and hitting it with a belt sander worked as well (hand sanding with paper may not).
The inverted method for the transfer can get messy too. you're talking about a lot of black (toner) area to be covered. Best to leave the large spaces blank and brush or tape something over them for a mask (I think that was on the pedal tutorial).
George
PS@Robin - I like that pitting thing too. It's easier to see with gloss paint in the etch. Here's a picture where the glare hit it more:
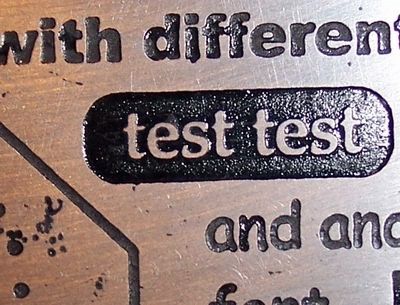 - BTW, that black area that says "test test" is really only 5mm tall.
 -
Btw i spy a neve eq :) ...whats the story with that one ? ..hopefully, liike the SSL Comp, its not a small fortune in hadrd to find components ;)
If you mean mine, I sort of doubt it ;)
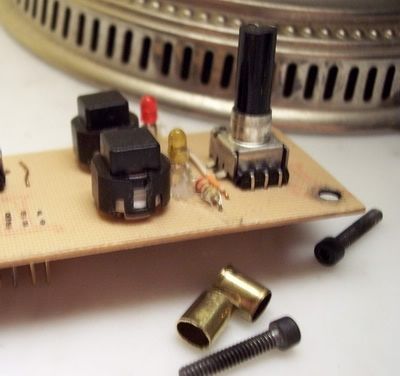
You'll need a 74HC595, a 165 and a PIC (it's got an MB64 app in it ;D). It just runs as a front end for the 1073 plug from the Universal Audio software. ...Well, it could. I think I used it once and then ripped it apart for some reason. I may do another later with a better panel and I wasn't happy with the case joinery either (it's a CDROM box). once you rip the "side" off a CDROM case, it becomes really flimsy and has to be reinforced. I learned some junk when I did that one, and built a small cheap metal brake for bending, so I may have better luck on the next. If you saw that one picture with the pile, you'll know I've got a few to play with.
George
PS- If you get any good techniques (and pictures) for filling in the etched areas in the aluminum, please post. :)
-
Artesia,
If you're getting good with the toner procedure, definitely consider the aluminum etching for that SSL panel (unless you're already set on a different style). The black on silver looks really good IMO on analog stuff like that, especially with some old style glossy black or bakelite knobs. Sort of looks like old Teletronix era hardware (maybe not that good ;)). I've done a few things with plain black toner labels (with a thin topcoat), but will likely be moving to etched aluminum. There's a picture of my first attempt at that in that aforementioned thread of RTurner's. Should work really well, but I'd like to revise the "darkening" part of it, and maybe learn how to use colors. BTW- That was done with Ferric Chloride. I'll be trying the new acid mix next time.
This is a thing under the desk here at home (mixes audio outs from the computers):
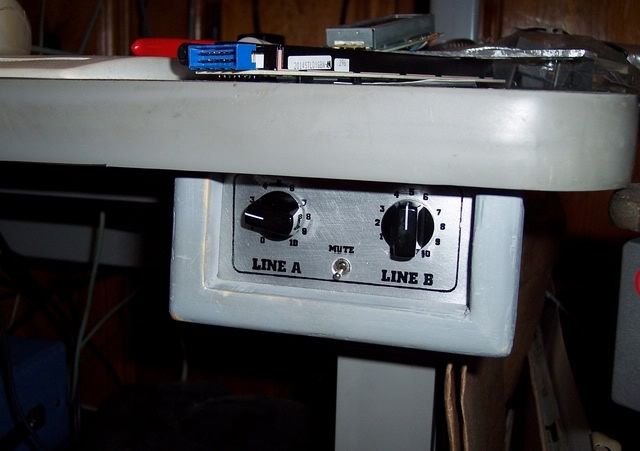
That's the style of knob I meant. I'm holding a bunch for a cue mixer if I ever get the time to build it. That will be the same style, but with buttons, lights, and way more knobs. There are some pictures of a silver EQ controller here as well (about midway down)-
http://s5.photobucket.com/albums/y193/Jidis/
That's also just plain toner. I may do it over with an etched panel now that I know how. The etch method also allows for different surface textures. Before, I had to keep a relatively slick surface on the aluminum, for the transfer. If etching, I can smooth over the final panel however much I desire. The test in that other thread was hit with a really fine grade of paper on a belt sander (for a "brushed metal" look).
The toner/aluminum will take some getting used to. It heats differently and can blur things if you're not careful. Spraying the surface with clear acrylic helped grab the toner and allowed me to lighten up on the heat and pressure for cleaner lines, but with the Staples paper, I may be able to do that anyway. That paper just leaves a nasty film, but if I'm just using it as an etch mask, it won't matter anymore.
Also, I built a heated bubbler tank like you're looking into, but after the first couple uses, it hasn't been set up again. It still may be worthwhile for large boards, but it's a pain to set up and clean, and it requires way too much etchant to sufficiently cover the heater (my main complaint). The acid is doing really well unheated, so I may be fine with that most of the time. On the plus side, the heated bubble tank did really well with some otherwise "useless" FeCl. It really brings out the best in that old dirty stuff.
Like you, I also played with some Sodium Persulfate not long ago. Indeed, it can be a lot of trouble. It did one really great etch, and I was never able to get any mixes to work too well afterward. It seems to change a lot after you mix it, and I never did find very good recipes online for normal measurements like we use. I found it locally and was able to get 500 grams pretty cheap. If anyone knows a working formula to get an amount of etchant in the 1 to 2 cups range, let me know. I'd like to still use it once in a while for doing stuff inside.
On the woodwork stuff- I've gotten by for almost two decades with no table saw. I use a combination of a radial arm saw, a giant DIY router table with a jointing fence to clean up edges, and an assortment of hand-held power tools and jigs. The radial can do much of what the table saw does in a tighter space. It doesn't require all the room at the front and back, as the work actually remains stationary. It can also rip and do all sorts of weird angled cuts, and I've got everything from sanding drums to dado and molding head cutters to mount on the arbor. For larger cabinetry and sheet material, I usually take stuff outside the shop on sawhorses, with an edge guide clamped to the sheet. I'll use the circular saw for that and make a sloppy cut, usually about an eighth inch over what I need. I can then usually take that inside and run it across the jointer a few times to get the edge square and straight and burn down to my layout line. It works out pretty safe (the router table is one of the things I'm least afraid of).
Take Care,
George
PS- I get treated like a hairy, hippy unabomber terrorist at most of the places I go. Buying the muriatic acid was ironically one of the few occasions where I didn't get treated like that. The guy actually opened a "double jug" case to sell me a single jug when I told him how much I really needed. Apparently they're not allowed to do that (there's a regulation involved). He went with me to the counter to explain the sale.
-
Hi,
Did you make the call for MIOS_AIN_UnMuxed (I'm usually in assembler)?
If it isn't in that app, I guess you'd need to add something like
call MIOS_AIN_UnMuxed
to your main.asm or somewhere. You can see it in the USER_Init code in apps like the MB64, but there it uses an "if/else" because they have that DEFAULT_MUX_ENABLED user pref. I think all you'd need is that one call, but make sure you've got your number of pots or whatever else you need set correctly as well.
Hope that helps,
George
-
The MSH was a longhaired guy from some Japanese site holding out a big foot-long submarine sandwich thing horizontally with both hands, while wearing one of those pointy looking masquerade masks that just covers the eyes and nose (maybe wearing a cape too).
- On the "alternative etchant"- If you start off scared of it, you should be fine. Just don't treat it like FeCl until you've seen it fizzle a bit. ;)
Take Care,
George
-
Evan,
Couldn't help but wonder when I first read this: Is there no regular MTC output from modern day ProTools (I left back in the NuBus days 8))?
BTW- I've wanted a JLCooper CuePoint ever since it was actually current, and finally got around to grabbing one about a month ago. Thorsten's MTC/MIDI Clock code kicks the crap out of the CuePoint's display. There are many ways to configure it, so maybe I'll find a better one, but the display's response time is horrible and it's missing some of the "follow while not in play" type of features. - Another vote for the MIDIMon!
George
-
Well if this stuff's anything, it IS cheap. ;D
Here's one of Robin's posts, but there are some other sites on the web as well:
http://www.midibox.org/forum/index.php?topic=7775.0
The acid is some sort of brick cleaner or something (I think). I used to sell roofing supplies and we had it, but it's at most hardware stores. My mix can get pretty sloppy and it still always works. I think I go roughly 1 part acid to 2 parts Hydrogen Peroxide, but Robin should have the true recipe in there somewhere.
Just be warned- Wear long rubber gloves and goggles, keep a roll of paper towels and a bucket of water (and maybe some baking soda) nearby, work outside (away from everything) and mix slow until you see the reactions. The cloud that comes off the acid can knock you down (even before you mix it). Try to inhale away from all the stuff while you're working.
Good Luck,
George
PS- I can't see the name Artesia now without thinking of that masked "sandwich holder". ;D
-
Maybe different setups (printers, toner, paper, heating methods, interpritations, patience) all give different results
That's the conclusion I've reached as well, and while I get pretty consistent, good results here, I'm always living in fear that my toner cart will run out, my iron will die, or Staples will change paper and I'll never get the right combination happening again. :'(
On the bright side, I'm on an HP LaserJet 6L right now, but have used an old Sharp printer/fax with good results and even had decent luck with a regular copy machine from my father's office long ago (before the Staples paper or the modded iron). I'd recommend anyone interested in it, try swapping out factors (iron/paper/printer) to try to pinpoint the problem if the results are consistently crappy. One of those things will likely be the culprit.
With this current config., I can get really clean results with slightly lower than maximum heat, and a bit less pressure, but for longer durations of total time, moving the iron from point to point around the board for 3 minutes or more. Too much heat and pressure was blurring my lines before. I think with a bit less of each, you can spend more time seeing that each spot gets a decent bond without risking too much.
BTW- Artesia, you may want to experiment (carefully) with the Muriatic Acid/Hydrogen Peroxide mix that RTurner and I are into if you haven't already. I seem to be getting more even, quick etches with that, with less over/under etched areas.
Hope you enjoy the convenience of the toner!
George
-
Hey again,
After working on mine again, I realized that the power LED doesn't actually light until the adjust pot hits a certain point, so that's on now. :)
At the test header however, I wasn't able to get the supply up to spec. though. With the pot maxed out, I can get 12.07V tops (supposed to be set for 12.5 & 13.1 for the 16F).
Double checked my input supply, and that's putting out 18.5VDC.
Yeah, I had the 317 in the correct (reversed) position. I actually ended up finding a TO92 version of the 7805 here. I'll probably try to get that style of 317 later too, as it is awkwardly large and has already lifted a trace (all connections are still OK though).
Anybody got any idea why I can't pass 12.07 volts? ???
George
<<<< EDIT >>>> -Just tracked the problem. The 2.2k trimmer was reading closer to 1.8k. The board I pulled it from had a bunch, so with a more well behaved one (2.1k?) I can now get into the 14 and a half voltage range. :)
Where is the led matrix?
in Design Concepts
Posted
Speaking of these things:
I've been holding a few red 4x4's I got last year. Scube has me interested in them again. ;)
I don't appear to have a datasheet for them. If anybody knows the pinout or the procedure for mapping it out myself, I'd appreciate it.
They show as being Sharp brand. On the side, they say " .S LT 5107D 5 ". They have two rows of 4 pins.
Thanks,
George