

TK.
-
Posts
15,248 -
Joined
Content Type
Profiles
Forums
Blogs
Gallery
Everything posted by TK.
-
Hi, as explained in the ChangeLog you have to update MIOS (-> V1.9g) to get the encoder properly working again. Best Regards, Thorsten.
-

Easiest way to download a project source code
TK. replied to HUROLURA's topic in MIDIbox Tools & MIOS Studio
For windows you could use Tortoise as a SVN client as described in the Wiki: http://www.midibox.org/dokuwiki/doku.php?id=windows_toolchain_svn Note that this tutorial has been written for MIOS8, for MIOS32 it's similar (download svnmios.midibox.org/mios32), but the toolchain is different. There are many detailed postings about the MIOS32 toolchain in the forum, but I'm too lazy to use the search function to give you the appr. links. Best Regards, Thorsten. -
I'm sorry, but I have to close this topic as you haven't aligned such a "bulk order" with SmashTV. Background information: Please discuss the options to save shipping costs with us before starting such a order! Best Regards, Thorsten.
-
Easiest way to download a project source code
TK. replied to HUROLURA's topic in MIDIbox Tools & MIOS Studio
Since you haven't specified if you are working under Windows, MacOS or Linux, I give you the command which works under MacOS and Linux: svn co svn://svnmios.midibox.org/mios You could also upload code to the repository, but this requires SSH access (see programmers lounge - I gave you access to this hidden board) Best Regards, Thorsten. -
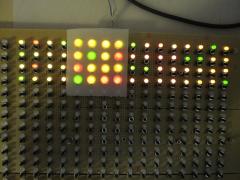
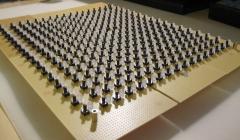
From the album: TK: BLM16x16 + X
-
It's too early to give you the construction details about this project - first I want to complete it and test the robustness before anybody else starts to build it (or starts with PCB layouts...) I will create a new webpage once the project is finished. Best Regards, Thorsten.
-
Sounds like you haven't mounted all parts of a DIN module - especially the 10k pull-up on each 74HC165 SER input is important to ensure that no unindented button function will be triggered. If all parts are mounted: check the soldering joints around these resistors. Best Regards, Thorsten.
-
Matching switches to protoboard/veroboard holes
TK. replied to findbuddha's topic in Parts Questions
You could also use a small screwdriver to widen the holes. Best Regards, Thorsten. -
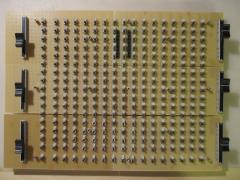
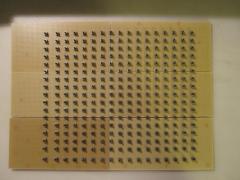
From the album: TK: BLM16x16 + X
-
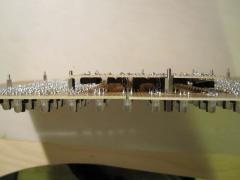
From the album: TK: BLM16x16 + X
-
 No filing required - I only had to reduce the size of the middle boards with a cutter so that the second button row is between two boards (was done in 1 minute). Thats the reason for the small gap between second and third board row. But this gap doesn't hurt, the distance between buttons stays identical.
 -
Ah alright, so you need more randomness for a single light. I would take a microcontroller (can be a real small one) that outputs a pseudo random pulse train, e.g. with a linear feedback shift register algorithm (LFSR) Building a LFSR with discrete logic is too complex/expensive. Using a discrete true random generator (example) is a bit easier to build, but it wouldn't give you enough control about the effect (and this was your request) Best Regards, Thorsten.
-
Yes, it will work. The circuit looks similar to these ones: http://www.midibox.org/dokuwiki/doku.php?id=bipolar_12v_psu Best Regards, Thorsten.
-
http://www.free-electronic-circuits.com/circuits/8-random-flashing-leds.html
-
Are you a Mac or Windows user? Could you please check with a MIDI Monitor that only USB1 sends the MIDI clock? Best Regards, Thorsten.
-
Great find! With this simple design the participants will be less busy with building the device, but more busy with drawing the perfect tune :) Best Regards, Thorsten.
-
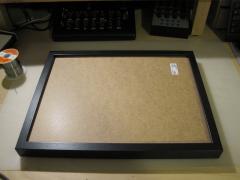
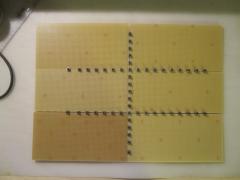
From the album: TK: BLM16x16 + X
Ikea Ribba 30x40 cm for 10 EUR Guaranteed worldwide available ;) -
From the album: TK: BLM16x16 + X
-
Hi, so long the MIDI interface only sends the clock signal (0xf8) and nothing else, it should be possible to create a discrete solution with a 1:6 divider (because 0xf8 is sent 6 times for each 16th step). Once other events are sent as well (such as 0xfa for MIDI start, 0xfb for continue, 0xfc for stop), it will get a bit more complex if you don't want to use a microcontroller. Best Regards, Thorsten.
-
Hallo, da die LEDs durchgaengig leuchten, liegt das Problem wahrscheinlich an der SC/RC/SO Verbindung zwischen Core und DOUT Modul. Unter http://www.midibox.org/dokuwiki/doku.php?id=din_module findest ein paar Hinweise, wie sich der Fehler mit Hilfe des SRIO Interconnection Test finden laesst. Weitere Infos gibt es auch im entspr. README Gruss, Thorsten.
-
You will love it :) Song names with 20 characters are already prepared, but they are not editable yet. I'm not sure if they are really so important anymore since the new session concept gives you a better way to name (and organize/backup) your projects anyhow. Best Regards, Thorsten.
-
To everybody who suffers from wet dreams about huge MIDI controllers made for Ableton Live: don't watch this video! :) http://vimeo.com/11091676 Julien wrote a decent documentation, which is located under http://www.julienbayle.net/diy/protodeck/ Alternative link to the MIDIbox Wiki: http://www.midibox.org/dokuwiki/doku.php?id=protodeck Discussions about the project for people who are interested to do something similar:
-
From the album: TK: BLM16x16 + X
-
From the album: TK: BLM16x16 + X
-
How to port mios32 to other microcontroller?
TK. replied to Arkadiuz's topic in MIOS programming (C)
Since your uC as only 64k flash and 16k RAM, I can already inform you that the resources are not sufficient. Thats the current memory usage of MBLC (Logic Control == Mackie Control) Macintosh:midibox_lc_v2 TK$ make -s ------------------------------------------------------------------------------- Application successfully built for: Processor: STM32F103RE Family: STM32F10x Board: MBHP_CORE_STM32 LCD: ks0108 ------------------------------------------------------------------------------- text data bss dec hex filename 62400 96 14328 76824 12c18 project.elf [/code] text = flash bss = RAM ...and the application isn't completed yet Best Regards, Thorsten.