

nebula
-
Posts
943 -
Joined
-
Last visited
-
Days Won
4
Content Type
Profiles
Forums
Blogs
Gallery
Posts posted by nebula
-
-
I have a MB-6582, and in every way it exceeded my expectations of what I thought I would be. It really sounds great (I have 8x 6582), and the programming is shockingly deep.
I have messed around with layering multiple lead engines, and it really sings when you do. I find that on the whole, the machine excels at ridiculously big leads, very dark bass sounds, gritty sound effects and dubstep wobbles.
I produce techno, and I often find that when my track is missing that little extra bit, I'll muck about with the MB-6582 and come up with a percussive part or two that give me just that little bit of dirt that I need. Be forewarned that sometimes the SID gets sloppy with really busy percussion bits. I think this is part of the nature of the SID itself, not the PIC implementation. For this reason I always record the MIDIbox to its own audio track and record multiple takes.
Sometimes I bring it out with me for live gigs. It consistently turns heads, and I get to tell everybody I built it myself.
@ytsestef: I suggest you throw your ideas out in this thread. Since you don't have a MIDIbox SID of any sort yet, you can't be sure that the ideas you have aren't already implemented in some other way. TK may or may not chime in. Once there has been some discussion, and if TK has not yet said anything, then send him a PM to draw his attention to the thread.
I've made a few suggestions over the years. Some have found their way to the UI, and others were shot down (like "it already does this if you press shift").
-
Don't forget that for boards that aren't really intricate, you can usually get decent results drawing the traces with a permanent marker (like a "Sharpie")
If you want slightly more controlled results, maybe you could find some dry-transfer (letraset-style) circuit board markings. Radio Shack used to sell them, I don't know if they still do.
Look at the pictures on "step 5" on this page: http://haroldsbeambugs.solarbotics.net/Index3.html
... you just rub them on to the copper clad board with a pencil. Years ago I had GREAT results doing this, but now I'm using toner transfer for the rare occasions I make boards.
You can get AMAZING results submitting your Eagle files to Laen's group panel order, where for $5 per square inch you get 3 copies of your design, double-sided, solder masked. I have used his service a few times and the quality is excellent, and it's a great value if you don't need a huge board. His website url recently changed (from dorkbotpdx.org):
-
Depending on how much coding you don't want to do, another option is to use more than one DOUT pin connected to each LED, through different values of current-limiting resistors. Not as economical, but probably easier to code (and no flickering)
-
PM sent, requesting one GM5 module, if you are willing to ship to Canada! :)
-
May 28, 2012. 4:00 PM
at Foran’s Grand Trunk Pub, 612 Woodward Ave, Detroit, Michigan, USA
Admission: FREE!
This sweet little place has a patio, a fantastic selection of beers, and really great pub grub. If you’re in Detroit for the festival (heard of it? DEMF? Movement?), this makes for a really nice Monday afternoon getaway for those who don’t want to stand in the scorching sun with a 10-dollar Bud Light Lime and a corndog.
Starting at noon The Grand Trunk Pub will feature beats all day, delivered by some of Detroit’s greatest underground talent. A 4PM guest timeslot is reserved for ... me ... of course. I'll be playing my usual glitchy techy style, complete with MIDIbox SID MB-6582 in foreground :)
http://juggernautmusic.com/2012/05/nebula-live-may-28-detroit/
-
The schematic you link assumes the SID boards have their own regulators. You can stuff each MBHP SID board with a 7809 (6582/8580) or 7812 (6581) and they will work with the power supply schematic exactly as shown, which delivers a pretty good 14 VDC.
This is not the only approach you can take of course, but if you want to use your C64 power supply, this little circuit is the way to go for a MIDIbox SID made with discrete Core and SID modules.
-
Hi TK, your board looks amazing - again! I like "integrated core" designs, and I think this is the first time I've seen you do it.
I was trying to ask is how you program the dynamics in the sequencer, and what is the visual indication? (In my last post in this thread I thought up the question faster than I could type it)
On the TR-909, if a step is "off" and then you press the GP button once, you've turned on that step with quiet dynamics. The corresponding LED lights up, but it's dim. Press the GP button again, and you've bumped the step up to loud dynamics, and the LED gets brighter. Press it a third time and you've muted the step again (and the LED goes out).
The two nice things about that method: (1) it's very fast to program a beat with lots of dynamics, and (2) you can tell at a glance which steps are loud and which ones are soft.
Are you planning anything similar for the user interface? Is it possible to dim the LEDs by pulsing them?
-
I see nobody's answered you yet so until you get a response from the likes of Wilba hopefully this will help:
North American users with C64 power supplies need to solder a piece of wire where the power jack is. But I suggest you find Altitude's recent post about using a new switching regulator which allows you to use a simple 12V supply.
Also, there is a problem with the LCD connector - something about the way the contrast is wired - sorry I can't remember what that is right now.
Apart from that, my build tips would be to make sure you use the typical low-profile crystals, and mount the electrolytic capacitor near the bottom centre of the board so it's laying on its side. There's less clearance down there than you might think.
-
The original 909 had a vast area of wasted space at the top. I would support limiting that space or using it to spread out the pots so you can get your fingers all the way in between the knobs. You could also use bigger knobs. I don't think you'll find many "pro" devices that would make that design mistake these days so why repeat it? Otherwise the large size doesn't bother me.
I completely disagree. First, regarding size, the 909 is as big as it is because of the component count, and the thru-hole style of circuit board. Have a look at the pics at http://hackaday.com/2008/06/18/tr-909-teardown/ which pretty clearly show why the machine is so big.
As for the grouping of the controls: I have used the 909 extensively, on stage (live programming on-the-fly) and in the studio. I find the spacing of the controls to be very comfortable (most mixing boards are more cramped than the 909), while the extra "white space" at the top of the machine is a great place to rest another small device, or my headphones, or my glasses. And it looks so BITCHIN!
IMHO The TR-909 has a tasteful, minimalist look that doesn't detract from its usability.
-
I don't recommend you install them until you're sure you need to.
-
@technobreath: now that you mention it, I think you're right, the mini-resistors still needed to stand up in the MB-6582, but I was able to lay them flat in the x0xb0x.
@blat: it's not heat shrink, those older boards have old-school resistors which are manufactured pre-bent with the exposed part of the lead dipped in the same resin that coats the resistor. I don't think you can buy them like that any more. It's totally not necessary in this application - there are lots of exposed conductive parts on a PCB anyway. It could only be a concern if there is a loose screw or something rattling around in the enclosure.
The 1.2K resistor on the slave cores is not necessary in any standard build. I think you would install them if you were adding additional MIDI IN ports for the slave cores.
-
Some boards are designed so that the resistors stand up on one end. Usually this is to save space. Using Google I quickly found these two images as examples:
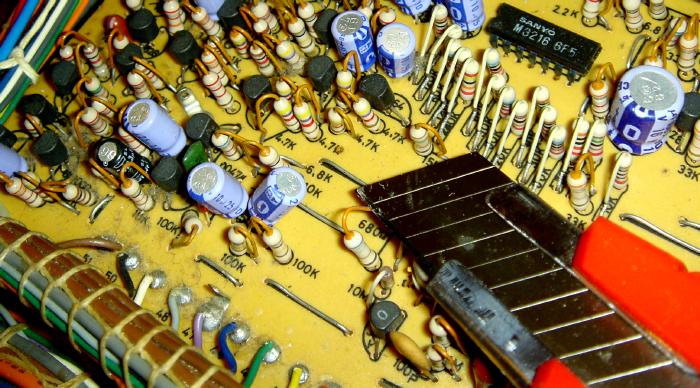
Theoretically, resistors mounted in a "stand up" fashion like these may be slightly more prone to developing intermittent solder joints due to vibration, but in practice the difference is mainly cosmetic. LOTS of boards have resistors mounted in this way.
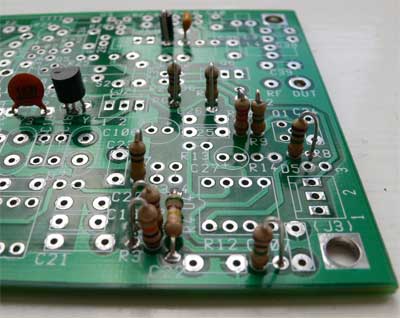
If you don't want to mount your resistors like this, you can use smaller resistors, but you must observe the wattage rating. Miniature resistors are 1/4 watt resistors in a 1/8 watt package. I used them on my MB-6582.
I'm attaching a shot of the miniature resistors like the ones I used in my MB-6582 (but the shot is from a different project). Click the image below to see what I'm talking about.

-
In MIDIbox SID, there are two different uses of the word "engine". The software uses "engine" to describe the programming modes, such as "drum" or "lead". A single PIC supports all of these engines (or modes) - they are like resident programs.
"Engine" is also used on the MB-6582 (the 8-SID monster synth you've no doubt seen in pictures floating around here) to describe a Core+SID set. The MB-6582 has up to 4 SID pairs controlled by 4 PICs, which can be selected for control from the front panel using the "SID Engine" buttons.
Let's put it another way: a SID Engine is simply the chosen parameter set for a given patch, all handled (albeit not simultaneously) by a single PIC. In a multi-SID setup, a SID Engine could also refer to one of its Core+SID modules, each of which has its own selectable software "engine".
Is that sort of clear?
-
I responded too. Can you share your findings, or your thesis with us??
-
MIDIbox SID can be fully programmed using the most minimal control surface (LCD, a few buttons, 1 encoder). All the additional control surface controls make it faster to get to certain functions. Programming patches becomes faster and more intuitive, and the knobs can be fun if you want to tweak the sound as you play.
If you just want to play preset SID sounds (the included presets are pretty good), you don't need any of it. I still recommend the minimal control surface ("step B") though, so you can see patch names.
You can also create SID patches with your computer using editor software available around here (I don't use it personally), which may negate the requirement for a lot of controls.
As far as the bassline, lead, drum engines ... if you want to play monophonic 3-oscillator SID sounds, most of your time will be spent with the lead engine. The other engines are optimized for different things. Drum and bassline have built-in mini-sequencers and a few parameter optimizations for creating some pretty damn cool little grooves. But it is all available to you with the most basic MIDIbox SID.
-
I googled "raystar oled distributor" and found a few leads, like
http://www.review-displays.co.uk/
http://www.masters.com.pl/en,el-displays
... whether these people would sell small quantities may be another story ... might be worth contacting them though
-
Knobs made it in today. Thanks Altitude!! (Now all I need is everything else for my 808)
-
by doing this, the software only looks for the first 3 inputs on J5, the other 5 are not looked at and therefore i do not need to ground them.
Correct - but it's still good practice to do so.
-
Wowwww.... I have been wanting to do exactly what you're doing for a long time. I have a Sequential Six-Trak and I think the 3394's sound so nice, but its Z80-based implementation is so limiting by today's standards - slow envelopes and coarse resolution on controls.
I could check the voltages on the VCA pins if you like to figure out what the chips are getting in the Six-Trak. Might take me a few days to get to it though, so let me know!
-
I want to populate my GM5x5x5 board. I had a spare chip but it is lost. I had taken it out of its packaging and I think it ended up on the floor, and later in the trash :(
PM me if you have an extra that you wouldn't mind selling.
Thanks
-
can anyone help me with a stripboard plan of the core v3.
Total newbie to this and any help is greatly appreciated
Hi, if you're a total newbie, you would be way better off getting a kit from SmashTV (http://midibox-shop.com/) in USA, or Mike's (http://www.mikes-elektronikseite.de/) in Europe. It is possible to do a Core on a stripboard, but it would be a lot of work.
-
Thanks for your patience Altitude. If I'm not too late ...
50 x DR110 006
Caps (colour / pointer):
15 red / white
35 white / black
10 black / white
10 black / no pointer
... and I would also take 25 of those black/grey/red oddballs if there are any left.
-
Doug posted about it today at http://electro-music.com/forum/viewtopic.php?p=353389#353389
Hopefully nobody will mind if I re-post it here. Apparently he has plans to produce a 9090-like set of two boards with 808 voices once he ships the MB-808 kits...
Well, the bad news is that I'm in the middle of yet another business trip. I fly back home Friday. The good news is that I think the MB-808 PCBs will be there when I get home!My current plan is to get the current (batch 3) kits shipped, then to build the prototypes of the voice only boards (two boards with six voices each). At that point I'll decide whether batch four is going to be the voice boards or the entire board with sequencer. I'm planning to finalize the stand alone MIDIbox drum sequencer and test it with both my 8080 voice board and Trev's 9090 voice board, so there will be two ways to build an entire 808 clone with sequencer...
Regards,
Doug
-
The velocity levels will be controlled by additional DOUT shift registers + a resistor network (similar to the original TR909 design).
Since the number of DOUTs is limited to 16 maximum, only 10 velocity outputs will be available, but I think that this is acceptable for most cases (e.g. Open/Closed HH can be shared)
Thorsten, this sounds excellent. I have a couple of comments / suggestions, sincerely intended as constructive input ...
(1) Do you really need all 8 pins of a DOUT for drum machine dynamics? The TR-909 sequencer only offers two dynamic levels per step (not for all sounds though). Even if you use 4 pins, that could still allow 16 levels per sound and you could use a single DOUT IC for two voices' dynamics.
(2) How do you plan to add such a great deal of velocity control to the MIDIbox 808 UI? The TR-909's two dynamic levels are cycled through as you press each step ("GP") button.
(3) I haven't looked in great detail at the 9090 schematic, but I believe it somehow uses the only a single resistor array to achieve full dynamics for all drum voices.
(4) Finally, I wonder if MIDIbox 808 is still a good name for this project, for a couple of reasons. The MB-808 is a TR-808 clone, of sorts, and a MIDIbox-based drum sequencer powers it. The sequencer is similar to the TR-606, and soon also the TR-909/TR-707, but it expands on those sequencers with numerous really cool, modern features. The name "MIDIbox 808" leads newbies to believe that the ucapps project is an 808 clone, when in fact it is much less (no sounds) and also much more (more comprehensive sequencer). Maybe something like "MIDIbox0x" or "MIDIbox beatbox" or "MIDIbox drumSEQ" describes what you're doing without suggesting that it strictly clones the 808, and also distances this multipurpose sequencer from the MB-808 project.
where to get the last MIOS Studio for Mac OS 10.x ?
in MIDIbox Tools & MIOS Studio
Posted · Edited by nebula
Well I have it working on 10.5.8 so I just zipped my .app - I think it should work.
Try it: (right click and save as... then unzip into your applications folder)
[[ link removed ]] :hmm: