snebenan
-
Posts
46 -
Joined
-
Last visited
-
Days Won
1
Content Type
Profiles
Forums
Blogs
Gallery
Everything posted by snebenan
-
Ah, I have suspected that but never found a good reference that says it's a "undocumented feature". But I trust the green alien I found on the internet. ;) //Peter
-
Congratulations on a successful build ;D The auto mode can be very brutal. at least mine goes bezerk in Auto mode. ;D Update. I must have been using dry cardboard or somthing for cables during my last testing. The hum and noise is completely gone. Unless I try the Auto release mode when it goes into berzerk mode. ??? but mayby that is supposed to happend on the sixth release option? If you look at the controller PCB on the ssl.pdf at Gyraft site http://www.gyraf.dk/gy_pd/ssl/ssl.pdf Did you put your release Switch to 5 or six positions? Mine is set at 6 and it's the last one that goes weird (rather nice if you want metasonix style distortion) //Peter
-
Nah, I'm just a happy newbie aswell. You'll be happy too when your SID makes it's first beeps :) Good luck!
-
Because there are two powerlines in PSU (5V DC, 9V AC) and both need to have a switch if you want to shut it down without pulling the plug. If you have a C64 you can use that Switch, otherwise a dual switch should be easy to find. //Peter
-
SIDbox in Progress, Core Done, LCD Working, DIN4X trouble solved?
snebenan replied to snebenan's topic in MIDIbox SID
Well, no bankstick for me yet. I got stuck playing leadsounds all night. Just a simple sound with some delay/reverb and woha! Awesome! ;D Next steps are -bankstick -DIN -buttons and encoders ( And here I guess i need to edit some source code right? ) -Second Sid -Feedback -Hard Clipper My evolver is looking jealously at the SID right now... ;) //Cheers! -
SIDbox in Progress, Core Done, LCD Working, DIN4X trouble solved?
snebenan replied to snebenan's topic in MIDIbox SID
Thanks. I bought it from here http://www.fractronics.com/ (For once I could find what i wanted in Sweden...) But you can't buy them there anymore since PLED is going the same way as laserdiscs... I found the old product description though. http://www.fractronics.com/2x20oled_new.shtml (btw. I bought two so if one fails I have a spare, i hope won't need it.) //Cheers -
SIDbox in Progress, Core Done, LCD Working, DIN4X trouble solved?
snebenan replied to snebenan's topic in MIDIbox SID
Ok, MIOS v1.9f uploaded without any problems. SID and 74HC595's populated. But when uploading the "setup_8580.hex" the first big chunk of Sysex is sent and then nothing??? Try again, Nothing Restart Mios Studio and Core, still can't upload. Ok, time to panic, run for your life I'm going to ask a question!! Wait, i'll restart MIOS studio and try it once more. Yes! The sysex is flowing! :D after 40 seconds of hexadecimal ligo My LCD says [tt][glow=black,2,300]E002|A001*Ld Chn. 1 1***|Lead Patch [/glow][/tt] I guess I'm going to need that bankstick now... Joy! -
SIDbox in Progress, Core Done, LCD Working, DIN4X trouble solved?
snebenan replied to snebenan's topic in MIDIbox SID
Ok, downloaded Java Runtime and MIOS Studio and connected the Core to my midiinterface (Midisport8x8/s) On power on I got a sysex message: 00000000065780 ms | Sysex message: F0 00 00 7E 40 00 01 F7 And according to the walkthrough this means the Core is happy and want more action. Yay! ;D Core Voltages OK, Core OK, SID Voltages OK, Hmm I think it's time to stuff my deploy the 8580... //Peter -
Yes, i've looked at the prodigy-pro forum but I think I lost my motivation somewhere at page 32 of 171. The posted sympthoms just didn't match mine. Oh, I see that they have cleaned up the SSL help thread. Cool! I will give prodigy a new chance. But then there is this lack of free afternoons... ;)
-
Yes, I was warned, old topic etc. Still nice info for rookies like me ;) Thanks Roger! //Peter
-
I have built one of those but still have some problems with it. ??? Mainly due to me being a newbe in electronics. Also the 230 voltages are a bit scary... If you get yours up and running maybe I can ask for some voltage measurements to see where mine is messed up? //Peter
-
Just stumbled over these awesome tutorials when searching for a really small headamp design. http://tangentsoft.net/elec/movies/ The tutorials are as videos as well. :) Maybe that will help some other newbe getting started soldering. //Peter
-
SIDbox in Progress, Core Done, LCD Working, DIN4X trouble solved?
snebenan replied to snebenan's topic in MIDIbox SID
I will probably end up known as the slowest Sid boxer ever... But at least it's going in the right direction. :D I've soldered my sid board and just did some voltage checks: With only power connected to the Sid PCB (without IC's) I got 9,07V on leg14 - leg28 on the SID socket. Good! Btw I did a silly misstake here, I switched my +/- 5V first causing my voltage to be only 7,37V. But I color coded my + and - cords so I could spot it rather quickly. After connecting core and Sid board: IC1: leg 14 - 25. 5,31V IC2: leg 08 - 16. 5,31V IC3: leg 08 - 16. 5,31V Still a bit high, but my meter was very cheap ;) Next is to load some code into that PIC and see what will happend. I'm expecting LCD troubles (4bit issues) but you never know. Cheers! //Peter -
SIDbox in Progress, Core Done, LCD Working, DIN4X trouble solved?
snebenan replied to snebenan's topic in MIDIbox SID
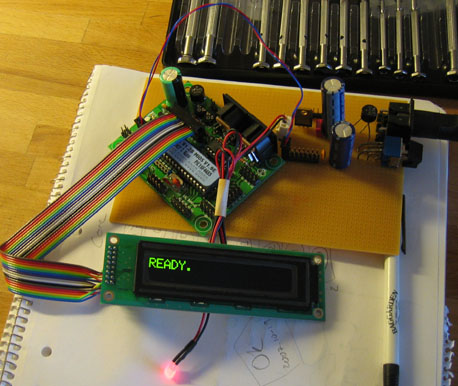
Ok, I finally got some spare time to finish my core. I did some measurements before plugging in any IC's PIC: pin 1, 11, 32 5,33V Pin 20 5,28V Optocoupler pin 8 5,33V Looked OK to me so I plugged in IC's and attached LCD and threw the switch and see a black LCD, hmm maybe i should try to adjust the contrast? [glow=black,2,300]READY...[/glow] Aah much better, It's ALIVE!!!! =D Next step is to solder the SID pcb. /Cheers
-
Being a newbee myself and having just finished the optimized PSU I can say that it is simpler than it first looks. The schematics look big and scary at first but if you break it down to two power rails of 5V and 9V it becomes a bit easier. I have 2 C64 transformers, one has only 4pins and one has 7. I measured their voltages and it matched the information in the german C64 wiki. Looking at this exellent little guide togeather with the schematic pdf makes it easier as well. http://www.danielprice.org.uk/synth-diy/sid_2.htm The hardest part for me was actually to desolder the switch and PSU connector from the C64 mainbord ;D /Cheers //Peter
-
SIDbox in Progress, Core Done, LCD Working, DIN4X trouble solved?
snebenan replied to snebenan's topic in MIDIbox SID
Yep kanelbullar is a great thing about Sweden ;D Btw, I just checked your website and saw the MagicBoogieBox and Damn that thing is cool!!! 8) Cheers // Peter -
SIDbox in Progress, Core Done, LCD Working, DIN4X trouble solved?
snebenan replied to snebenan's topic in MIDIbox SID
well, my meter was quite cheap so it is possible ;) I checked the LCD guide, the core description and also my LCD datasheet so it should be ok. I usually check my connection one extra time before connecting anything so it should be ok. However it is a PLED so we'll see if I need to mess with the driver or not. Cheers! :) / Peter -
SIDbox in Progress, Core Done, LCD Working, DIN4X trouble solved?
snebenan replied to snebenan's topic in MIDIbox SID
Ah, what the xxxx I soldered on the 390 Ohm resistor and did some measurements: ;) 5V = 5.33 V 14V = 14.3 V LCD = 5.33 V That looks a bit on the high side for me, but mayby that's ok? Straight from the power supply: 5VDC = 5,33 V 9VAC = 10,0 V Cheers /Peter -
SIDbox in Progress, Core Done, LCD Working, DIN4X trouble solved?
snebenan replied to snebenan's topic in MIDIbox SID
Ok, I received a box from Smash last week. Very professionally packed and lots of small bags for everything. :D I've soldered my core board, a flat cable to my LCD and is now working on my optimized PSU. However, I made a small mistake when buying stuff for the PSU, I'm missing the 220 Ohm resistor. Does anyone know if I can use a 390 Ohm one from the C64 main board insted? (It's the resistor that is attached to the power LED on the main board ) It should only make the led a bit dimmer or? Oh, some tips for future newbees. 1. Desoldering using a 18W soldering iron is not great for desoldering bigger components like the power plug. I ended up brutally carving away some solder and mainboard to get it off. :-[ 2. Wireing the LCD cable reqiores patience... Cheers //Peter -
Hi all. I've been lurking this forum a few months and you seem to have a real nice community here. Congratulations! I'm Chemical engineer from Sweden with a taste for electronic noise (and often plenty of distortion) Anyway, I've just ordered my first Core/sid kit(s) from Smash so it won't be too long now before I start asking silly questions, like what end of the soldering iron to hold onto... well, maybe not that one but I'm a complete newbe when it comes to PIC's and assambler. I've done some electronics in the past like building a Gyraf SSL clone etc. But this is a bit different. I'd just like to give you a little preparation of what to come. My plan is to build a stereo SIDbox with 2 8580SID's with a minimal control panel. The first step is to just get one voice working. Then a second voice for stereo. When this is working, I'll probably add a feedbackloop and create a nice frontpanel. But, that's the current plan, it may be revised later ;) And I'll tro to post some pictures along the way as well. The name is Peter by the way. //Cheers
-
With a offer like this I guess it's time to stop lurking and post a me too ;) I'm interested in 4of the 2x40. (I'll give a proper introduction in the general forum in a few minutes as well.) //Peter