creatorlars
-
Posts
118 -
Joined
-
Last visited
-
Days Won
1
Content Type
Profiles
Forums
Blogs
Gallery
Everything posted by creatorlars
-
I expect to do a "batch" every 3-5 weeks, if people keep wanting this. I'm doing a batch of a few of my own panels here in 1-2 weeks if you want it soon. The next batch will probably be around early/mid March? I guess it really depends on how many panels I have to do... if there's a lot, I won't wait until I have a larger batch. It's a very messy day long process, so I won't be able to do single panels if I can wait a little bit and do several at once.
-
The actual printing surface needs to be completely flat, but if there are standoffs, etc mounted on the underside, I can work around that. Awesome! I knew there were some of you out there. :) I learned a lot from Guitarfool's guide, but had to adjust my methods. Using that Speedball ink is not going to come out nearly as well as the Plasticene stuff that I have. Also, the 1/8th" gap between the panel and the screen won't work when you're using the thicker ink and a fine-mesh screen... found that out the hard way. It works best if the panel is fastened to the table with double-sided tape first, to avoid the "sticking-to-the-screen" problem, and then the screen held by an assistant or clamped down to the printing surface as firmly as possible. I also have to heat the panels to 300 degrees for 20 minutes to cure the ink, but it bonds really well... impossible to scratch it off. I'm going to be doing my guide in a series of blogs, then I'll edit it and post a longer article. I'm going to make sure I take lots of pictures of all the different supplies, and include complete lists with brand names, prices, places to buy, etc. If any of you keep up with it, please let me know if anything is confusing or could be elaborated on! Please give me the panel dimensions (couldn't find them off hand...) and I'll be glad to give you a price. Also give me an idea of the colors. Lightening/darkening the colors I already have is easy, as is some mixing -- but some colors are hard to get.
-
Hey midiboxers, I've spent a lot of time over the past few months figuring out an efficient method for doing panel silkscreening, and ended up buying a lot of supplies in the process (more ink and emulsion than I will ever need.) A few people have expressed interest in getting panels silkscreened, and I'm about to be doing a few more of my own, so -- anyone want in? I'm going to limit this batch to about a dozen requests. Just prefacing with that, in case demand is higher than I expect. Keep in mind, I'm no print shop owner, but I've been getting great results (see attached image -- more images coming soon or on request.) I'm using professional Plastikote ink (the kind reccomended for printing on metal and plastic) and 220 mesh screens, which give a really detailed print. I also have many ink colors available and can do multi-color prints. I'm not sure what a fair pricing schema would be, but it's just going to help me pay back some of these supplies, so I'll make it cheap. 90% of the work is in the setup costs, so multiples of the same panel will be cheap. If these prices seem too steep, I'll swap or discount for components, PCBs, hardware, whatever, if it's cool. :) Here's the deal: Screenprinted Panel $10 setup fee + $0.25/square inch + $5 for each additional color + $0.25/square inch for each additional identical panel + Shipping costs TBD. -- You ship your panel to me. $2 discount if you send me a transparency of your artwork -- otherwise I need a 300dpi flat b/w image for each separate color. -- Color choices: White, Black, Red, Yellow, Blue, Green. I can lighten or darken colors as needed. If you need a color I don't have, or fluorescents/metallics, I'll get it, but need +$10. -- Payment via PayPal or money order sent w/panel. Example: Two 1U MOTM format panels silkscreened with 2-color design: $22.66+shipping Things I will also happily do to keep my hands busy and my projects self-supporting: -- Design your panel artwork. -- Etch PCBs. -- Buy, drill (circular holes only), polish, and paint (auto primer+auto paint+clear coat) your panel. I order custom-cut 2mm aluminum panels from onlinemetals.com. This saves you shipping. Won't be accurate to the fraction of a millimeter (i just use a hand drill, clamps, and a uni-bit), but it works great for me if it does for you. -- Paint/coat colored knobs w/modeling paints. Contact me for costs on any of that other stuff. Just reply here or e-mail lars[at]8cac.net if you want to make an order. In the spirit of synth DIY, I'm writing a guide to DIY panels to share the experience I've had... first post is on my blog at www.larsattacks.com. Glad to answer any questions. If this post needs to be moved to a different board, please do so...

-
Awesome!! Thanks TK. Gonna have to open it back up to resolder those jacks, but at least I don't have to worry about reprogramming the PIC.
-
AOUT Channels -- Alternate Configurations?
creatorlars replied to creatorlars's topic in MIDIbox SEQ
Right -- sounds like it would be a bit of a hassle. I could potentially use the "Internal port", though, right? I have all four IICs installed, but I'm not using the output from the core. -
I laid this out a few different ways, but ended up not deviating much from TK's original layout. The panel was drilled and cut by hand with a step bit and a jigsaw. A few holes ended up being slightly off center. I should have used a drill press and drilled pilot holes. Still, with the screenprinting being with correct dimensions, it offsets the visual impairment of a few of the off-center buttons Below the rotary knobs & GP buttons, the layout and buttons are the same. The 14 buttons on the top left are vertical rows for Track, Track Group, Layer, and Trigger Layer. the 8 button group below those are the buttons from TK's layout, plus one for Step A/B. So it has all 8 additional buttons/LEDs (except the ones for Play/Pause, etc.) I may swap out the caps on the Play/Stop/Pause buttons to green and red, sometimes it's hard to instantly see them. I forgot about adding in a Footswitch Play/Stop control until after I was done with the backpanel, so I'm not worrying about it for now. I may just build a 4-6 button footswitch controller to send the SEQ play/stop data as well as be programmable to do other things as well. I never could get J5 gates 1-5 working from the core, so right now only 1 & 2 (from AOUT) and 6-8 (from core) work, leaving 3 of those jacks dead. :( I'd really like to fix that at some point. Someone mentioned that they could have been disabled from a previous software upload, that the SEQ software didn't overwrite... but the only app I've had on this PIC besides SEQ3.2 was the "change_id" app.
-
AOUT Channels -- Alternate Configurations?
creatorlars replied to creatorlars's topic in MIDIbox SEQ
Very good. Thank you Thorsten. I will post my results and try to keep it clean enough to offer as a downloadable "alternate configuration file." Two more quick questions... If I wanted to keep the current AOUT configurations available... how difficult would it be to add an "AOUT2" port, with my alternative configurations for drum sequencing? You've made quite the brilliant machine here. The sequencer has been "my instrument" ever since I began playing music, so building the MBSEQ3 was a very personal experience for me. There's nothing out there even compares, in terms of what features and control I would want in my dream machine. Hopefully an opportunity will present itself, and I can help contribute to the community in some way very soon. -
How easy is it to change the configuration of the 16 AOUT channels? Since my SEQ's primary purpose is as a drum sequencer, the current configurations are somewhat limiting. I'd like to be able to setup some of the channels to work with the 1ms pulse triggers instead of the Gate outputs, and send out Velocity on CV. I am comfortable with simple code mods, I can usually find my way around -- I just wanted someone to advise me on the complexity or difficulty of a modification like this before I dove into it. (I can work around it... just not ideal.)
-
Hah, cool! I just ran into some of that Metasonix stuff the other night, very cool. Mainly I was inspired by old SUNN amplifier designs. I own a Beta Lead, looks like this: http://sunn.ampage.org/site/museum/betalead/sbl-front.jpg And old KORGs, I have one of these... http://www.sequencer.de/pix/korg/M500micropreset_big.jpg And of course the Roland Juno, TR-808, CR78, etc... ...and dystopian/post-apocalyptic/cyberpunk novels and games and movies of all kinds. I really like old MOOG modular systems too, but I wanted to add some color to that look.
-
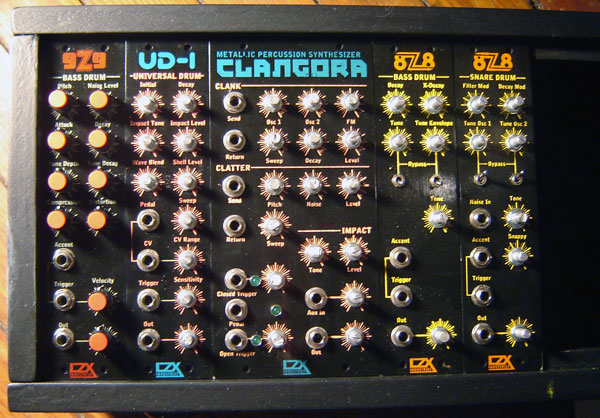
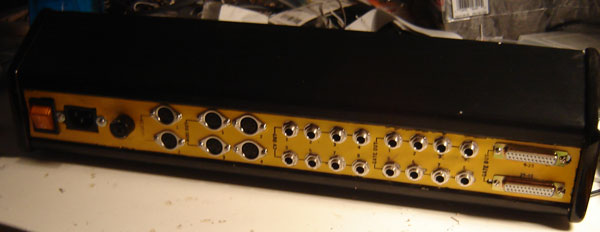
I finally got everything into the case and fully tested. (It survived a 2 hour rehearsal with absolutely no problems at all, earlier tonight.) I'm slightly paranoid about potential screwups in the future due to shifting internal components (a couple boards are mounted with foam tape). But I used good connectors throughout all the DIN/DOUT boards, and everythings pretty firmly packed in... so unless it falls off a table really hard or gets thrown into a wall, I'm probably okay. ;) Backpanel shows 8x Gate output jacks and 8x CV output jacks. The DB25 ports are for the 48 drumpulse outs (currently only the first 8 are enabled.) It's got all four possible IIC boards and 8x 64k banksticks. I'll have better pictures and some videos with this plus my analogue drum synth soon.


-
SEQ3 freeze after 5-15 minutes, ideas?
creatorlars replied to creatorlars's topic in Testing/Troubleshooting
I decreased the LCD backlight brightness to minimum and noticed the 7805 heatsink was "warm" as opposed to "burning my finger"... and sure enough, no more freezing, so that seems to have completely resolved the issue. I'd still like to use the full brightness of the LCDs, though... so maybe I'll put a second regulator small board, and use that just to feed the backlights... Just had a two hour rehearsal with my band, which has been on hiatus waiting for me to finish up some of our new homemade gear... and the SEQ is great! Very happy. I'll post more soon. -
SEQ3 freeze after 5-15 minutes, ideas?
creatorlars replied to creatorlars's topic in Testing/Troubleshooting
I've got a big heatsink on my 7805, but it DOES get very hot, and is pretty cramped, it appears. Not sure what I could do, but maybe try to squeeze room for a fan? Doesn't make sense that using the AOUT would push the 5v regulator too hard, right? I'm using Ray Wilson's +/-12v PSU powered by a 2A 25.5VAC CT transformer. And feeding the 7805 directly from the +12vdc line. Maybe I should try adding a little board with a 7808 between the two to share the thermal load? I'll check out that ground loop thread. -
SEQ3 freeze after 5-15 minutes, ideas?
creatorlars replied to creatorlars's topic in Testing/Troubleshooting
I've narrowed this down... the freeze doesn't happen until using the AOUT gates for 4-5 minutes. It'll run for an hour without the Gate outs connected to the modules. What could be happening here? -
Well my SEQ3 is done and finally in its case! I messed up one of the LCDs during assembly and had to wait for a new one to come in. This has been a laborious project for a beginner like me, but it is working (and working great!) I am successfully triggering my 808 bass drum and UD-1 drum voice modules via the Gate outs. Only problem, is after jamming for 5-15 minutes, the machine freezes... all of the panel LEDs stay on, but the LCDs fade out, and the buttons are unresponsive. If I reset the power, it boots back up with no apparent problems. This sounds like an easily diagnosable issue for someone who knows what they're doing, but I'm not experienced enough to really know where to start. The PSU has been working without a hitch so far and everything functions great (the encoders are occasionally a little jittery.) This problem has only existed since I mounted the panel into the case. I've checked for consistent ground, but could have messed up a connection somewhere. What would be the most likely culprits for a problem like this? Thanks very much for your advice. I'll have pics and soundclips up soon for you all.
-
Did anyone else continue to develop this? I'd be very interested in making a synth module just for the purpose of having a "MIDI-sync'ed 2xLFO, 1xADSR" for my modular synth... Just a Midi in-point, and rotary switches that would sync the LFO rates to fractions of the MIDI clock sync. Has anyone implemented anything like this? Is it possible?
-
Just double checked this again, and I'm getting the same result out of ports 6, 7 & 8... weird. Gonna keep tweaking and see what happens.
-
Well I got things working after some board troubleshooting. Judging from what I'm getting, I'm making a guess that the CV outs need to be tuned so that the middle C is 5v, and the voltage scales at 1v/octave up and down from that?
-
I got all 8 CV outputs of my SEQ working, and am now trying to get the 8 gates from J5 of the core working as well. Gate 6, only, seems to work perfectly, but the rest appear to have issues (wiring and connections are triple-checked and all good, the appropriate line in the code has been enabled.) I am testing with my multimeter for voltage at the J5 outputs and sending MIDI note signals from MIOS Studio, routed to the appropriate AOUT channel. With Gate 6, I get a steady +5v while holding down a MIDI note, as expected. With all other gates, I register /some/ fluctuation of voltage, but it is a quick random jump from 0v to 0.5-1v. I've tried grounding the two gate outputs from the AOUT module (which are working correctly), but that hasn't seemed to help. I'm kind of at a loss here -- could there be other issues I'm unaware of? A bad PIC seems unlikely, but I can't think of what else to try. Any help is kindly appreciated.
-
Well Christmas vacation is nearing an end, and I have my +/-12v power supply, all buttons/LEDs, the LCDs, and the 6 MIDI ports (via 4 IICs) functioning without a hitch!!! Wiring has been a troubleshooting nightmare and next time I'll definitely want to try to make a PCB for all of the panel components -- or at least mount everything on a single veroboard. Now I'm just rearranging things to make sure everything is mounted snugly & securely when the frontpanel is finally mounted in the enclosure. Only thing left is the AOUTs. I've got 8x quarter inch jacks for CV Gates and 8x quarter inch jacks for CV Outs. I've got the gates going from the core, and I just wired in my AOUT module. Before I begin testing and adjusting those trimpots, I was wondering if anyone had tips for how to calibrate the AOUT gates & CVs without the MBCV application, assuming no access to analog modules? I'm guessing I just need to make sure I've got fresh batteries in my multi-meter and test the voltage.... Should I be calibrating the CVs to make sure I'm getting exactly 1v/octave from 0v to 10v? Or is it -5v to 5v? What MIDI octaves are standardly used for which voltages? I have to admit my ignorance in this area. Should I try to use some sort of software oscilloscope as well? I'm mainly using these to control velocity/accent of analog drum modules, but also will be controlling VCO's that need to be pitch-accurate. I could always save calibration for later, but this box is going to be a bitch to get back apart for that, and I'd like to avoid it if possible. Any tips on how you've done calibration before?
-
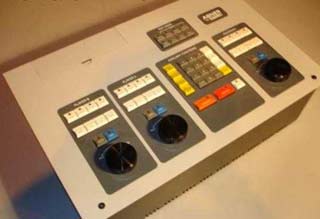
So I found another cool case the other day, it's an old Paltex video editing console (picture attached.) It's probably about 19"x19" and rack mountable. As you can see there are some extremely nice tact switches, some with LEDs, and some good colors... and three extremely high quality jog wheels (looking inside it looks like they are mounted on a pot/spring assembly. Everything on the frontpanel is mounted onto a board with a connector that connects to the rest of the unit. I know this is a perfect candidate for a Midibox guts project!! But what? Potentially a sequencer, but I'm already almost done with one. It would be awesome if I could design around the panel and button arrangement already in place. Let me know if you have any ideas. :) Salvaging the buttons and making a new panel would probably be cool too.

-
Hmm, interesting... I guess we'll see what happens! As long as they work, for now, I won't be too sore about not getting both colors... I just realized I may have made a really stupid mistake... I soldered the long lead on the LEDs to the DOUT pins, and the short leads together & to ground... this is backwards, right? Does this mean I'll get the second color, or that it won't work? Ahhhhhhhh... frustrated. ;)
-
Okay, that makes sense. Thank you all for your help, much appreciated. Glad I got that tip before wiring up my first 5 drum modules. :) I guess as long as _one_ thing on the panel is grounded, i should be able to just snip the leads between the ground pins I soldered between the jacks, and it should eliminate any hum I may experience? MBHP Burner built & 18F4620 + four 16F88's burned with firmware successfully last night... 90% of the frontpanel wiring/mounting is done... I think tonight might be the night! Thanks! Lars
-
Damn! Yeah, they're metal jacks. And they're already mounted and wired (and not easily, in this case.) I wonder, though -- since these are CV instead of audio outs, how would this affect what I'm using it for? Would a little ground hum inhibit the accuracy of the control voltage? Thanks very much for your help, very useful info. :)
-
For my 1-16 step LED indicators, I used 5mm duo-color LEDs (yellow/green). They are the kind with only two leads instead of three, so I wired them in as in the default DOUT wiring schematic... are they going to function correctly, as far as showing the current step in a different color, or should I be doing something different? Finishing this up and it will be easier to swap them out before I mount all the boards. :) Thanks, Lars
-
One more question... Do the AOUT/Gate output jacks need to be isolated from the chassis? ...I hope not. :)