
julianf
-
Posts
322 -
Joined
-
Last visited
-
Days Won
10
Content Type
Profiles
Forums
Blogs
Gallery
Posts posted by julianf
-
-
thank you,
work email is -


-
Quick question:
Is this -
http://www.ucapps.de/midibox_seq/tk_mbseq_backpanel_v1_1.zip
The correct file for the current v4 pcbs from Smash?
I just want to make sure nothing has changed before i cut a test plate.
Thanks, Julian
-
Bumping -
I had some interest in this, but, as of yet, noone has actually given me any cash for it, so its still up for grabs : )
-
Bumping -
Some of these are sold, but ive had a couple of cancelled orders, so have some remaining.
Thanks, Julian
-
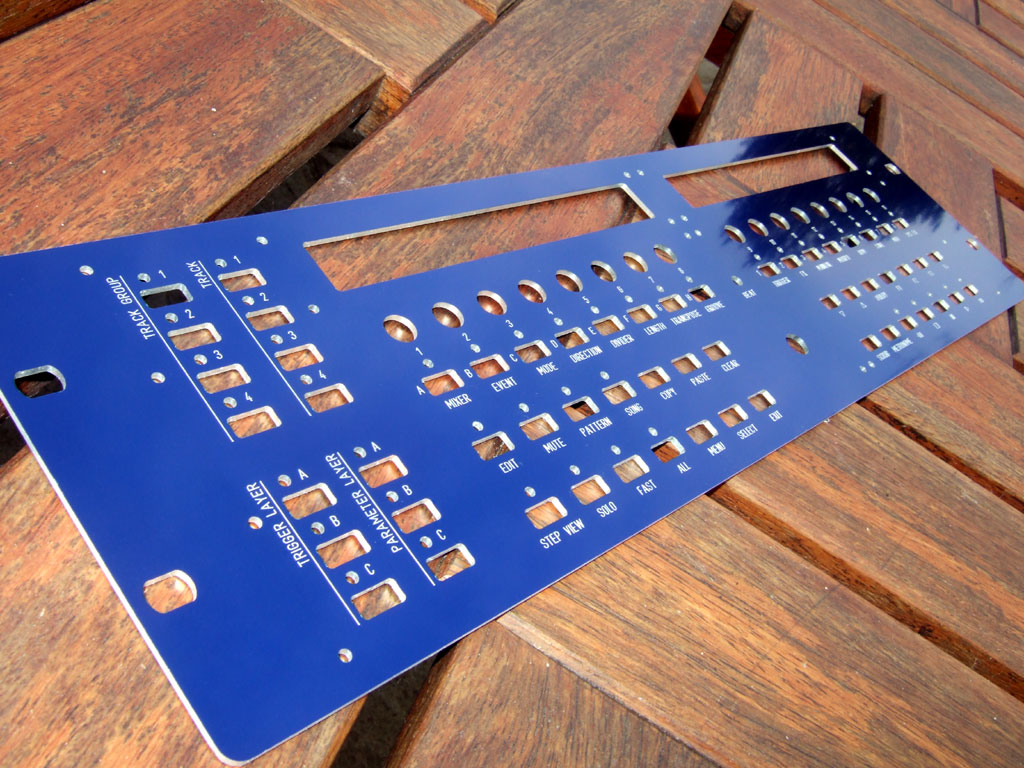
I have now cut a test panel for the mbseq.
I have only cut the top so far, but i am very happy with the result. I took 'real life' measurements of the case and cut to those measurements (which differ slightly from the datasheet / wilba's fpd) - i am very happy with the fit of the top panel. It is a much firmer fit than it would have otherwise been.
I have not yet cut the rear panel.
All the mb6582 panels i cut are also not cut to the datasheet. If you measure my panels, they are larger than the datasheet dimensions. Cutting the mb6582 panels to the datasheet dimensions leaves a gap at the top or the bottom of the panel!
This is exactly why i purchased one of the 17" desktop cases - as you can not always trust datasheet dimensions!
I will take a photo of the top plate tomorrow.
-
so what's your price offer ?
i dont have one.
my post was not an attempt to start a group buy - it was an offer to check details if there was no other reasonable supplier in place.
so, if you have a supplier, and want to run a group buy go ahead! but, if it doesn't work out, ill start looking up prices etc.
again, i dont enjoy making the acrylic parts. its not something i especially want to get involved with. but its possible for me to do so, if people had no other option.
-
I hate working with acrylic, as it scratches so very easily, but, i guess, if people were stuck, then i could see if it were viable.
(viable being that i have no stock of acrylic here, and it seems crazy to buy a whole sheet for a few windows)
To be clear though, its not a load of fun for me, and cutting windows is never going to make me a millionaire, so its only if other group buys dont work out : )
Julian
-
Same terms as the mb6582 post ive just made, but different fault : /
Perfect panel in all respects, apart from that i gouged the edge as i took it from the machine : (
Photos (again, theyre not great, but its raining too much for me outside at the moment!)
Please ignore the 'dust' on the panel. It is just from the tissue i wiped the panel with. Normally i would take more care with photos, but not today...


This panel was cut before the bearings failed on the engraving head. There is no issue with the engraving. It is just the gouge on the left hand rack ear.
Note - this panel is cut in 2.0mm 'bronze' anodised.
Yours for GBP 67.50.
(there is only 1-off this panel)
Usual terms -
Postage at cost.
Packing free.
Payment by bank transfer in GBP or Euro, or...
By google checkout (usual processing fees apply) or...
By paypal, but *only* if marked as a gift, with fees pre-paid (basically i hate paypal, and have never taken it up until now, but, if you want to use it, that's the only way ill do it : )
Insurance / tracking is optional (at buyers risk) for items paid for by bank / paypal gift
Insurance not optional for card payments by other means.
-
Right - i have some photos (not great photos, but the light is not good inside, and there is too much rain outside!)
Ignore the infill residue in the holes. I am not going to remove it on these panels, but it will push out when the LEDs are inserted.
Remember, all the holes are perfect - it is just the engraving that is rough.
For example -

Does not look terrible, but is not as it should be.
If we take a closer look -

Look at the "02" - the / section of the "2" is wider than it should be. The cutter will have moved to one side on the second pass. So two shallow, rougher cuts, that do not hold infill well.
This is a better example -

Look at the lowest waveform. I think this is the most extreme example i have seen. It is rare that you can properly see the exact problem with your eyes - normally the cut just looks 'rough' but a microscope tells you why.
So there you have it - the panels are milled fine - there is no problem there, but the engraving is rough. If you want perfect panels, these are not for you, however, if you want a unit to use, and you want cheap panels, then these could be good for you. They really are not terrible, but i would not consider selling them at full price at all.
Thank you,
Julian
-
Nice! Looking forward! :)
Thank you, i appreciate your patience - but at least you know im working on it : )
My main machines engraving spindle is at a re-builders at present - i have a couple of pre-engraved panels to mill at the start of the week, and then some outstanding work as soon as the engraving head comes back, but, assuming i can clear the delayed works, i hope to get back on with the mbseq testing in the 2nd half of the coming week.
-
Due to some failed bearings here, ive produced a handful of mb6582 panels that im not happy with.
The holes etc. are fine on them - they are cut with a different cutter / bearing set, however, the engraving is not as sharp as it should be. I will take some photos later, but im not certain how well the photos will show the issue, so i will describe first -
A cutter spins in bearings, such as its cutting tip is held in the same position with limited 'run out' (deviation from the center point)
Bearing failure increases the run out, or deviation from center point. In this case im measuring about 0.125mm.
It means that when a line is cut, normally the cutter passes over the same line again, in a cleaning pass. With the increased run out, it may not pass exactly over the line again, but be offset by as much as 0.125mm.
What does this mean in real terms?
This obviously isnt something that's easy to asses with your eye (i have measuring microscopes for this kind of stuff) but the end result is basically that, whilst all the text is in the right place, the edges of the cut are imperfect - they just dont look as clean as they should, and the infill doesnt take smoothly.
The bottom line?
Yours for GBP 67.50 per set.
They are all matt black with white infill (however, i have 2 bronze sets which i have not milled yet, and probably wont bother, unless someone specifically wants them)
Ill take some photos. I think that the price is good for the level of error - theyre not even really that bad at all, but theyre not as they should be, and im not going to send out items that i know have even the smallest defect without mentioning it / reducing prices.
Usual terms -
Postage at cost.
Packing free.
Payment by bank transfer in GBP or Euro, or...
By google checkout (usual processing fees apply) or...
By paypal, but *only* if marked as a gift, with fees pre-paid (basically i hate paypal, and have never taken it up until now, but, if you want to use it, that's the only way ill do it : )
Insurance / tracking is optional (at buyers risk) for items paid for by bank / paypal gift
Insurance not optional for card payments by other means.
-
Right, ive just redrawn the panel in CAD, messed about with spread sheets, and datasheets, etc, and, after all that, it dawned on me that theres a nice simple way to take a physical measurement after all!
So, in conclusion -
Assuming all cases match my one (which i think is a fair assumption) i will be cutting the top panels to a 134.8mm dimension in the visible y-axis : )
-
Thanks for that.
I just dont understand it.
I have a 19" panel here, that ive just measured -
131.88, which is 1/10 of a mm slim on both edges, so 1/5th of a mm down overall.
If i lay this in the case that i have here theres *about* a 2mm gap.
If i then just get the case, by itself, and 'tilt' the rails so as theyre at the correct angle, and measure the gap, i get 134.6mm on the top (ie not including the profile grooves)
134.6 minus the 131.88 that i measured the panel to be actually gives 2.72mm, which i guess ties in with my visual "about 2mm" gap that i see when i lay the 19" panel in place.
So all this is telling me that a panel to fit the case i purchased from one of the group buys (specifically for measuring - i have not built a mbseq myself!) should be just over 134mm in height, on its visible surface.
But 5.25 inches = 133.35 millimetres so that's over 1mm out. Or 1/2 mm on each edge.
I guess this could be taken up by the rails tilting slightly? Maybe im just being too fussy. I guess a half mm doesnt look that much. Do you think there could be 0.5 mm of groove either side on your 'cut to datasheet dimensions' panel?
As a side not from all of this - the mb6582 panel i cut for people are not, and never have been to datasheet specification. They're larger than spec. Which means that they fit the pactec case nicely : ) If you cut them to the dimensions given on the datasheet the y-axis is a bit on the slim side, and creates a groove between the panel and the case. Sure, its no big deal, but its nicer to get it right : )
-
So, im trying to cut some test panels for the 17" desktop case.
Wilba's 19" panels were 132.08mm high (ie 3u - 1u being 1.75", less a fraction on each edge for clearance) - no problem there.
Wilba's design for the desktop case gave the front of the panel as 133.881mm with the profiling at the edges in addition to this - i can see no issue there either (5.25 inches = 133.35 millimetres)
...however
Ive just picked slid the remains of a 19" mbseq panel into the top of the desktop enclosure, and it needs to be larger. By almost 3mm??
Going by my figures above, this would mean it would need to be more like 135mm high - ie probably 2mm greater than 3u size.
So, where is the error? The case is hard to get precise measurements from, as the rails 'rock' changing the space, but im just confused. Often things are not as they say on the datasheets, but 2mm is a large difference, so am i overlooking something somewhere?
Thank you,
Julian
-
Quick post here, as, i suspect if anyone is interested, they will be on the yahoo group anyhow.
Im running a very small group buy type thing for 19" 9090 panels.
The order page is here -
http://www.thebeast.co.uk/9090.html
Its this type of thing -


Ive found that life in the 9090 lane is slow, and so this wont have anything like the frenzy that the euro[C]rack stuff attracts - indeed, its taken the 9090 mailing list about two months to get close to the ten orders that id like to have to be able to make the price - so dont expect any real rush, but, if youre keen - well, you have the link : )
Julian
-
Does anyone know where the distance between the centers of the threadded fixings on the front panel rails are mentioned?
Ive looked through all the datasheets that i can find, and cant find the measurement anywhere!
To clarify -
The top surface fits against two rails that run the length of the case. One option (which is what Wilba has chosen) is to profile the edges of the panel to slide into the recess in these rails, but another option is to use the 'tapped strips' (rather like eueorack subracks) that were supplied with the cases, and mount the front panel to these.
However, as i say, i cant find the details for the centers anywhere.
Can anyone point me in the right direction?
Thank you,
Julian
-
Panel now reserved for "emzii".
Thank you,
Julian
-
Ill drop you a pm in a moment... : )
-
Oakley Cascaded OTA Filter with tick marks and corner radius
£40
As per files on Tony's site but with tick marks
Polymoog with tick marks and corner radius
£45
(Price incl. VAT @ FPD is 87.44 € )
design in fpd format - http://modularsynthesis.com/jhaible/resonator/DJB-Polymoog.fpd
Oakley Noise & Dual Filter graded panel - very small engraving offset to top (im sure you would never notice unless id told you, and even now you might have to ask twice for me to explain!)
£20
As per files on Tony's site but with tick marks
Oakley State Variable Filter with tick marks and corner radius
£38
As per files on Tony's site but with tick marks
5u Oakley VC-LFO no tick marks
£10
As per files on Tony's site.
5u MFOS Rotary sequencer panel
£65
Thomas White's design with minor tweaks to match in better with Oakley visuals.
I only have 1-off each item at this price. Shipping from me is always at cost price only. Im happy to ship interntionally. Payment by bank transfer in GBP or Euro, or by card using Google Checkout (standard surcharges apply - again at cost price only). Packing is free.
Postal prices are here - http://www.royalmail.../airmail/prices
(for tracking options, look under "Airsure")
These are priced low as theyve been hanging about a while, and id like to shift them. If youre thinking of building one of these modules, the prices above should offer you quite a considerable saving!
-
We're moving, and id like to shift some old stock.
I have this panel -
for sale - GBP 69.50.
(Wilba's 3mm "wilba_mbseq_19in_opt.fpd" comes out at 154.72 € when ordered from FPD)
I only have 1-off this item at this price. Shipping from me is always at cost price only. Im happy to ship interntionally. Payment by bank transfer in GBP or Euro, or by card using Google Checkout (standard surcharges apply - again at cost price only). Packing is free.
Postal prices are here -
http://www.royalmail.com/delivery/delivery-options-international/airmail/prices
(for tracking options, look under "Airsure")
I do not know, at present, how much the item weighs. Id imagine somthing like 700g packed - but that's just an estimate.
Again, i have just 1-off these. I think the price is good and id like to sell it quickly : )
Thanks, Julian
-
My main desire is for an optomised drum sequencer, so it seems like what youre working on is just what im after : )
-
Hi there,
Sorry for the slow reply - i dont always see posts in threads.
Yep, i can cut you custom stuff. If you get as many details together on what you want, then i can quote you.
Do be aware that spraying aluminium is a little more involved than spraying, say, steel. You would need to find yourself some etching primers - if you just use normal paints, the results will be dissapointing : (
-
i was asking to see if you were eu...
if you think i can help you, parts wise, with your development, let me know.
we're moving at the moment, but will be setup again soon.
(in case its not clear, im not talking about trying to sell you stuff : )
-
im quite interested in the idea of a stand-alone drum sequencer
where abouts in the world are you?
thanks, julian
MBSeq desktop panel dimensions query (i cant make it work, and i dont understand why!)
in MIDIbox SEQ
Posted
weeks later, ive managed to point the camera at the job -
Im pretty pleased with the fit : )