

TK.
-
Posts
15,248 -
Joined
Content Type
Profiles
Forums
Blogs
Gallery
Everything posted by TK.
-
No, it doesn't make a difference since the sequencer module (which is included into the project) provides an internal clock generator with Master, Slave and Auto Mode. By default it is in Auto mode, which means that it will automatically switch to Slave (-> external clock) once MIDI clock events are received Best Regards, Thorsten.
-
E.g. at Schaeffer - but I'm not sure if this is the cheapest solution. Good point (you know him very well ;)) In fact he already requested two cases as one of the first guys, but probably hasn't found out how to enter his name into the Wiki yet Best Regards, Thorsten.
-
Thanks for doing these experiments! In my snapshots I connected the DOUT/DIN modules over a very long cable (ca. 3 m) to increase the impedance. Normally I'm only using these snapshots to illustrate what I mean - the waveforms will always look different depending on the environment and the point from where the signals are probed. (e.g. interesting is a comparison between SCLK at the core and SCLK at the end of the chain by using two scope channels) Best Regards, Thorsten.
-
Shipping to the states: please align this with Nils, he will handle the shipping :) Best Regards, Thorsten.
-
Hallo Can, wenn Du den Ribbon Sensor loslaesst wird er hochohmig, und am AIN werden scheinbar zufaellige Werte konvertiert. Am besten schliesst Du am AIN Pin noch einen hochohmigen (bspw. 100k) Widerstand gegen Masse an - so wird die Eingangsspannung nach 0V gezogen und erreicht somit einen definierten Zustand, die von der Firmware ausgewertet werden kann. Zum Testen koenntest Du dann mal die Stribe Firmware aufspielen, die hat eine clever programmierte Erkennung fuer diesen Zustand eingebaut, siehe auch AIN_NotifyChange() in: http://svnmios.midibox.org/filedetails.php?repname=svn.mios&path=%2Ftrunk%2Fapps%2Fcontrollers%2Fstribe%2Fmain.c Gruss, Thorsten.
-
Did you install the 220 Ohm resistor array R31a/b/c/d on the MBHP_CORE_STM32 module? Best Regards, Thorsten.
-
Hi, you are searching for an arpeggiator function. Here is a programming example, but it will only run under MIOS32: http://svnmios.midibox.org/listing.php?repname=svn.mios32&path=%2Ftrunk%2Fapps%2Ftutorials%2F018_arpeggiator%2F Similar things can be done with MIOS8 (on a less elegant way) based on this clockbox firmware: http://svnmios.midibox.org/listing.php?repname=svn.mios&path=%2Ftrunk%2Fapps%2Fclockbox%2F Best Regards, Thorsten.
-
Bugfight: if login to the Wiki is still failing please contact Twin-X Since we already got more than 10 pre-orders for the case, I will ask Heidenreich for a first run with 10 pieces next week (this week the whole company is still on vacation). Upcoming runs could include higher quantities, but it's better to rampup this slowly. I finished my backpanel and will order it at Schaeffer today: It includes: A power socket + switch. The appr. "power board" will be provided by Wilba USB and 2 MIDI IO pairs of the MBHP_CORE_STM32 module slot for SD Card -> Seppoman's MBHP_SDCARD module OSC (ethernet socket) -> Seepoman's MBHP_ETH module 25 pin SubD socket for AOUT module connection + gates + clock outputs. I will assign the pins exactly like on my MB-6582, so that I can simply re-use the same breakout box for both MIDIboxes depending on the situation 4 additional MIDI OUTs and a BLM socket (7-pin DIN) soldered on a veroboard, since an appr. PCB doesn't exist I will make the .fpd file public once I got and tested the panel. A bulk order for such a panel will be difficult, as it's almost impossible to find a compromise. E.g., OSC is currently only a "nice-to-have" option, additional OUTs are expensive (since this option requires 4 MBHP_IIC_MIDI modules), BLM is not used by most people, and instead of a CV/Gates/Clk extension port some of you probably prefer an integrated solution. Therefore it's better when people modify and order such a backpanel individually. /update: picture of the backpanel: Best Regards, Thorsten.
-
Hi Rio, I can't check this by myself, since both of my MBSEQs are running with the V4 firmware meanwhile, and with this version the scenario is perfectly working (although I never tried this out before ;)) However, in the old V3 firmware it could be that this behaviour is caused by SEQ_TRKMODE_FLAG_RESTART not being cleared by SEQ_CORE_ResetTrkPos Could you please search in seq_core.inc for following lines: SEQ_CORE_ResetTrkPos ;; don't increment on the first clock event movlw SEQ_TRKVARSTATEx bsf PLUSW2, SEQ_TRKVARSTATE_FIRST_CLK [/code] and add following lines thereafter: [code] ;; clear position reset flag that was probably set in seq_midi.inc during stop mode bcf PLUSW2, SEQ_TRKVARSTATE_POS_RESET If this doesn't help, you will have to continue searching for a possible reason by exploring the source code. Remote diagnosis is too difficult (and from my previous experiences with you it can be very time consuming ;)) Best Regards, Thorsten.
-
It's inside the case, see also this picture: http://midibox.org/forums/index.php?app=gallery&module=images§ion=viewimage&img=430 Your panel could be used after the rack ears are cut with a milling machine - maybe there is a company close to your location which could do this? It isn't much work, so it shouldn't cost that much money (maybe 10 EUR and/or a crate of beer ;)) Best Regards, Thorsten.
-
Yes, it will be anodized as well :) Best Regards, Thorsten.
-
yes, correct Best Regards, Thorsten.
-
Yes, it even contains a "dummy" backpanel if somebody wants to drill the holes by himself. :) Only the frontpanel is excluded to save costs. Mounting: see the comments of these pictures: http://midibox.org/forums/index.php?app=gallery&module=images§ion=viewimage&img=423 http://midibox.org/forums/index.php?app=gallery&module=images§ion=viewimage&img=424 Future frontpanels should have 1 mm extrusions to "stick" the panel into the frame. Best Regards, Thorsten.
-
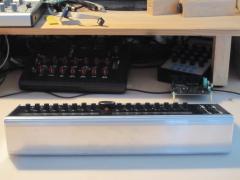
I'm in contact with www.heidenreich.de for manufacturing nice looking aluminum desktop cases based on their "Multiformis" system which can be used for 17"/3U frontpanels like Wilba's MBSEQ frontpanel, but also for other purposes/MIDIboxes. After some alignment discussions I got a prototype and I must say that I'm really happy with the results! :) Note that this is only a "quick prototype" with untreated aluminum for checking the dimensions with existing components (frontpanel, MBSEQ_CORE_STM32 and other modules). The final option could be anodized black! /update: picture of the black case: More pictures and additional comments: see this album Estimated price: ca. 50..60 EUR if we order at least 10 pieces We will get better prices if we order higher quantities. Note that the price doesn't include the front- and backpanel, they have to be ordered separately (e.g. at Schaeffer or from More informations about the backpanel soon. If you are interested in this desktop case, please add your username to this list: http://www.midibox.org/dokuwiki/doku.php?do=show&id=tk_mb_seq_case_bulk_order Update: here are the exact measures: http://www.ucapps.de/midibox_seq/mbseq_case_measures.pdf FPD File for Backpanel: http://www.ucapps.de/midibox_seq/tk_mbseq_backpanel_v1_1.zip NOTE: not compatible with new MBHP_CORE_LPC17 module, since the Ethernet socket is now part of the Core PCB! Best Regards, Thorsten.
-
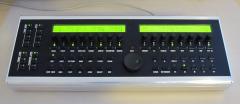
From the album: TK: MBSEQ Aluminium Case
Front view -
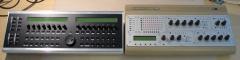
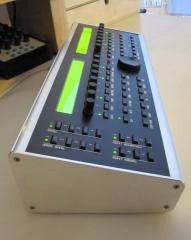
From the album: TK: MBSEQ Aluminium Case
MBSEQ + MBSID Vintage Case together :) -
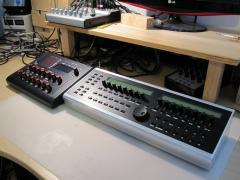
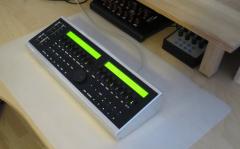
From the album: TK: MBSEQ Aluminium Case
MB6582 + MBSEQ together. -
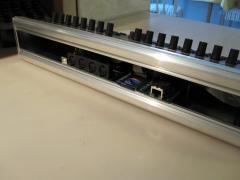
From the album: TK: MBSEQ Aluminium Case
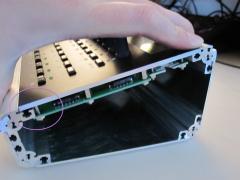
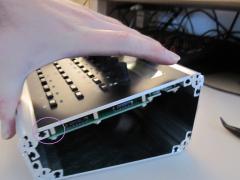
Temporary it's possible to use the case w/o backpanel - the case construction doesn't require it for holding the remaining panels together. -
From the album: TK: MBSEQ Aluminium Case
Next step: creating the backpanel -
From the album: TK: MBSEQ Aluminium Case
And when I'm writing "closed", it's really closed. Perfectly fitting frontpanel! :) -
From the album: TK: MBSEQ Aluminium Case
Closed case -
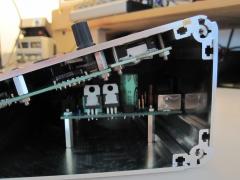
From the album: TK: MBSEQ Aluminium Case
The MBHP_CORE_STM32 mounted on 20 mm spacers inside the case - it fits! Was it Nils intuition to place the mounting holes below the USB socket so perfectly? ;) -
From the album: TK: MBSEQ Aluminium Case
...these spacers can be removed w/o disadvantages! -
From the album: TK: MBSEQ Aluminium Case
There are 4 spacers of Wilba's MBSEQ Frontpanel which are a bit too much outside so that the case cannot be closed perfectly. But don't panic...
