

Elektruck
-
Posts
279 -
Joined
-
Last visited
-
Days Won
10
Content Type
Profiles
Forums
Blogs
Gallery
Posts posted by Elektruck
-
-
Hello,
I just came along this kickstarter project:
https://www.indiegogo.com/projects/axoloti-a-digital-audio-platform-for-makers
Looks really cool espescially with your custom made midicontroller!
Cheers,
Roel
-
Wow this is great, superb work!! I'm building a new studio/workshop in my garage now and this machine would be the perfect data centre. I'm lookinig forward to build one myself.
-
I succesfully assembled this PCB, in the end. I made the stupid mistake to solder most of the shiftregisters the wrong way. I started OK, did a double check etc. but half way I went wrong and noticed it to late. I just desoldered them using a blow tourch?! and put them back the right way. This was more difficult because the surface wasn't flat anymore, but it worked. Not the first time of coarse, one little pcb trace was damaged, so when I attached my TPD it did strange. But after beeb-testing the pcb traces of al shift reisters I found the bad trace, repaired it and then it worked!
So my only usefull tip is beeptesting your work with a multimeter to check your connections!
Succes!
Roel
-
 1
1
-
-
Hi,
I'm making an instrument for schoolkids, a cabinet/chest of drawers, to make music with that schools can rent from a educational art institute.In fact it's just a midicontroller (MIDIboxNG) with an integrated mini PC running Windows7 and Ableton Live9.
The teacher has to power on the machine without a screen or mouse etc, just hit the power knob, and at the end of the day hit the powerknob again so the PC will shut down.
Everytime Live should just loads its template without asking for anything, like crashreports etc.
Is there a way to achive this? I found this threat
https://forum.ableton.com/viewtopic.php?f=4&t=161743
but I don't know how to do this exactly.
Any help will be greatly appreciated, I have a truly great machine but now it hangs on such a stupid issue.
Thanks in advance and cheers, -
OK Clear, I thought so, but somewhere in the menupages I saw a LCD screen that looked like a drumtrack with a drumtrack-name. I thought maybe I'm missing this thing, but now I can let it rest. THANX again!
Cheers,
Roel
-
Maybe someone can confirm that it's just not possible?
-
Hi,
I hope I'm missing something completely but I can't give my drum tracks a new name.
I renamed my synth tracks (note and chord tracks) in the Event menu>Edit Name, and the new names are shown in the edit view, left LCD.
But if I go to: Event menu>Edit Name in a drumtrack, I can only edit the name of the individual druminstruments, like BD or SD, HH etc. but I can't rename the complete drumtrack. So when I go to Edit view I see in the left LCD:
G3T1 OUT1 Chn.10 PA:Vel. TA:Gate,
but I would like to see:
G3T1 Dstation 808 PA:Vel. TA:Gate,
How will I achieve this?
Cheers,
Roel
-
You're very welcome, it's the least I can do!
Great such a simple connection is possible, I'll give it a try this week.
Cheers!
Roel
-
Hi Thorsten,
Thanks for your reply. I thought it wouldn't be that easy.
I played with the board alone to see what happens, just powering it from the 5v output of my stm32f4 board. I don't see any onboard LED's blink when I touch a sensor input, so I let it rest for now.
The midio128 suggestion is a good idea, I'll try that!
Can I connect the PIC based MIDIO128 V2 midi out directly through a 220 ohms resistor to the midi in of the MIDIbox NG board/ pin PA3 of the stm32f4 board?
Last month I builded the Mayhem Machine, a video sequencer (see pictures in my gallery) running MidiboxNG together with Max/Msp. It was my first experience with Midibox NG and configuring it in Mios Studio. WOW I was really stunned by the ease of use, it works great!!!
I did read the info a lot of times before and did some little tests, but I really need to work with a practical application to get the feel with it. I'm really impressed how you lift this Midibox platform to the next level over and over again. Your work enables a nitwit like me to create really stunning stuff! THANX!!!!!
( the Max/Msp programmer I worked with was also really impressed!)
Cheers,
Roel
-
Hi,
I'm playing with Midibox NG and would like to add some touch sensors to my next project. I'm aware that they were supported by MIDIbox64 and NOT by MIDIboxNG. After searching the net I came across this little board: https://learn.adafruit.com/adafruit-cap1188-breakout/
I would add this to my MIDIbox NG but I'm not sure how to. It has I2C, ISP and outputs that go from 3V to GND when touched the corresponding input.
On adafruit there are some examples but they are with Arduino, i don't know how to use them.
I'll start experimenting with adding the outputs to my DIN's an see what happens, but all help/idea's are welcome!
-
I made a pinout sheet for my own clearance. Maybe someone can use it. It's just for the R3 boards!
-
in order to exclude a problem with the smashtv boards you could try to disconnect your button array and test each contact on the smash boards by using a jumper cable between ground and the individual DI pins, at the same time checking in MIOS studio that you get the expected button events.
That's exactly what I did and ment by shortcutting the pins to ground. It had the same results, so I knew it wasn't just bad wiring.
But... problem solved!!!
I used 2 different DIN boards from SmashTV, R3 and R5, they look exactly the same but they aren't! They have a different pinout, like in reverse.
So that's why my buttonboard was good first time (years ago), but after connecting it to a different DINx4 board the buttons react like 2,1,4,3,6,5,8,7.
I resoldered my buttonboard, then it was good again with a R3 board except for the strange mirroring on SR 2, 3 en 4. Today I reconnect it to a 'new' R5 DINx4 board and my buttons react like 2,1,4,3,6,5,8,7 again, but on all 4 shift registers the same, woha!!!
After beep testing the SmashTV R3 DINx4 board with my multimeter, I found out that the labeling/pinout of D0,D1,D2,D3 of SR 2,3 and 4 is wrong (mirrored) on those boards.
All really confusing but I'm happy it's not just my stupidity.
Thanks for the replies!
Cheers,
Roel
-
I think you're wright about building a new core won't solve the problem, cause the problem is in some basic (wiring) thing. But sometimes I get stuck and starting over again clears a lot.When I first soldered my buttonboard, see picture, I soldered it wrong. My buttons were like 2,1,4,3,6,5,8,7. So I re-soldered the first row and checked it again. Now it was good, so I copied the other rows. After I plugged them in I noticed the strange behaviour like I mentioned before. I thought I soldered it wrong again, so I attached button row 1, wich was good on SR1, to SR2 and it did the same strange mirror thing. So I'm quite shure the button rows are soldered correctly. I even tried to shortcut the pins from SR2 to ground and see what happens, and the mirror thing is still there.That's why I started thinking I maybe changed the DIN pinout on the software side. But I guess that's not possible,I installed a new bootloader and formatted the SD Card, and the problem is still there with the new DEFAULT.NGCAnyway thanks for your replies, I hope tomorrow will clear things up.
-
So, it behaves like if D0..D3 are mirrored?
Because my expectation is that D0=Button#9, D1=Button#10, D2=Button#11, D3=Button#12
That was my expectation also, and SR1 is like that, but SR2,3,4 behaves indeed like if D0..D3 are mirrored.
I did test it with MIDIO128, and it shows the same mirroring. I couldn't see the button ID, but I looked at the generated notes. SR1 D0....D7 shows C,C#,D....G#
but.... SR2D0...D7 shows D#,D,C#,C,E,F,F#,G#
I just don't understand, tomorrow I'll solder a new coreboard, for an other project but I'll check if my buttons reacts the same, if it does I'll try your idea Marxon.
-
I've made a prototype/testboard with a STM32F4 board, running midiboxNG. I've connected a 2x40LCD, a SCS board, a DINx4 with 24 buttons and 4 encoders, a DOUTx4 with 32 leds and an Ainser board with 8 pots, and a SD card of coarse.
After changing the DEFAULT.NGC to activate the Ainser module and the 4 encoders everything seems to work like a charm. But I got a strange problem with my DIN SR pinout and the button/encoder ID's.
The first SR acts just normal, like I would expect it to do. D0=Button#1, D1=Button#2, D2=Button#3 etc.
But SR 2 acts like: D0=Button=Button#12, D1=Button#11, D2=Button#10, D3=Button#9, D4=Button#13, D5=Button#14, D6=Button#15 and D7=Button#16
SR's 3 and 4 acts the same as SR2.
I tried all things I could think of, like changing the buttons boards, changing a DINx4 board. I've uploaded Midio128 with the same result. After that I flashed a new bootloader, formatted the SD Card. I made a new 'button only' NGC file with RESET_HW to check the button ID's but the problem stays.
I can't find were to check/change the DIN SR pinout/Button ID's. I can only find that Button ID1 is equal to SR1D0, Button ID2=SR1D1 etc.. but in my case it's not after SR1?! any help appreciated!
Cheers,
Roel
-
If you want a cheap and easy way to control this over midi, check out the ACX Quantizer which also takes the cv input and sends it to a midi-out:
Thanx for the tip, I saw the site before but it's great, with pcb-layouts and and hexfiles for PIC's! really cool, gonna check this out further.
Hi Roel,You made a really cool module!
Currently I'm working on a new version, that can read wav files too.
Thank you, you made a nice one too. Great news that it'll read wave files!
-
Here some pictures of my newly build SD Card sample player module. It's the smallest module in my modular, but so powerfull! Till now I only used one bank full with hardcore-basskicks,kicking through some analoge filters, really lovely! I made a reset button on the module cause when you change MicroSDCards it needs a reset.
I don't need the pushbuttons on this kind of module, midi in works great. But I wanted to make an other module for using in a live-theatre show where I have to trigger some (only2 )sounds. Now we use two CD players for that, and it would be great to swap those CD players with this tiny sample player. But the audiofiles are 5 minutes each and I noticed this SDCard sample player only playes a couple of seconds/sample, or can I change that somewere?
-
Yess, I got this to work, It plays my own samples!
But how hard would it be to add some pushbuttons to trigger samples?
In midiboxNG it's really easy to add a button creating a note on/off event, with the MIOS filebrowser. But MIOS Filebrowser is not implemented by this application, so I don't know where to start.
Cheers and thanx again for a wonderfull application!
Roel
-
OK, I'll check it out, thanx!
-
And where or how can I get acces to this new version?
-
You're very welcome! I got a lot of help here myself, so I'm happy if I can help someone else.
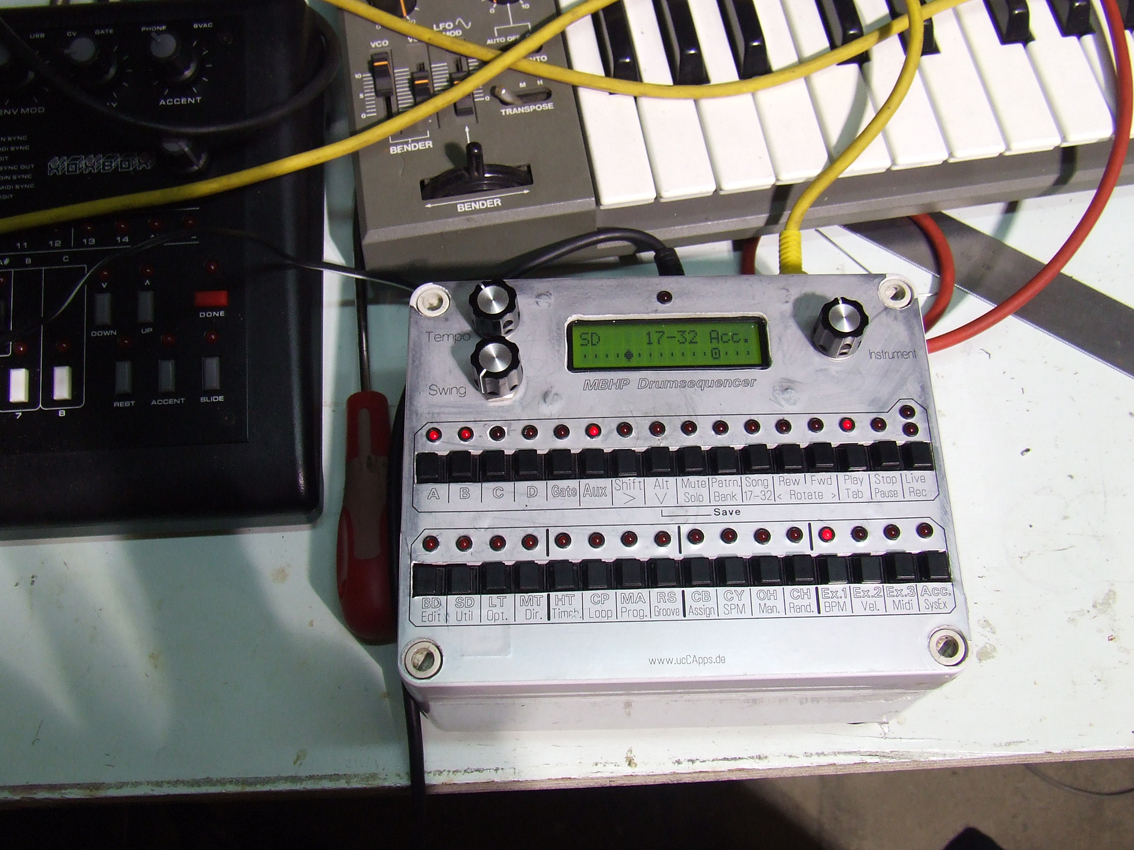
But unfortunally I only build this machine as a midi-drumsequencer, so I didn't use any DOUT modules to trigger voices, so can't help you in that direction. But others build it to trigger voices, I guess they can help or that the answer is already on the forum.
I like my case too, recyceld plastic installation box with alu-sticker. Really lo-tech, but works like a charm! I didn't know anything about programming, and code stuff etc, and I managed to get it to work...
Succes with yours!
Roel
-
Hi Julien,I'm not Thorsten but I found a MB808 hardware change/ configuration sheet on the forum and with help from that I made a MB808 pinout sheet witch I'll be happy to share, see here:
 I'm not sure about the midi in/ velocity question, never used this.Cheers,Roel
 -
In SeqV4 you can select 'program change' as a track parameter layer, but not in drum tracks. If you don't see it in a 'note track' you can add this parameter layer by entering 'event menu' and at the right side you can choose the parameters of the parameter layer.
Succes!
-
I also want 2 of those boards, please.
Thanx
note off (HEX 80)
in MIDIbox SEQ
Posted · Edited by Elektruck
I think I suffer from the same issue. I have a WTPA2 8-bit sampler wich I can play manually, or by midi. Manually works great but I can't get tight loops of e.g. 4 bars. Midi from ableton works also great, I can record really tight 4 bar loops, and by playing the loop an octave higher it doubles speed, great machine. But if I play it from my SeqV4 I can record music (it starts recording on CC#3) but when I play the sample with notes it only triggers the sample to play, but it doesn't stop at the end of the note. It does stop at the end of the notes comming from Ableton.
I didn't understand yesterday but as I read your/this thread now I think this is the issue.
I also would like note-offs, so any help or comments appreciated!