

sbm
-
Posts
33 -
Joined
-
Last visited
-
Days Won
2
Content Type
Profiles
Forums
Blogs
Gallery
Everything posted by sbm
-
Building my own Midibox Sid Synth. Outa Time? Just want to start this. Now.
sbm replied to Philtron's topic in MIDIbox SID
@dwestburyHey thanks for that. I'm still forging ahead with building this, but life and this annoying thing that brings home the bread got in the way.... I did follow it and also happened to verify that my 4 PICs were working OK before and after flashing and loading the software - but, can't hurt to follow this guide as a double-check....for the holidays. -
Building my own Midibox Sid Synth. Outa Time? Just want to start this. Now.
sbm replied to Philtron's topic in MIDIbox SID
For reference: This might be related to my problem, but I'll note it here in case others need to look at it and hopefully it wasn't a defect from fabrication. -
Building my own Midibox Sid Synth. Outa Time? Just want to start this. Now.
sbm replied to Philtron's topic in MIDIbox SID
Yeah this is a brilliant summary. No, it isn't too late to build, so long as the PCBs are still available which is the main thing. Everything is still available and the MOS chips are getting harder to find, so I turned to ARMSIDs. (it took me 2.5 years to build, in spurts, on-and-off). Be warned it is a big project with lots of soldering to do - not that hard, just tedious, but other way to look at it is that it's all practice, practice, practice! @dwestbury, do you have a link to a complete schematic? I'm in need of one since today I finally finished the last bits of this, but no ekyboard input and nothing on LCD. But power sound and the dancing LED matrix all work fine. Almost there. Which brings me finally to my next point - this is a fairly big project to assemble so take your time with it and don't be frightened or discouraged. Some times things don't wor 100% but there's help here. -
Totally agree, especially since I have been holding off buying any SIDs and clones because I don't have a C64 - not for a huge long time. Makes no sense to get a creaky one just to program the clones, so this adapter is a great idea.
-
Thanks Darrell! I received the cable assemblies and looks like I have the version with both headers being straight, not half as right-angle. I'll have to check clearances but maybe I can gently bend the pins to fix that. Otherwise I'm shelving the build for now as there seems to be part shortages and I have to wait.
-
Excellent this was a solution I was looking for too for my build :)
-
Cool! Thanks guys for the hints and various pointers. I';ll have a look around for the original SIDs, just need to be patient. In the meantime lot's of reading up if I am going to build this.
-
Hi all So like some other folks around here, it's the MB6582 bug that has now got me. But before I commit, I wondered about the status of obtaining the right SID clones vs tracking down the old ones. I've seen various older postings about the clones and some comments to the sound quality. These days, which SID clone would be best used today in a MB6582? Or is simply sticking to the original SID still the way to go, despite their age (and maybe fake ones floating around)? Thanks for any guidance.
-
OK that brings me to another question about the MB6582, separate post....
-
+1 Good to know, wondering if this was ever tested as it looks fun to build.
-
+1 Looking to get a couple of modules too, but hope those guys are OK and only on holiday . The brd files for the newer stuff aren't available but at least the older ones are if it comes to that.
-
Building an MB808 clone the long, hard way. Link to old thread.
-
-
From the album: midibox 8060/8080 build
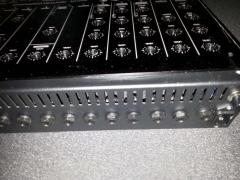
Panel attached to the drilled out and machined case, plus the rear jacks. -
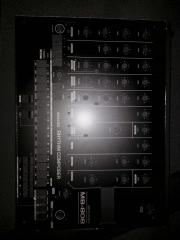
From the album: midibox 8060/8080 build
A view of the front panel. -
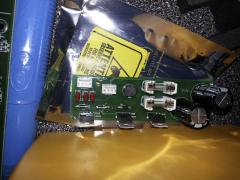
From the album: midibox 8060/8080 build
The power supply, likely faulty. -
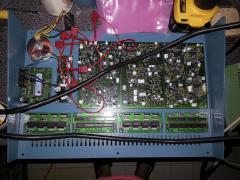
From the album: midibox 8060/8080 build
A close up of the TR-8060 and the core8. -

From the album: midibox 8060/8080 build
Here's the work bench with Christian Hartig's TR-8060 being built and fitted into the case. -
Should have updated this....an air-driven reflow station is your friend when it comes to making fixes to SMD parts! This was a lot of fun to do and get working. Looking forward to building another one day.
-
Well, from bad to worse, looks like my board is shorted now. Not sure how that happened but I measure 2.5 ohms resistance between ground and 5V. That was a waste. :-/
-
Hi Those rows are all off. I'll re-flow the solder at those locations to see if there's any life. So close!
-
HI all, looks like I'm almost there. From what I have seen in the power-on test, I have 3 rows not working. I'm guessing this is down to a cold solder joint or a short. They are (going by transistor Q number): Q29, Q19 and Q22. Would a cold solder joint some place be the top of the list of culprits?
-
Wow, what an awesome build this all was. Now that the 'hard' part is done, comes with 'soft' part: What's not clear to me, using a virgin PIC (F4620), is what firmware this BLM would use? Is it just a matter of loading the bootloader and that's it? Or should the blm_scalar_v1.0a.zip file from the MIOS download site?
-
Very nice case, just got mine, plus the Mouser order and acrylic surface, this will be a good project to pass the winter months. :-)
-
Is there a BoM yet while we wait?
-
I'm in as well, looks like on a waiting list possibly, but definitely quantity of 1 each.
