
cosmosuave
-
Posts
259 -
Joined
-
Last visited
Content Type
Profiles
Forums
Blogs
Gallery
Everything posted by cosmosuave
-
As I recall when I inititially installed my bank stick it took a while to format and I think it had 64 pre programmed patches notice I said "I think"... Anyway I think I need to reformat it since I cannot save any patches to it... I go to the Save menu and all I get is the following... E# do! E--- I followed the guideline on the stereo sid "First steps" but am unale to save... When I scroll thru the the patches I get the default Lead Patch and all the rest are blank.... Oh BTW the Stereo SID rocks... I have not been able to mess with it much since I am a stay at home dad with my 11 month old son so time is a rarity for me...
-

YEEEEEEHAAAAAAAAAA!!!!! COMPLETE AND WORKING STEREO SID
cosmosuave replied to cosmosuave's topic in MIDIbox SID
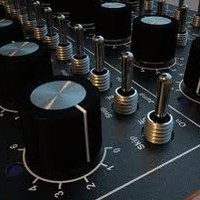
Sorry about the size of the pics I reduced them in PS but I guess it was not enough... Here is the core and the 2 SIDS boxed up with the optimised power supply.... After this pic I tidy'd up the witing with some tyraps... This is the control surface with the DIN4 pcb and a 2x40 LCD... Unfortunately the LCD is not back lit... Rear view with midi in/out, C64 ps connector, left/right outputs and an RS-232 connection for memory sticks... Control panel with 10 buttons for each parameter displayed on the LCD... One LED was burnt out and it is hard to find a 1mm led replacement not really a worry at the moment... All in all an awesome project I did have some issues since this was not the defacto 2x20 5 button minimal control surface but after building it the next one will be easier... Even programming the code was not too hard and I hate programming... The Ucapps site is awesome for support... -
All right it works.... The reason I had no sound was due to 2 reasons... I had the MD line from the right SID connected to the wrong connection on the CORE... Also upon removing the SID chips and reinstalling them I noticed that on the right SID socket that the one row of the IC socket was open farther than the other causing for some play in the chip causing no connection... I swapped the left chip with the right for a better fit and voila test tone.... I thinks this what was the issue I had a month ago when I try'd to perform the test tone app a month ago.... I only have one patch on the bank stick I though it automatically loads the bank stick on boot up... I will post pics shortly as I tidy things up and I would like to say thanks to all and being patient with me... I will build a mono sid next and it should be a breeze after this... To the following... nILS TK smashtv wilba stryd one and those who I have missed... Side note there is a new editor for the Nord micro mod for those interested.... Nomad 0.3 Release - Opensource Nord Modular Editor I'm very glad to announce the release of the 0.3 version of the opensource nord modular editor Nomad, which you can download at http://nmedit.sourceforge.net/ . Christian has done an incredible job that is still totally blowing my mind, and I helped him out a bit on the end. This release is pretty much usable, and it has a ton of new cool features that the Clavia editor doesn't have. I'm just gonna post the RELEASE notes, and 2 short videos I made to show the different stuff we have in there. Go get it, it's fresh new, and it works under Windows, MacOSX and Linux: http://nmedit.sourceforge.net/ Videos: http://inflection.bl0rg.net/~manuel/nomad1.swf http://inflection.bl0rg.net/~manuel/nomad2.swf
-
Well I came across the encoder diagram specs and noticed that the labelling for the lugs was different from what I assumed.... What I assumed was A, B, C when it was A, C, B? Felt like an ass after that... Now to figure out the interconnection test it was a month ago that I performed but I forget on how you toggle pins 1 - 14 on the SID socket... Using the modulation param via midi-ox but no dice...
-
Ok after sorting out the control panel mappings to the DIN and getting it all to work I now find out that i have no audio once again when I did before.... Have uploaded the interconnection test app and am using midi-ox to send modulation msg's... It has been about a month since I used the app and forget how to use it... I checked the instructions in the asm file... Question how do I change the Pin# on the LCD? Is this done when you apply your volt meter across the corresponding pin and grd? Or do you change it some other way? Everytime I apply the volt meter I'll hit the mod send button in midi-ox to toggle the pin but nothing... The big isue here is that last time when I finally got the audio to work I had no idea how I did it....
-
Encoder is working correctly WooHoo... Now there is no sound when there was sound.... Back to the interconnection test.... ARRRRGGGGHHHHHHHHH!!!!!
-
WooHoo buttons 6-10 are now working.... All that is left is the encoder... The encoder works without being erratic but turning it left or right only decreases the value of the parameter...
-
If you build the stereo SID you will need to use an identical SID chip since the filters are different and other things...
-
I have figured out SR and Pin mappings but there seems to be an issue with buttons 6-10 functioning... The LCD (2x40) is displaying 10 parameters with buttons 1-5 accessing those parameters but not buttons 6-10.... I have made the change as outlined below and have made all other SR and Pin to 0 that are not being used to avoid conflicts due to duplicate values.... I mod'd Code: #define CS_MENU_DISPLAYED_ITEMS 5 to Code: #define CS_MENU_DISPLAYED_ITEMS 10 Then deleted this all together... ;; NOTE: if CS_MENU_DISPLAYED_ITEMS > 5, you have to adapt the DIN settings ;; in cs_menu_io_tables.inc Also in the CS_MENU_DIN_TABLE I deleted the following for buttons 6-10... ; define this if CS_MENU_DISPLAYED_ITEMS > 5 As I have I said I am not much of a programmer and slowly stumbling thru this with some results but for some reason buttons 6-10 are not being defined... They are there when I run the midi128 app to determine the event# for the buttons... On a side note the encoder is very erratic and takes multiple turns to change a parameter... Gotta step out and have a cappucino...
-
Ok I managed to write down all my Event numbers for the controls on my SID... Now I'm a little lost at this part as per the Wiki... SR = (event_number % 8) + 1, Pin = event_number - (SR * 8) In plain english SR is the event number divided by 8 (using integer division), and Pin is the remainder of that division. So this is what I think is correct ... Button 1 - Event# 8o SR= 2 (8/8)+1 Pin= 0 Button 2 - Event# 7o SR= 1 (7/8)+1 Pin= 0 Button 3 - Event# 6o SR= 1 (6/8)+1 Pin= 0 Button 6 - Event# 25o SR= 4 (25/8)+1 Pin= 1 Am I understanding this correctly? Where I question things is when an event number is less than 8 that means the SR will always equal 1 and the Pin equals 0... Thanks...
-
Thanks nILS it was a hardware grounding problem... I wired up the pos side of the DIN connectons to the ground of the switches... The switches I have, have 4 terminals and I was running a ground loop on all of them... Reconnected the pos leads from the DIN board to the pos side of the switch and am now getting pin read outs on the LCD.... Just have to jot down the pin#'s and do the compiling... Thanks once again... So close now to completion...
-
Cool cos some of the buttons work .... i.e Shift, Up, Down.... Back to the drawing board for me... ARRRRRRGGGGGHHHHH!!!!!... I'll get it to work this week... Thanks for your reply...
-
Ok I have stuffed all the boards into the case and have loaded the ain64_din128_dout128_v2_0.zip file and following the wiki guide on How to detect the pins output config.... Ok so this what I am seeing on the lcd... AIN DIN DOUT xx 0 22o 1o So what is happening is that it looks like unde the AIN it is cycling thru a series of numbers very fast causing the 0 to flicker to a 1 breifly as in very very brief... 3 buttons do manage to change tunder the DIN... Nothing on the DOUT which does not apply (I think)... To troubleshoot I have done the following.... To isolate the AIN cycling number issue I individually disconnected the connectors J3 to J6(DIN4 pcb) one by one to see if it would stop and it did not... Disconnected J1 (DIN4 pcb) and still no change... So any idea why the AIN is cycling through a series of numbers so rapidly or is this normal? When I boot up with the ain64_din128_dout128_v2_0 app I do not get the following as per the wiki guide lines Waiting for DIN or AIN event... Seems something on the core or the 2 SID boards are causing an issue... Thanks... BTW I have appreciated the help given in this thread and all the others that I have posted...
-
Thanks for the reply.... I used this for the button encoder setup... http://www.ucapps.de/midibox_sid_cs/2x40_enc.pdf As for asm setup file I used the one for 6581 since that is the chip I am using... In essence I should make the changes you suggested but for the setup_6581.asm I did check the wiki in regards to control panel connection... The wiki suggests testing din connections with a midio128 application... Upon veiwing the midibox128 section this is the only file that resembles midio128 application midio128_v2_1e.zip is this the right one... I know I have asked questions that have been answered numerous times but I do try to source an answer with the info provided on the site... I am not much of a programmer and in fear that I will corrupt my core... That' all..
-
Ok I almost have my STereo Sid complete... I have done the following... Loaded http://www.ucapps.de/mios/midibox_sid_v2_0_rc17.zip and getting the following default Lead Patch and have audio output... My 2x40 LCD is behaving as a 2x20 LCD and I did read that I may have to change code is this correct? Also I am using 10 buttons to in conjunction with 2x40 LCD for the parameters... I found somewhere that the code has to be changed from 5 -10 buttons...in main.asm, you have to set "CS_MENU_DISPLAYED_ITEMS 10" Is the main asm for this file---->midibox_sid_v2_0_rc17 My encoder seems to work but it only searching for other connected SIDS with the following mssg SID2 not available CAN disabled My Shift up button will give me the ADSR parameters but I cannot back out... Upon reading there is a test app to check DIN controls... Is this the file to use midio128_v2_1e.zip to check all buttons and encoder? I'm stoked that I am close to done but a little lost on getting to the finish line... In the meantime I'll keep sleuthing... Bankstik is now working... Thanks...
-
Thanks I'll wire them up and attempt to program them in the code...
-
As the subject suggests this is the configuration I am striving for except for one thing.... I have installed the Shift Up Down buttons and on the following PDF... http://www.ucapps.de/midibox_sid_cs/2x40_enc.pdf the wiring is not listed for these buttons is that because the additional 5 buttons for the 2x40 lcd make up for them? Here is a pic of my layout... Above the encoder there is a Menu button that is not shown... I am almost done as far as wiring and hardware is concern... I have a feeling I may not need some of those buttons... Thanks...
-
Hey I was wondering how do I cancel the Test Tone application? Everytime I boot my SIDbox it appears on the LCD... Thanks...
-
another MB SID.. [Finished!!!] ' Greenie' updated pictures.
cosmosuave replied to TD's topic in MIDIbox SID
Your going to have to find yourself an electronics supply store or order from Mouser or someone similar... Radio Shack will not have the parts and their prices are through the roof... Best of luck I am nearing the completion of my stereo SID.. -
Not sure what really resolved the issue... I followed Wilba's suggestions... I was using a different version of the interconnection test... Had to do multiple reboots of the core and then on my scope I saw the 1Khz tri wave...
-
YESSSSSSSSSSSSSSSSS!!!!! I finally got the 1Khz test tone to work on both SID boards finally... Now to finish it off and box it up... Thank you Wilba and others....
-
Thanks Wilba I'll give those things a go but tomorrow strict instructions from my wife that I cannot work on it tonight...
-
Hardware. Stereo SID 6581 Sid chip MIOS V1.9 installed LCD connected and works Getting the following voltages Ensure the following voltage levels: IC1:Vcc(25) - IC1:Vss(14) = 5V IC2:Vdd(16) - IC2:Vss(8) = 5V IC3:Vdd(16) - IC3:Vss(8) = 5V mbhp_4xsid_c64_psu works PCBs and parts from SmashTV I'm stumped with this interconnection test... Have all the IC chips pulled on both SID boards and fail to get 5v on pins 0-13... Except 5v on pin #7 on the left SID board.. # 0: Pin A0 = 5V ; # 1: Pin A1 = 5V ; # 2: Pin A2 = 5V ; # 3: Pin A3 = 5V ; # 4: Pin A4 = 5V ; # 5: Pin RES# = 5V ; # 6: Pin D0 = 5V ; # 7: Pin D1 = 5V-------> on the left SID board.. ; # 8: Pin D2 = 5V ; # 9: Pin D3 = 5V ; #10: Pin D4 = 5V ; #11: Pin D5 = 5V ; #12: Pin D6 = 5V ; #13: Pin D7 = 5V ; #14: Pin CS# = 0V I have rechecked all my connections for being correct and checked the cabling with an ohm meter fo any opens and all is ok... I am starting to think that I need to load some additional hex files such as below.... Search the .hex file which fits for your needs: setup_6581.hex and setup_8580.asm are nearly indendical, only difference is the filter calibration value which will be written into the ensemble BankStick during formatting (6581 uses range 000..FFF, 8580 range 000..600). Where do I find the setup_6581.hex and do I need to install it? 3) if the MIOS device ID hasn't been adapted during bootloader installation, you have to do this now. Download the "change_id" application at the MIOS Download section, and upload following .hex files with MIOS Studio: device_id_01.hex for the first slave device_id_02.hex for the second slave device_id_03.hex for the third slave Appreciate any help on this... THe documentation is great for this but sometimes I find it a little overwhelming and am now thinking there is a bunch of hex files I have forgot to load or do not need to load... I know I'm close but yet so far to getting this to work and my wife is getting tired of me moping about the house trying to figure it out... Thanks...
-
Ok I will do the test on each SID board as a mono SID and see if it will pass the test...
-
I'm using the 6581's ... I have tested with the 6581's out and get 0v on all pins except Pin 7 D1 = 5.1v... Something is not right... Still getting 12v (pin 14 & 28) 5v (pin 14 & 25)...