

workspace
-
Posts
42 -
Joined
-
Last visited
-
Days Won
1
Content Type
Profiles
Forums
Blogs
Gallery
Everything posted by workspace
-
ok my bad. at least it's easy to fix!
-
Everything works fine as long as I don't activate more than 10 steps (and not choosing too many at the boarder eg. steps 1,2,3 or 14,15,16) and I get the "VU meter display". Like that the voltage drops down to 4.4v if i lit all 16 steps it stalls with 4.25v just checked my PSU: it's a cheap cellphone usb adapter with 1A. too little?
-
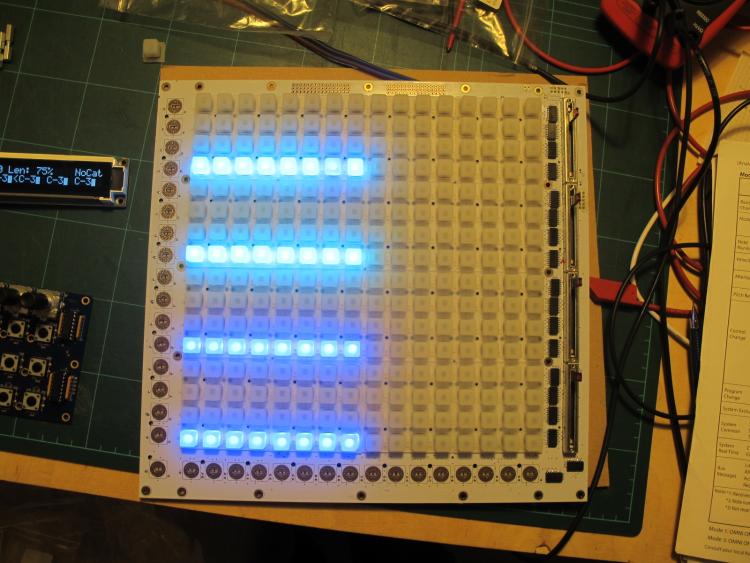
I have a strange issue with my newly built BLM: When I start the SEQV4 and select all 16 steps in the selected Track (G1T1), then switch to the length layer and then to the velocity layer the BLM stalls with the "pattern" showed on the picture. I have to unplug it to fix it. Besides that everything works as supposed. In test mode I can lit all led at once. I have the PICF184685 so I suppose the brown out reset is not the issue and I run the newest firmware (project_with_4_mapped_ains) Before I put everything in the case I want to be sure it's not a hardware bug. Any ideas what my problem is? Thanks Michael
-
Too bad. Tomorrow is family day. Have fun! Michael
-
Did you use flux to solder the SMD parts? I bought this one: http://www.mouser.ch/Search/ProductDetail.aspx?R=8341-10MLvirtualkey59020000virtualkey590-8341-10ML and found it really easy to solder the SMD parts this way: put flux onto the pads. place the part roughly. put some (a tiny bit of) solder onto the iron. hold the part with tweezers and press down one of the pins in the corner with the tinned iron. the solder will flow under the pin. adjust the smd until everything is aligned. now you can put away the tweezers and take the solder wire. go to the opposite side of part and drag some solder over all the pins. thanks to the flux it will only flow onto the pads and under the pin. you can drag the iron up and down until the solder is nicely distributed. you can wipe the superfluous solder of with the iron. then do the same on the other side. I have also some places on the board where the edge of the mask is damaged and exposes the ground. but with this method this was not a problem and I have not shorts. good luck!
-
up & running! thanks to everybody! now I have to wait for the silicon buttons. I ordered them from mouser at the beginning of december and they will ship in february...
-
Thanks! I have the Quad IIC board, but I just realized that the DIN8 Socket I got from Mouser has another pin layout. So I will have to play with wires....
-
Finally all the soldering is done! Now I trying to figure out how to get the blm_scalar app onto the PIC. I read somewhere that I can do this via the SEQV4. But I can't find it anymore (was it on the wiki?) Or should I upload the app with my RME Fireface?
-
thanks!
-
SmashTV sells only PIC18F4685 in his shop. Will this work as a replacement for the 18F4620 that is used for the miniCore?
-
got them. tanks a lot
-
BLM 16x16+X PCB and case order [CLOSED/waitlist]
workspace replied to latigid on's topic in Bulk Orders
Got it & thanks for the chocolate! -
I recently finished soldering my first electronic curcit: It's a Midibox SEQV4! Never thought I would be capable to make such things. A big thanks goes to T.K., wilba, SmashTV, Hawkeye (for the photo tutorial) and everybody who helped making this possible. Now I'm about to discover the power of this sequencer with my volca beats. The volca beats doesn't recognizes velocity, but it let's you change the volume of the 10 drum instruments by CC (40-49). I would like to map the velocity value (100/127) of a drum instrument to a specific CC number that would then be triggered togethe with the instrument. Is this possible with the current firmware? I tried it by playing with the one parameter in the drum track and changing it to CC (instead of Roll) but it seem that the CC number is not configurable in the Track Event Page and is the same as the note/number of the instrument. EG C-1 for BD > CC 36. Is this correct? Thanks for any hints or help Michael
-
BLM 16x16+X PCB and case order [CLOSED/waitlist]
workspace replied to latigid on's topic in Bulk Orders
I too, received no PM with the invoice. Only the one on the 2nd of August. -
BLM 16x16+X PCB and case order [CLOSED/waitlist]
workspace replied to latigid on's topic in Bulk Orders
I' m in as well! Name PCB BLM PCB miniCore Case Shift button M2 hardware 4xLED availability 0 0 - 4 1 12 latigid on 1 1 1 1 1 1 Rowan 1 1 1 1 1 1 Phatline 2 2 1 1 1 1 TK 1 1 1 1 1 1 Altitude 1 1 1 1 1 1 rwo 1 1 1 1 1 1 jojjelito 1 1 1 1 1 1 tashikoma 1 1 - 1 1 1 workspace 1 1 1 1 1 1 Total 10 10 8 9 9 9 -
Full 16x16+X BLM with silicone buttons, matching case. Interested?
workspace replied to latigid on's topic in MIDIbox BLM
Wow, this looks great! I'm too! -
I guess this is the through hole type SD connector for the smash pcb.


