nILS
-
Posts
4,314 -
Joined
-
Last visited
-
Days Won
4
Content Type
Profiles
Forums
Blogs
Gallery
Everything posted by nILS
-
F0 00 00 7E 40 00 01 F7 string every 20 ms *solved*
nILS replied to cimo's topic in Testing/Troubleshooting
Just goes to show that stryd_one is correct and the problem is not the core but the interface ::) -
Copper Rocher (an MBSID inside a former-candybox)
nILS replied to ris8_allo_zen0's topic in MIDIbox of the Week
-
...which turned out to be the problem. An additional pull-down resistor on the burner solved the problem.
-
Hihi :D Yes, it's spikey (the noise itself is from my PC, the cable etc), but not necessarily noisey (yeah, spikes *are* noise too, I know ;-)). I wouldn't recommend it for studio use or the likes, but for a cheap and easy to set up (well, there's nothing to set up really) PSU it's a good deal @ 3€.
-
Smash, if you're reading this: Notice how noone's like "the pcb is fukt. I want a new one?!". I think that's a pretty giiood hint towards "don't throw them out. It's not that bad." :D edit: damn you, i and o mixing dvorak layout!
-
Actually I did. I happened to have this very episode on my computer. I was too lazy to copy the while 23 frames though ;-)
-
I consider changing it atm as people seem to take it seriously... Let me quote myself:
-
Uploading MIOS/apps without MIDI or optocoupler
nILS replied to rasteri's topic in Testing/Troubleshooting
Sure you can, but resistors and low cost LEDs cost $50 a piece here :D Okay maybe $0,10 was a bit off (by about $0,30), but it illustrates my point. -
How about measuring voltages?
-
F0 00 00 7E 40 00 01 F7 string every 20 ms *solved*
nILS replied to cimo's topic in Testing/Troubleshooting
What are you trying to upload? As there's no MIOS on the PIC yet, this is what you need to upload. -
What exactly is the question?
-
F0 00 00 7E 40 00 01 F7 string every 20 ms *solved*
nILS replied to cimo's topic in Testing/Troubleshooting
00000000284621 ms 00000000286512 ms 00000000288402 ms 00000000290293 ms This is an upload request every 2 seconds. That's not a bug, that's the bootstrap loader telling you to upload MIOS. -
Uploading MIOS/apps without MIDI or optocoupler
nILS replied to rasteri's topic in Testing/Troubleshooting
* smaller cases: build your own core module on veroboard or etch it/have it etched, go SMT * fewer components: just don't stuff it * faster programming: Removing the PIC from a finished and closed case, sticking it into the burner, burning it, putting it back on the board and closing a case is faster than the 3-click MIDI version? Remember that you'd have to do that for every software update... It might be good for your project, but you've got to keep in mind that a lot of people are using the boards for various projects. Most of them don't make any sense without a MIDI In. And I honestly doubt that it's really good for your project - leaving out this $0,10 part's got you waiting for a couple of days now ;-) -
Welcome back henrygr! Feel free to start a "Midibox for better living"-petition with your government, I'm sure a lot of 'boxers will join it! :) Whee, it's working!
-
Quick and dirty translation: "Hi guys, my Midibox is about ready and I wanted to report the progress and show some pictures. First up the history. I was looking for a comfortable possibility to remote-control my "lighting system" from my PC. Before I only had a small MIDI-keyboard with 8 pots. The pots were too small for me and there weren't enough keys. So I decided to build one myself. I started with a MBox 64 planning to use 64 buttons each with a LED and 11 faders. After I read though all the info with my "school english" I ordered a core, an LTC, an AIN and 2 DINs and DOUTs from Mike. The soldering was quick and worked without problems, but that's were small problems started occuring as I couldn't install MIOS over the LTC because I was using a UCS-serial converter. After buying a USB-midi adapter it still didn't work. Turns out the PIC had been programmed incorrectly. TK checked it for me and reburnt it - after that it worked. I could install MIOS but the PIC was rebooting every 3 seconds as apparently the voltage was too low, so I switched the PSU from 7V to 9V and it worked. Now that everything worked as supposed to so far I started thinking about the layout of the front panel and ordered it, the case has been hand made. Unfortunately I didn't take the grid size of the vero-boards into account and had to cheat a bit when putting in the buttons. At the moment I'm running the Mbox 64 application, I might switch to the ain64_din128_dout128 as C programming is supposedly easier. The only thing I still need to do is to adjust the LEDs. I'd like to have something like a LED "toggle", unfortunately I'm not really all that good with C/ASM programming, so I'll most likely need your help again with that. All in all building the hardware worked without major problems thanks to the great documentation and help on the forum. So, here are a few pictures, sorry for the quality, I took them with my cell phone."
-
Gratulation! Sieht echt schick aus! STRYD_MARKER (move to MBOTW, pleeeeeease)
-
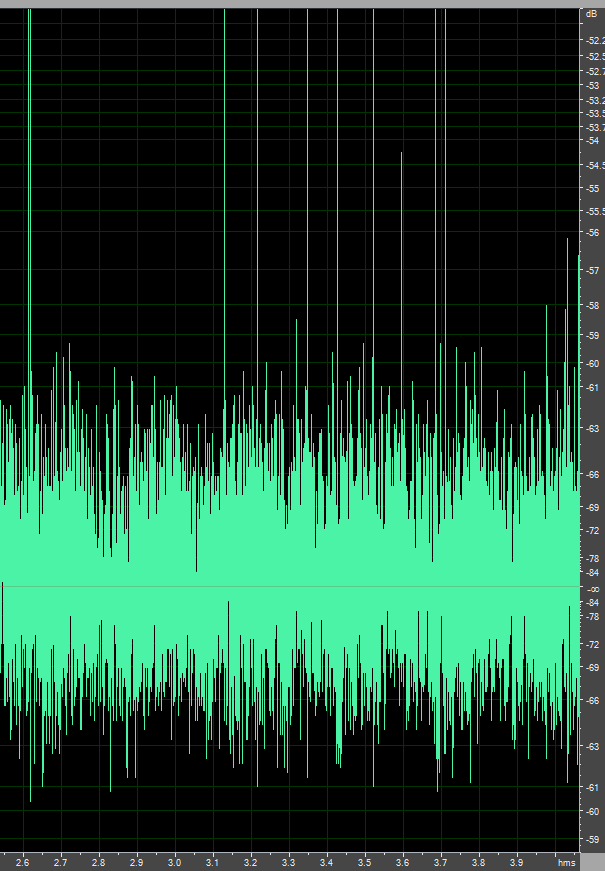
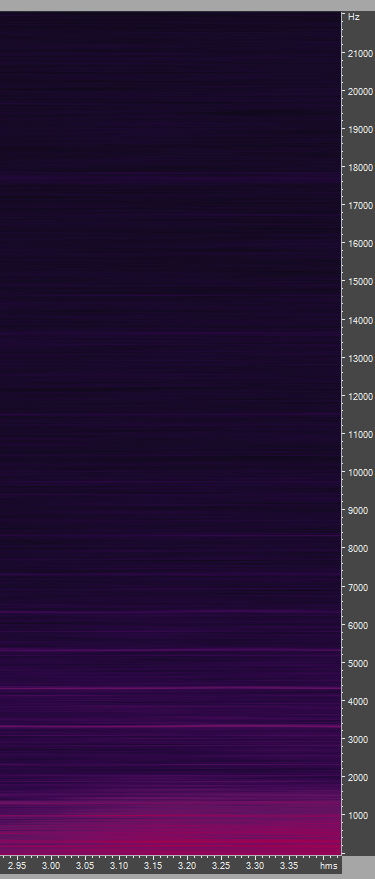
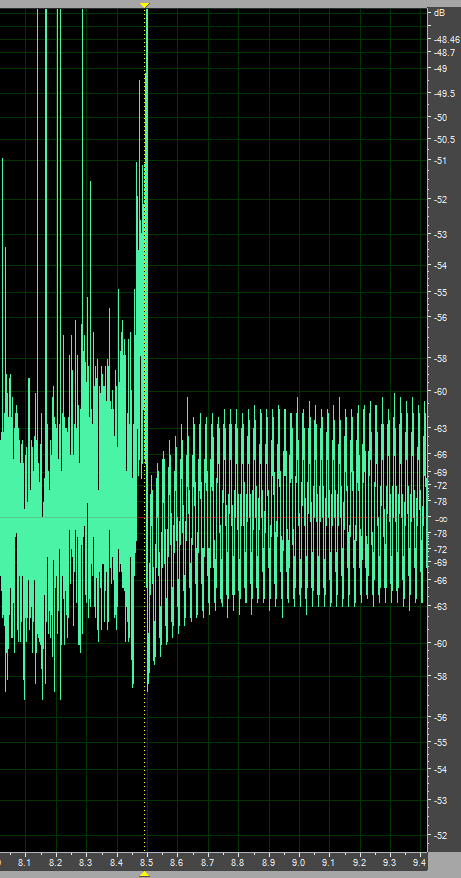
I just got the psu from pollin and tested it with my mbSID v2. About the box: * boards: modular boards from Mike, revision 2 (the old-school-stuff) upgraded to v2 * sid used to record: 8580R5B * power: the above mentioned switch-mode psu, 5V directly into the core (w/o 7805), 12V into the sid module (with 7809) * soundcard: SBLive Player 5.1 *shudder* Results: * the first picture is a capture of the noise. * the second pic is the same part of the wave in spectral view (amplified by 15dB to make it more visible) * listen to the attached mp3 if you're not sure if that's good enough for you * I added the last screenshot to show what kind of noise I get when the cable is unplugged from the soundcard (before the yellow line sid plugged in, after the yellow line the cable is unplugged) - now you know why I said *shudder* earlier I like it :D psu.mp3 psu.mp3


-
Done. :)
-
http://www.midibox.org/forum/index.php/topic,10788.0.html
-
What temperature is the station set to? How long to you have to heat up the pins?
-
Do you solder the ICs directly to the board w/o headers? Are there any specs for you new torch which I really hope is a soldering iron?
-
noise when plugging MIDI cable on the mbSID MIDI output?
nILS replied to sineSurfer's topic in MIDIbox SID
hihi :D Glad to hear it's working now! -
multiple SID outputs into 1? I know it's possible without a mixer, but...
nILS replied to cyutaeha's topic in MIDIbox SID
You basically have 2 fairly easy choices: 1) Passive Mixer 2) Active Mixer Both are described really well here: http://www.nirvis.com/mixers.htm -
Welcome aboard Karlos! :)
-
Darn. [me=nILS Podewski]hands wilba the 1c2s pcb[/me] :D