

Altitude
-
Posts
1,184 -
Joined
-
Last visited
-
Days Won
30
Content Type
Profiles
Forums
Blogs
Gallery
Posts posted by Altitude
-
-
My guess is that its power supply related. Are you sure that its a linear PSU and not a switcher? What is the max current and output rails for the PSU? A 4xsid will pull quite a bit off of the 5v rail and if there are not enough smoothing caps in the system, you could be getting ripple noise. How hot are your 5V regulators getting? They could be shutting down if they dont have heat sinks and you are running 12V directly to them and that would explain your freezing
-
I have tried with different PSUs,
What are you using now?
-
The slim LCDs are 27.99 USD directly from crystal fonts and I am moving forward with that but I'll probably hold out for V2 before committing to anything else
-
Have you shorted the audio in's? That will reduce the noise significantly. Just make sure this is done with everything off
-
My 8580 will be 1u. The big problem I have encountered is finding a display small enough for a 1U rack. Generally, 1U racks which are 1.75" in height will only have 1.4-1.5" of usable height before you hit the top and bottom lids most 2x20 LCDs are more than this (40mm). The one I finally arrived at was this thing:
http://www.crystalfontz.com/products/2002d/index.html#CFAH2002DTMIET
Which comes in at 21.5mm/0.81" in PCB height which will clear the top and bottom by a wide margin AND allow for all 5 buttons underneath (which is critical IMHO) You can pick and choose the other controls but real estate is real limited
The problem however is that the LCD is interfaced via a damned contraption by the name of ZIF connector. This is the 1mm pitch super flat ribbon cable which can only be terminated by another ZIF connector and there are no commercially available ones that will convert it to DIL so its either solder the ribbon cable from the IDC to a ZIF connector (thankfully they make thru hole mountable ones) or etch an adapter board.
My desktop is at a premium so a 1u is the way i am going for sure. Just have to find and build a suitable flat transformer (I hate wall warts)
-
what about the EUSART bug?
-

orginal

It is pricey but if you can get several ppl to go in, its not too bad (x0x one was $40)
-
If you mean does JDM work for 4682, probably yes, try it with PICPgm.
I was wondering more along the lines of do all the features of the 4685 hold true for the 4682. I have not done an in depth comparison but superficially, the 4685 looked like it only varied in the size.
As far as burners go, I use the DIY kit 150 burner and that works for everything, I added an entry to its chipinfo file identifying the 4685 and was all I needed to program the bootloader
-
check out c0nsumers x0xb0x overlay, quite nice actually
-
Does everything also hold true for the 4682?
Wilba: care to post your fix? I have the same problem with my LCD which was bought from Smash TV so this may be a common problem for a lot of ppl
-
Nice! Thanks
-
Will these be compatible the existing burner?
-
How about MIDIbox UC (Universal Control)
Best Regards, Thorsten.
Nice. "you see"
I see a future in advertising for you T ;D
-
The cubase control surface implementation is really straightforward so it should be a neat project!
-
yea, i dont get that, the boards should be grounded toghether
-
They do not recommend the laser stuff anymore since most modern lasers operate too hot for the paper. The inkjet stuff is what you want (you can laser print on it too)
-
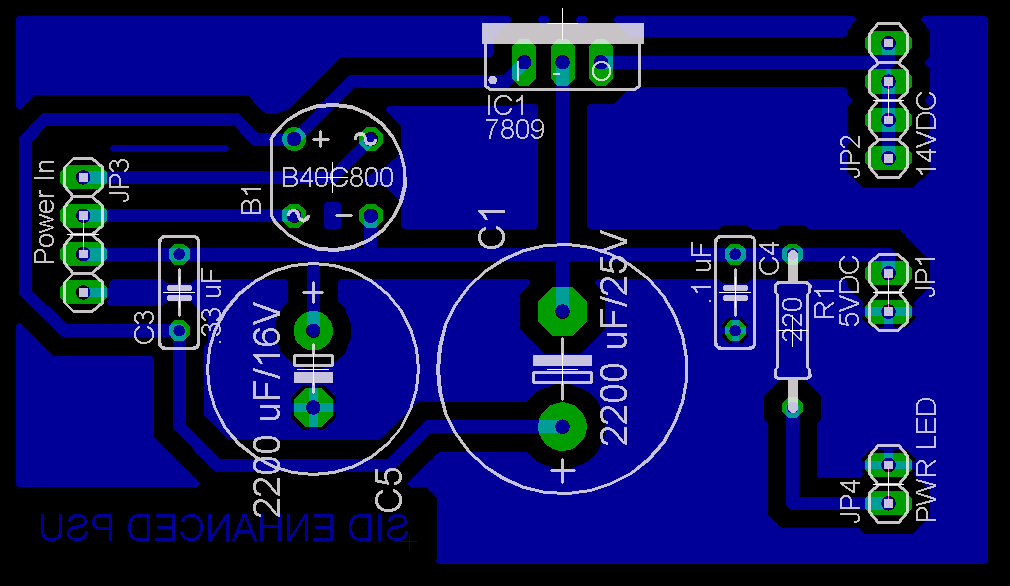
By the way, Does anyone see a problem in not chaining them as in the Optimized PSU schematic and sending each one out separately anyway? It seemed like a good idea to me.
You are supposed to put a cap on the end of the chain to cut down on the digital noise
-
it will be the same thing as the 1 long row. I double check each pin against it's spec sheet and the pinout of the core with continuity meter
-
Carsten, see if this helps:
-
Ok so if i unsderstand correctly, theres no chance i could use the 12VAC/1.2A for both the core(+smashtv lcd) and SID, without having to do as much work as the C64optimised hack? If yes,
if a big ass heat sink required for the regulator?
What kind of ground loop avoidance trick i could easily use?
using the 12VAC for both the sid and core should be fine. Just put a big ol heatsink on the 7805 since it will get pretty hot.
Using the c64 is not really a hack, it really solves alot of the PSU issues since it has both 5 VDC and 9VAC which is plenty for all your power needs
-
Here is an other site that has some info on the use of lazetran + some other tips on making front panels.
Yeah, saw that. that is the old lasertran which you have to bake. the new stuff is just water and clear coat. Plus the lasertran results they got look awful
-
1. Am I jumpering across the right holes anyway where the 7805 used to be?
you should be jumpering accross the outside pins of where the 7805 use to be, the center pin is ground. The reason for this is that way you keep the caps in the circuit (the rectifier can go though) which help smooth out the DC voltage. If you pulled the pad out, scrape away some of the soldermask from the trace right next to the where the pad was and solder to that. Check continuity with a volt meter if your not sure its connected.
2. Where should the 5V output from the PSU be connected to the Smash TV Core board. The Optimised PSU diagram says J2, but J1 on the Smash TV board is the 5V OUTPUT. Should I just connect the PSU to the J1 power input pins on the Smash TV board?Either one if the rectifier is still there. If you take it off, then J2
-
what is the exact sysex string that is being received in MIOS studio when you power it on?
-
i thought It was suposed to say ready?
It will once you upload MIOS
read this:
Reducing noise in my 4x SID? (Other problems!)
in MIDIbox SID
Posted
Sorry, not familiar with the SMPS term, but yeah, thats the source for sure. I thought is was mentioned in the walk-through that you should use a linear supply, but i cant seem to find it anywhere. Unless you want to dive into the linear power supply happy fun design world I would look for a C64 psu