Sasha
-
Posts
1,944 -
Joined
-
Last visited
-
Days Won
3
Content Type
Profiles
Forums
Blogs
Gallery
Everything posted by Sasha
-
...it always was. thanks again mate. I might build soon one VJ controller to play with. I wanted to do it long time ago but wanted to be proper, and making these T-bars was keeping me off. Now it shouldn`t be a problem.
-
Panther, I`ve been hunting red LCD for my MBSID without success. Same problem as you have. I just find and contact Wintsar company about distributors and waiting for an answer. Thanks Wilba. I find this page: http://ouwehand.net/~peter/lcd/lcd_md.shtml but none of the distributors have working website, except Italy but their English part of website isn`t English at all. Panther, will you please inform us about buying the display you need in europe? I am also interested in any unconventional (non-blue) LCD - negative, white, red... so if someone knows ehere in Europe to buy one I`ll appreciate it.
-
Kris, you the man... showing this pictures was extremely helpful! The construction is much simpler and compact than I expected. I don`t need any lever to move the slider pots at all... this slot in the lower part of T-bar is a way to go. So trivial! Thank you very much.
-
Nice packaging... While I was waiting pics to load I thought... why you didn`t integrate some sSID in it since it looks there are enough space above the SEQ, and then I saw ML... beautifull ML. This things never gone into production right? How did you get it?
-

HDD Chatter - Was Re: Making of Endorphin (photo blog)
Sasha replied to Sasha's topic in MIDIbox SID
That is interesting... Is that because gyroscopic effect has smaller effect on smaller disks and shorter arms of reading head, or laptop HDDs are made more solid than regular HDDs? -
I thought of building one also since I have never seen T-bar to buy. I had an Idea using lever to transfer radial movement to horizontal movement of very short slider. It shouldn`t be longer than 30mm if you want standard size T-bar. I think it is not problem to make it work properly but to look good. It must be something out there you can convert to T bar but I dont have a clue what should it be.
-
HDD Chatter - Was Re: Making of Endorphin (photo blog)
Sasha replied to Sasha's topic in MIDIbox SID
Thank you all for valuable information about HDDs, but let`s not go further out of the topic. I don`t mind personally but it is better to keep our house tidy. ;) Thanks for understanding -
HDD Chatter - Was Re: Making of Endorphin (photo blog)
Sasha replied to Sasha's topic in MIDIbox SID
That makes pretty much sense action-reaction... nothing new, but still... I would never expect that kind of problem in todays disks. I think HDDs are most primitive part in modern computer that didnt changed much till this day, except of capacity. ...moving heads, spinning disks coated with oxides... how primitive is that ::) Thanks for informing me about it, I will take that into serious account. I will probably weighted the HDD and than hang it. :P I dont like the idea of using laptop HDDs for audio. -
Thanks MTE, but I`ve got space only for one smallest fan I can find. PS. I am also planning to build myself mobile PC based, simillar to what Kris did and I will definitely use fans on opposite sides of the case. I used bike inner tires before to dump HDD vibrations inside similar mobile PC project. for mounting fans I found silicone glue better. ;)
-
Stryd was right. :) Thank you Mike. Your reply cleared some things to me. I will see what exactly solution will be, but this is enough information/tips to consider. That IR thermometer from Maplin seams very good thing as you can measure some unreachable spots. It would be nice to have, but this is the first time I am struggling with temperature that is not cosed by virus or flew, so I`m not sure will I ever use it again. ;D Maybe when I start building next SID synthesizer in even smaller case ;) I hope I`ll never do. Thanks again Mike!
-
That metal was not aluminum, it was steel but it is very big so I guess it takes heat well enough. Aluminum must be better especially when it cannot be big enough. I really like those RAM heat sinks but are they good enough for SID? I suppose it not hard to find in computer stores. I`ve got 8580
-
I guess tie-wrap is the same as cable-tie. Right Fixing the plate onto SID is not a problem, but this idea sounds good. :) I will probably put a piece of foam underneath the PCB of top SID module to press the aluminum plate against SID. I never used touch SIDs before so this is the first time that I noticed how much they actually heating. It is not that I could fry an egg on it, but still seamed considerably.
-
Actually, I thought to make some holes on the one side of the case, and fan on the other to take out the heat. But as there is a space only for some very small, graphic card type fan probably I wont do much with it. Thermal paste is a must, and I will buy it definitely. ;) Yeah... I would measure it but I really don`t know anyone with decent thermometer. :( I`ll try to "invent" some more space for another piece of aluminum to be screwed to those plates with T profile, but still it can be only flat one without any ribs. Maybe some holes could help for exchanging the heat... I really made my life complicate with this miniaturization. :-\ Thanks Stryd
-
SID builders... any advise?
-
Last night I played with my baby for a while, holding it on my lap... I was fun but pretty unpleasant experience. The SIDs are getting hot. Yes, nothing new. My box is opened now, but I afraid temperature could build up pretty much when I close it. What is the chance to damage the SIDs because of overheating? I cannot do much about it, but to put piece of aluminum on SIDs at the 1st flore. Top ones can use chassis for cooling. Do I really getting anything with this 50x40x2mm piece of aluminum? ??? I have some spare space for small fan, (I know you don't believe it ;D), but I really like to avoid it because of the noise they make. They anyway wouldn`t help much because there is not enough space for air to circulate well. Do I have a problem and what should I do? Should I use those plates at all?
-
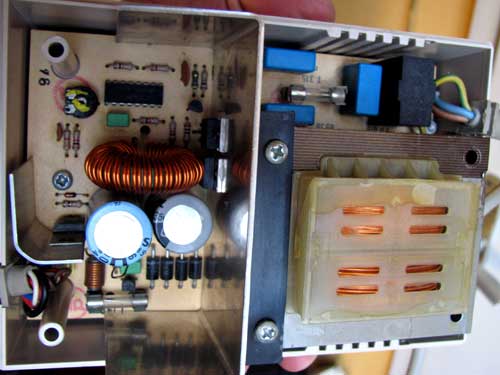
This is the picture of PSU I got with C128 I bought few days ago. I opened it to blow out the dust and was bit surprised when I saw much more components than in C64 PSU. I dont know much about PSU`s and filtration but this big choke and caps looks promising. :) Optimized PSU from C64 sounds pretty good to me powering the SID, but could this PSU be better? It has got some strange square DIN-like connector but it is not problem to change it to normal one. Only problem could be size as it is pretty big, and I won`t use it if there is no any benefit compared to C64`s PSU.

-
That`s Great! Thank you Thorsten
-
Thanks guys. ...well, it must be tidy, not to look good but to fit in. ;D One ot the things that really saved my day was cable ties and hot glue. I would surely brake some wires of the PCB till now if it wasn`t fixed in place that nicely and tied together. Blue sub-panels I bought from the local acrylic manufacturer. I don`t find them specially pretty, they are just there to support the structure. Above everything will be aluminum panels and wooded sides.
-
Yeah, I also seen that today and I wasn`t inspired to bargain anymore. I tried to publish few times on pretty good internet connection and publishing process was awfully slow! ??? By the way, the guy that cuts all that things for me actually ordered laser cutter from America. It cost him $15000 + $1000 for transport as he needed to pay whole cargo container as he said...
-
Here is another view. All wires going from encoders, buttons and LEDs are long just enough to reach connectors, again, to preserve the space. Only the LCD>Core interconnection cable is bit longer, but it is well packed. The aluminum L profile (2nd not on the picture) will be holding memory and LTC modules. My girlfriend said it looks like a brick, and she is probably right. :P I wanted something angled, not so squared, brick-like but it`s just not possible without making it bigger. As I build it It starts taking the shape of of Arthesia`s fabulous sequencer. Great work Arthesia!
-
Here are few pix showing how dense it is. All Core and SID modules are double stacked to preserve precious space, and all that because of bloody side panels that are just 75mm wide, but hey... they are Mahagony, so it`s worth it! :) PS. I`ll split the image posts - one image per post, even they are all optimised for web, to make this page as lighter as possible.
-
The back-panel is populated with connectors. Well, almost, as I left LCD contrast trimer to screwed on it later (hole most right) Beside that back sub-panel needs to be fixed to the chassis of course. I will probably use aluminum L profile or something. I sanded transparent sub-panel with fine sand paper so you can see it this time... ;D
-
To protect coax cable from breaking and to isolate naked joints I applied some epoxy, both on audio and on DIN connectors.
-
Yes, you could see that kind of spacers or as you call it legs on the computer motherboards. I`m not sure where to get it, but it shouldn`t be hard. Ask the guys from computer repair service.
-
jrkirkish, I think you can find alot of inspiration here for making the enclosure. People build it cheap, expensive, quick... it depends mostly about what do you want to look and how much money are you willing to spend on it. Enclosure, is usually most expensive part of any MBHP project if it is CNC milled. You can always make some compromises without loosing much on aesthetics. To me, cheapest but very nice looking front-panel or complete housing is made using laser cutter and acrylic based materials. If you cannot find good service locally I can make you one and send it. Like you, I always dont like to see screws, but it can be avoided using sub-panels that will have as many screws and holes as you need. Top panel will hide that all. It can be fixed over sub-panel with 4 corner screws or easily glued on to of it. Take look at my current project... I have so meny screws and holes all over the sub-panel and all will be hidden when front-panel comes in place. For mounting the PCBs, you can also use 3rd sub-panel like I did it on the link belove. It could have screws and holes wherever you need it. To me it is the best way to have screw-less box. http://www.midibox.org/forum/index.php?topic=8933.0 And, here is the laser cut/engraved panel I mentioned above, if you like it I can make it for you. http://www.midibox.org/forum/index.php?topic=7008.0