
julianf
-
Posts
322 -
Joined
-
Last visited
-
Days Won
10
Content Type
Profiles
Forums
Blogs
Gallery
Everything posted by julianf
-
 thank you : ) I have asked Wilba for the coordinates of the 'optional' mounting points. If there's no issue with them, i may as well cut them into the this run of panels. I can see why Wilba left them off the fpd file, as adding 21 (as per the photo in the wiki) threadded blinds from FPE would increase the cost still more (Euro 17.28 extra with tax) If there are no major issues, i will include the additional work wihout charge : )
 -
I'm wondering why that is, as, given the choice, at equal cost, i personally would go for the recesses and epoxy, rather than the thread. Lets look at this in more detail - With threadded blinds you only have a couple of mm of thread to deal with, in (relativly) soft alluminium. So, if you want to use them, you either have to use somthing like this - Or somthing like this - You cant use one of these - for reasons ill go into in a moment. So, take the first part - You will find that the screw end of the spacer will not have the exact ammount of thread that you need. This problem will be compounded by the fact that youll want a shakeproof washer in there also. So you wont actually even know how much thread you need. Normally this wouldnt be an issue, but, again we're probably only talking about 1.8mm of thread in the blind. 0.5mm too much thread, and youll bottom out, and 0.5 too little and youll probably only actuall be using about 1mm of thread (given that most screws are not threadded perfectly to the ends) 1mm of thread in a soft metal which you will probably have to do up and undo a number of times in the build. Overtighten it just once, and youll wreck the thread. Dont tighten it enough and the shakeproof washer wont bite, and youll get that irritating situation where, when you try and undo the screw in the other end of the spacer, it just spins the whole hex unit out of the panel on the other end, bending up the pcb as it does so. So, thats option one. Lets look at the 2nd part. The spacer without thread. With this you go down, through the pcb, through your washers, into the spacer, and then into the panel with the same screw. We're still only talking a small ammount of usable thread remember, and have you ever measured a batch of washers with some good verniers? Youll find they vary. And then, again, youll want to use a shakeproof somwhere. So how do you determin exactly how long to cut the screw? Ok, so youre not cutting the screw, youll pack it with extra washers. All of which may vary very slightly in thickness... And then you tighten it down a bit too hard again. There goes the thread. So you get left with an unusable mount. No change of helicoiling in a 2mm blind. Possibly you could counterbore it on a drill press and epoxy in a hex spacer though... Part #3 then - No hope with this one. You screw in from the top, through the pcb. Theres no way of easily controling the spacing between the screw head / pcb / spacer at the same time as governing the panel / spacer torque. Theyre all so interdependant. And then we have the epoxy option - No worries with precise measurements with this one. All you need to do is solder in a few switches, and put the switch caps on them, and screw the spacers to the board, using whatever washers you are using. Clean the recesses and fill with resin, and lie the pcb in position. The switches will locate the pcb in exactly the position you want, and you can leave it to set. The bond with the panel will be solid, so you wont encounter that irritation with trying to undo one screw in a spacer and the other end unscrewing insted. The levels will all be equalised when the resin sets. If you always used the same fasteners in the same locations, there would never be any flex on the pcb at all, and even if you mixed them, the error would only be one or two washers worth - you wouldnt need to be staking washers to increase spacing like you may have to in the other options. Say, one day, you mess somthing up, and you give it so much force that you manage to break the resin bond (im not even sure this would be the first thing to break). What do you do then? Use the same spacer, or even get another, and simply epoxy it into place again. No counterboring, no thread reapir - just an easy diy fix. So, i would choose the option ive suggested regardless. I often fear that when you say to someone that they cant have somthing they want it even more, but, possibly not for the right reasons. Id be interested to know exactly why you (or indeed anyone else) thinks that threadded blinds would do them better in this instance. (i guess ive gone to the trouble of explaining in this much detail as i dont want this to be looked down on as a cheaper, but not as good, option - sure its cheaper, but, for all the reasons above, id really have doubts at someone being able to suggest why threads would not be both more trouble in construction, less durable in use, and undoubtedly much harder to repair if somthing does go wrong)
-
They are GBP 70 per set (front and rear) It would be possible, however i do not have the required data. Wilba's FPD files show the positions of the blinds, but not these additional holes. When creating a surface-to-surface bond, the position can be gained from the pcb (ie the pcb itself locates the contact point), but if im to cut the holes, i need to know the true co-ordinates (which i dont have) Possibly, although, to be truthfull, id rather make all the panels the same. What, that company that tries hard to evade eu regualtions, causes *evreyones* cost to increase (buyers love it as they naively think that they dont pay the fees...), puts "safe" on evrey email they send out to you (including the ones where they tell you theyve lost your money), seems to have poorly coded AIs handling their email responses, offers no 'seller protection' whatsoever outside of ebay transaction, etc.etc. Nope, i use Google Checkout as a card carrier where needed - you know, that little company whom ebay claims isnt competant enough to handle processing cards on their site...
-
a few people have messaged me, so it looks like this could be a go'er. ill wait untill late next week, and then order in the metal, so as i can start work on them the week after. as for x0xb0x panels - did you meen the panel type shown with the mb6582s in the mb6582 flea market thread? if so, then yes, i currently have them in stock (or at least im pretty sure i do - can check tommorow!) ps. save me asking later - would anyone who posts also like to chose their infill colour. options are - red yellow orange green purple blue white my favourite is the green, but i quite like the orange also. (mixing different colours on one panel isnt somthing i much want to get into doing, as it takes a lot more time)
-
I had an order for a mbseq panel recently, but its not really feasible to make them in 1-offs, so i made a handfull (see thread in seq forum) and offered the spares for sale (i completed 4 in total) However, unfortunatly, one person missed out on the spare panels, and would still like one. The panel is a fussy panel, and i cant buy in cut-to-size for the run in less than 5-off, so would there be 4 people interested in a panel? This text is coppied from the description posted previously - Im not able to undercut the big engraving company by quite as much with these ones as im able to with the mb6582s, but the saving should still be well worth having - Cost per panel would be GBP 100, inc EU taxes, packing, but ex. shipping / transaction costs. Items would be shipped from the UK. Bank accounts are held in Sterling (GBP) and Euros. Credit cards can be processed at cost. I know that the number of people with PCBs is limited, so i probably wont do be able to take care of the last person who missed out on the previous batch if im going to get left with 4 panels unaccounted for. If youre interested, drop your name on a post below. If the total number approaches five, then ill get things in hand. If i could ask you to please not post unless you actually do want a panel, as, like i say, there are not that many PCBs about, and i doubt there will be significant outlet for unclaimed orders. Edit - Here is a table of the people who have confirmed below that they want a panel, and the quantities / colours etc sineSurfer 1-off (white) olga42 1-off (green) blackcelcius 3-off (white) gtxdude 1-off (green) A number of people have expressed interest in PMs but... I'm *only* going to cut panels that have a clear and public statment of intent on this thread. This is becuase i fear just getting left with a load without buyers. If your name isnt on the list above, please make your quantity/colour clear the thread below, and ill add your order to the list : ) Thank you, Julian
-
ok Julien, will do in the morning. So, one remains. Julian
-
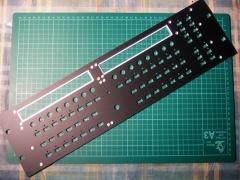
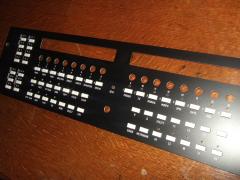
I have two mbseq panels availible. There are some pictures below - The availible panels are the one with the orange infill and the one without infill. The design has some minor changes to wilba's original. These are noted below - The recesses on the rear of the panel are all milled to 2mm depth. The circular ones are cut large enough to fill with resin and then 'sit' a hexagonal threaded spacer in. I make the panels like this as i cant (easily) make threaded blinds here, and i do not think that such shallow threads are very strong anyhow. The recess is cut to give much more contact area than, for example, the surface-to-surface bonds that a lot of people initially had trouble with the mb6582 spec (indeed, the mb6582 panels i personally cut have corner holes to get arround this also) The screen recess has a small change also in that it is cut 0.5mm deeper than Wilba's original specification. This meens that the cut is 2mm deep. Given that acrylic is often found in 2mm thick sections, this meens that a section can be hand cut (DIY) to fit in from the rear, without leaving a large 'step' on the front side. Basically the change allows the builder to use commonly availible material, cut by hand, and have all edges invisible without a large 'step' on the front of the panel, or a bit of acrylic sticking out on the rear side. ...anyway, i have two of the panels unacounted for @ GBP 100 each (inc EU tax, ex shipping / transaction charges) As always with me, shipping is charged at cost, and packing is free. Payment can be by bank transfer in GBP or Euros (converted at HSBS's euro 'buy' rate) or by card (Google Checkout) Cards are surcharged at cost. Thank you, Julian
-
From the album: Julian F
-
...what ssp said : ) if you cant get good physical measurements, then do your printout with centermarks on the hole (cross hairs) and then, when youre looking through the pcb onto the sheet of paper behind, judge how far out the hole is. alter the CAD file, and then repeat. can take some time, but you can get it perfect in the end. good luck : )
-
ps. do you have the plastic for your panel's screens yet? if the ones im cutting for the above batch work out correctly, ill cut a coupld extra for you, and mail them over...
-
I thought your displays were blue? This is the tone of blue i have - But it seemed too dark against the black metal? Its not that much fun (you have to scrub with solvents and a toothbush for some time) but if you ever feel real strongly about it, its possible to change the colour of the infill on your panel.
-
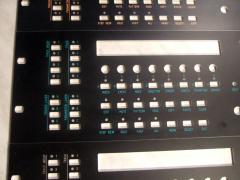
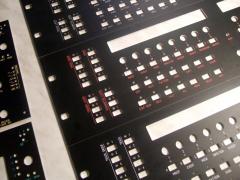
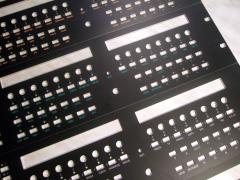
These are not quite finished, but i have been messing with infill colours - The panels are the same as Phil's build a page up in the thread, but with different coloured infills. You can see a couple of mb6582 panels creaping in at the side also : ) The mbseq panels are not yet complete - i still have the rear side milling to do, and i have some acrylic in that i want to use to make up some screens. Theyre not even properly cleaned up yet (oily smudges!), but im really just posting here to show the infilling. The different colours are - Natural (ie no infill) Red White Green (i like this : ) Yellow Orange I tried some with blue and purple also, but they were maybee a little dark against the black? I think the different colours will look very good with black button caps, and a similar colour of LCD screen to the infill (which is part of the reason i choose lots of different colours) Interested to know what people think of the colours? Julian
-
From the album: Julian F
-
From the album: Julian F
-
From the album: Julian F
-
Gloss Red and Gloss Black MB-6582 panel sets back in stock : )
julianf replied to julianf's topic in Fleamarket
Hello, Yes, i have some gloss red sets cut and good to go out right now. I have pactec pt10s, however... (and i think i said somthing to this effect above somewhere...) I buy them by the box load from pactec, but have never been 100% satisfied with the quality (some cases have small marks etc) so i 'grade' them when they get here. Im afraid i 'save' the best ones for my own x0xb0x sales, and the only ones i then retail are the b-grade ones. My general feeling is that these b-grade ones are no worse than the main suppliers sell (i buy the cases from pactec / they buy them from pactec) its just, with luck, you may get a perfect one from the other suppliers, but from me, ive allready filtered off all the spotless ones! ..but im cheaper. So, it depends whether you want to take an expensive gamble with the main suppliers and maybee (but maybee not!) get a spotless case, or spend less with me, and know what youre getting from the start! Anywy, PM sent.... -
yeah, i know... its irritating, i edited the sales page, and re-uploaded it, however the transfer failed, and i didnt realise for a few hours its all fixed now, but thank you very much for pointing it out to me - noone else did, otherwise id have fixed it sooner! thanks, Julian
-
Its time that i moved some of the bits and pieces that i have around here - http://www.thebeast.co.uk/cnc/sale.html If you click on the link, you will find a selection of panels, in different formats, and for different devices. Some are perfect whilst others have defects that have caused me not to sepperate them from usual stock. All panels are photographed, and any defects noted. Some panels are very cheap, whilst others are just good value. Im located in the UK (europe). The company runs accounts in both euro and sterling, and can take cards with all the usual caveats. I will ship internationally at cost price. Indication of postal costs are given. In an ideal world, i wont be making b-grade duplicates.... ; ) So hopefully, when theyre gone, thats it at the given price. Thank you, Julian
-
Gloss Red and Gloss Black MB-6582 panel sets back in stock : )
julianf replied to julianf's topic in Fleamarket
Valant: I ship all over, and a number of the comments in the thread above from those who have recieved panels are from people located in the states : ) The postal costs are on the first page of this thread. With regard to the infill - Nope, no photos of mb6582 panels specifically. The test one i did i stripped out again with solvent (i only tested small areas anyhow) ...however, im sure you can imagine. There are colour examples on the cnc page of my website, and theres an example of blue on the klee panel a few posts up. Ill have to check the colours, but i think i have - Yellow Bright (almost fluro) Orange Blue White Green Red Black Purple pingosimon: Ok, ill dig some pt-10 cases out and you can have a look at them. If youre not fussy, and want to save some cash, i have two reject mb6582 panels in gloss black also. Ill take some snaps of them too, and get them uploaded in the next few days. -
Gloss Red and Gloss Black MB-6582 panel sets back in stock : )
julianf replied to julianf's topic in Fleamarket
Sorry for the slow reply - ive been trying to keep away from the computer over the christmass period. The short answer is "Yes i am still cutting" ...however, itll probably be 10 days or so before im back in stock with the mb6582 panels, due to the downtime in production over the holiday period. Im afraid I have normalised all finishes to the same price now - which is good for those buying gloss panels as the increase in VAT we're suffering here in the UK has effectivly been leveled on to the matt panels only. However, this is obviously not so great for those buying matt : ( Compared to the "other" supplier, however, that charges about £120 per set, the price is still somewhat competative! : ) Anyway, im also considering offering infill in fancy colours to the matt black sets. I dont know if there would be much interest in this? I would not want to get into mixing different colours on the same plate, as thats quite labor intensive, but i have done some tests with blues and purples which do look quite nice across the whole panel. I may also have some b-grade and / or painted pac-tec pt 10 cases for sale soon. I buy these by the box load for x0xb0x builds, and always there are some in the box where the screws on one unit have touched the plastic on another. As i will only ever ship perfect x0xb0x units, i cant use cases with even the smallest of marks for them. I will not get the compressor out untill the weather improves though, as its too much bother to heat the workshop for painting at present. Coating platics without the correct paints is asking for trouble, so, if i do spray them, they will be coated with proper adhesion promotors, and probably 2pak paints. This is a workshop, compressor/gun, breathing apparatus (2k paints give off cyanide compounds as they dry) job however, so its not somthing im gong to do quickly tommorow : ) -
 protofuse >>from schaeffer ? hehe... nope, from me, for someone else, and <salesman> cheaper than shaeffer </salesman> ; ) http://www.thebeast.co.uk/cnc/
 -
...yeah, but itll look way more impressive once youve built it! : )
-
Ahh, you mistake me for someone who actually gets arround to building things for himself! (the metalwork was not for me, but for someone else) When you mention button clearance, do you meen arround the edge of the buttons, or behind the buttons (ie distance from pcb to front panel) If its arround the buttons, the clearence is pretty minimal, but fine (i meen you dont want much anyhow). This is using wilbas fpd dimensions, and my cutters. If youre talking behind the panel, between that and the pcb, i wouldnt know for certain (as i dont have a pcb) but, going from my experiance with x0xb0x building, i would say... On a x0xb0x i use 12mm spacers, and 1.5mm panels. This 3mm panel has 2mm recesses in the rear, so, using 12mm spacers (the same as i use on the x0xb0x) will result in the button caps being 0.5mm higher. Which i think would be fine ergonomically. I wouldnt want the caps 0.5mm lower, but 0.5mm more sticking out will be fine. Without a mill, im not certain how you are to do all the square holes, but, assuming you have them... I wouldnt not bother with the recesses on the rear for the pcb pillars. I would 'hack' (for want of a better term) the surface at the back of the panel to rough / gouge it as much as possible (i dont meen sand, i meen score as much as you can). I would then make sure its very clean, and the hex spacer very clean also (remember you would need 10mm and not 12mm then, as there would be no recess) and epoxy them on using a slow setting resin (a 15-24hr one) I would fit the spacers to the pcb, and some switches + caps to locate the position on the panel, apply the resin to both the panel, and the spacers (which are bolted to the pcb) and sit the whole lot together. The switch caps / panel components will locate the pcb in perfect alignment with the panel, and then you can leave well alone to set. ...applogies if this has all been covered before, but its a long thread now, and i must admit to not having read the whole lot!
-
some infill residue left arround the buttons and led holes - otherwise shiny : )
-
From the album: Julian F