

Wilba
-
Posts
3,310 -
Joined
-
Last visited
-
Days Won
2
Content Type
Profiles
Forums
Blogs
Gallery
Everything posted by Wilba
-
-
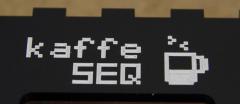
Based on his other post, he used acrylic on the Arctic Ice case. I think you'll get better results with enamel paint. BTW my experience differs slightly though... the Tamiya is quite liquid out of the bottle... yet very dense with pigment. Two coats is all you need, if you fill up the engraving two times and squeegee away the excess... since both coats are thin, after drying it will sink down into the engraving. Thick coats won't sink down so much, and will stick to the mask, and the edges won't be as clean. SRSLY the results I'm getting with enamel put my original acrylic paint filling to shame, and I'm a bit embarrassed it's taken me over a year to try out other paints and techniques. I hope there aren't too many messed up sammichSID panels due to my negligence. :whistle: P.S. kaffeSEQ will be available in Arctic Ice. It's amusing that people want kaffeSEQ when hardly anyone knows what it does, including me! The design brief was "make something better than Gorf". Maybe that was nILS' idea or maybe I just told him it had to be better than Gorf if we wanted me to sell kits. I forget. I used my powers of persuasion on nILS to tweak his design and make it more "kit-friendly", but I have NFI how to use it. Maybe once upon a time I did, way back when I made that proto which is just a bit of veroboard stuck on top of a sammichSID base. It's been a while since then. It has steps and stuff. It uses sammichSID-style bits. It fits together. I came up with the name, though... and if you like how cool it looks, that's all my idea, please send kudos and cash to Jason.S.Williams@gmail.com but SRSLY don't ask me what it does.
-
I just bought 652-PEC16-4220FN0024 which is the new Bourns version, will trial them in the current batch of sammichSID kits. I think it would be easier/cheaper if I just post you a new one, if you're not already buying stuff from Mouser.
-
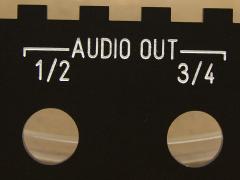
Here's some EXTREME PAINT FILLING... click for EXTREME CLOSEUP.
-
From the album: Wilba
© © 2010 Jason Williams
-
I pulled off another triangle in an "A" doing the kaffeSEQ case... but this is actually easy to fix, just scrape off paint after it is tack dry. I also wasn't so vigorous with the squeegee on the kaffeSEQ panels, and it doesn't cause any problems, i.e. lots of thinned paint around an engraving is OK, mask peels off cleanly. I think the most important thing to remember is leaving the paint to dry fully before peeling off the mask, or you end up with smudges, strings like melted cheese, lifting or pulling out paint from the engraving, etc. BTW I did a sample using red but it came out too dark. How did you get the red so bright? What brand of paint are you using?
-
From the album: Wilba
© © 2010 Jason Williams
-
From the album: Wilba
© © 2010 Jason Williams
-
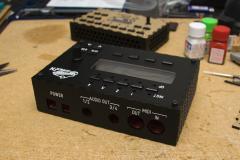
As originally planned, I will run this bulk order of OPL3 chipsets in between the current batch of sammichSID kits (packing now), and a batch of sammichFM kits (January?). I have in stock 100 OPL3 chipsets, which is enough for 50 sammichSID kits (assuming all kits come with OPL3 chipsets), plus another 50 spare for this bulk order. I am assuming that there will be some people cancelling their order in this bulk order and choosing to buy a sammichFM kit instead... plus there are always people who join bulk orders and then never follow through to actual payment. So 50 spare for this bulk order is IMHO plenty.
-
- check the 74HC165 and 74HC595 are in the correct positions - check orientation of the resistor networks - check for shorts or bad solder joints in the header between the PCBs First and last column of LEDs being on might suggest a short around IC3/IC4, or even a LED in reverse polarity.
-
After seeing Seimpre La Luna's painting, I decided it was time to give enamel paint a try, and I am so much happier with the result. I have perfected the technique, I think. I use a 5mm x 15mm piece of thin flexible plastic, cut from the clear plastic that you find in packaging. I use this piece of plastic a a mini-squeegee. Just like silk-screening, I use the squeegee to wipe off excess paint. Here's the step-by-step guide: 1. Use a good enamel paint. I'm using Tamiya Gloss White (X-2) 2. Apply paint to the engraving so it fills up to the backing paper. Do one word or about five letters at a time. 3. Remove excess paint using the squeegee. Use firm pressure, but avoid scraping off isolated pieces of mask, like inside "A" and "P". Scrape off in two directions. 4. Leave to dry at least one hour. The paint should have lowered into the engraving. 5. Do a second coat (repeat steps 2 and 3). 6. Leave to dry overnight! (I guess 6-8 hours would be enough). 7. Peel off mask. Paint should not be stringy, and the mask should not pull paint out of the engraving. It only takes two coats of enamel paint to give a solid fill, and still be lower than the top surface of the acrylic. Wiping off the excess using the squeegee means you can fill the engraving to the top... my previous method of using a paper towel to remove excess paint would soak up the paint in the engraving and require more coats. POIDH? Here you go. Note the triangle inside the "A" of "SAMMICH" came off during the squeegee phase... this was fixed with a craft knife, and I could touch up the black line to the right... but I won't bother. It looks better in real life - the camera picks up every spot of dust and paint flecks.
-
From the album: Wilba
© © 2010 Jason Williams
-
From the album: Wilba
© © 2010 Jason Williams
-
-
From the album: Wilba
© © 2010 Jason Williams
-
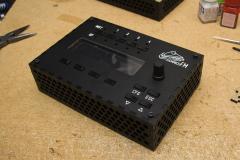
I'll just blat a whole lot of things to do without a lot of preamble: - check multimeter is set to DC - check 7809 and 7805 are in correct position - check voltage at 9V points and 12V points, report values (see section 5. Voltage Tests, Step 1) - check diodes between 7809 and 7805 are correctly oriented - check voltage going into the 7805, between middle pin (ground) and pin connected to D5... should be around ~7.6V - check middle pins of voltage regulators are connected to ground
-
The 12V AC 800mA will be OK, most likely it's unregulated. Leave it set to 12V. The 12V DC 1500mA might be preferable if it's regulated. If you measure exactly 12V DC out of the tip, then it's regulated. Use shunts in JBP so the 7809 receives exactly 12V, not 12V - 1.4V from the bridge rectifier. Rocker switch: flicking UP is powering ON.
-
Need adice trouble shooting sammich - buttons/knobs **FIXED**
Wilba replied to Technosoul's topic in Testing/Troubleshooting
I blame nILS :poke: -
Yes... I just "acquired" an iPad through exploiting government handouts... and was disappointed that it won't even boot until you connect to iTunes. Disappointing, really... you'd think it could be marketed as an alternative to a desktop or notebook computer. Now that depends on how much DIY you go... I agree that some LEDs and cheap switches soldered onto veroboard and buying DIN/DOUT/Core32 modules might be cheaper... but to make anything that looks decent, the 16x16 BLM cost will be close to the cost of a new iPad. Consider 256 "good" switches, and a top panel/frame, and a case, etc. Not that I'm promoting iPad over a hardware BLM. The iPad can do more than just be a BLM, but it doesn't have "real" buttons. In case you're interested, some examples of "doing more": http://hexler.net/software/touchosc http://www.tradlessons.com/iJammer.html http://www.morphwiz.com/
-
SORRY I CANNOT HEAR YOU OVER THE SOUND OF HOW AWESOME THIS SAMMICHSID IS.
-
Thanks! If it's no difference with JBP shunts, I can't explain it... if there is exactly 12V going into the 7809, there should be exactly 9V coming out. So I'm tempted to blame the 7809 being at fault, and/or it's sagging under heavy load (which it shouldn't be with no SIDs and no LCD connected). Strange. But if it works, and you're not getting any audio artifacts then fuggetaboutit ;)
-
Hex uploads to Midibox SIDs not working
Wilba replied to pingosimon's topic in Testing/Troubleshooting
I have zero experience with Mac, but I know that it sometimes Macs don't play nice with MIDIbox and sending/receiving SysEx... but I thought that was when using a Java interface (i.e. what MIOS Studio 1 used). Let's say it's not properly sending/receiving SysEx, not flushing buffers when it should, truncating/splitting up SysEx... etc. then you will get this intermittent working behaviour. Maybe you can upgrade/downgrade the M-Audio Firewire 410 driver. It might be a newer driver with the new OS. Newer doesn't always mean better.