

ssp
-
Posts
659 -
Joined
-
Last visited
-
Days Won
4
Content Type
Profiles
Forums
Blogs
Gallery
Posts posted by ssp
-
-
Decided to keep the buttons required for the selected item value change. It allows me to add space for a second panel to cater for these and also the menu system linked to a small oled.
also a couple of other things i want to add now.
-
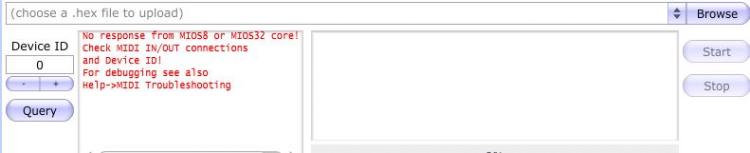
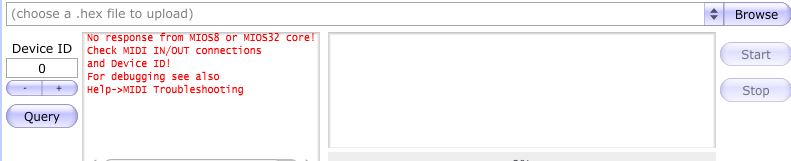
put pictures of yours up, the front and back of the board, make sure they are clear photos. The only way to know if anything isnt right is by photos,of the pcb both side.
are you sure have the right midi in and out selected in mios studio?
Thnigs to do
1: take good clear pictures of the pcb top and bottom
2: what midi interface are you using?
3: screenshot of mios studio with your midi interface connected and the in out ports shown setup.
4: try sending the hex file and take a screenshot of the mios studio window when this is done if it fails or not.
Then we can start looking at this for you.
I will dig out my board and gm5 and show you mine linked up this weekend.
hopefully it will help.
regards!
-
i posted in your other thread.
-
re flash the bootloader onto pic using your pickit2
fit the pic into your mb_ng make sure you have polarity correct pin 1 to pin 1
once you have done that you need to connect a midi interface to your computer, and connect the in and out midi ports to the midi in and out on the mb_ng module.
MB_NG OUT----> COMPUTER MIDI INTERFACE IN
COMPUTER MIDI INTERFACE OUT----> MB_NG IN
open Mios Studio
If you are using port 1 in and out on your midi interface then select the interface in the drop down menu for in and also for out

then you load the mb_ng hex file
send to your MB_NG pressing start button
the mb_ng wont show up just your midi interface, you choose the ports that its connected to.
when i did mine i used my GM5 interface
so in Mios studio it showed just the midi interface ports
I chose gm5 port 1 for in and out in mios
I hope this helps, if not let me know and i will grab mine and do a reflash with photos to show you.
-
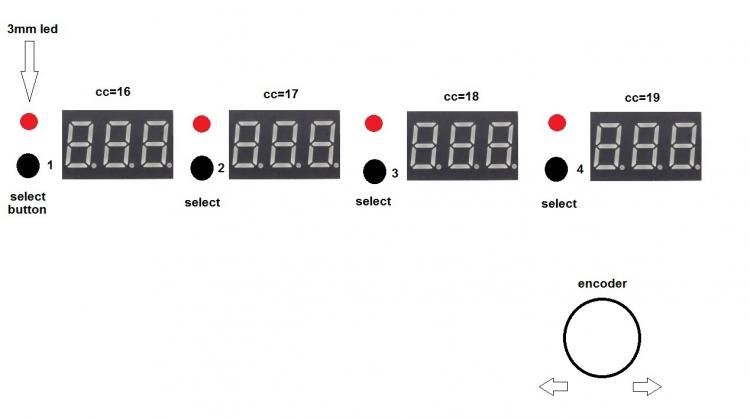
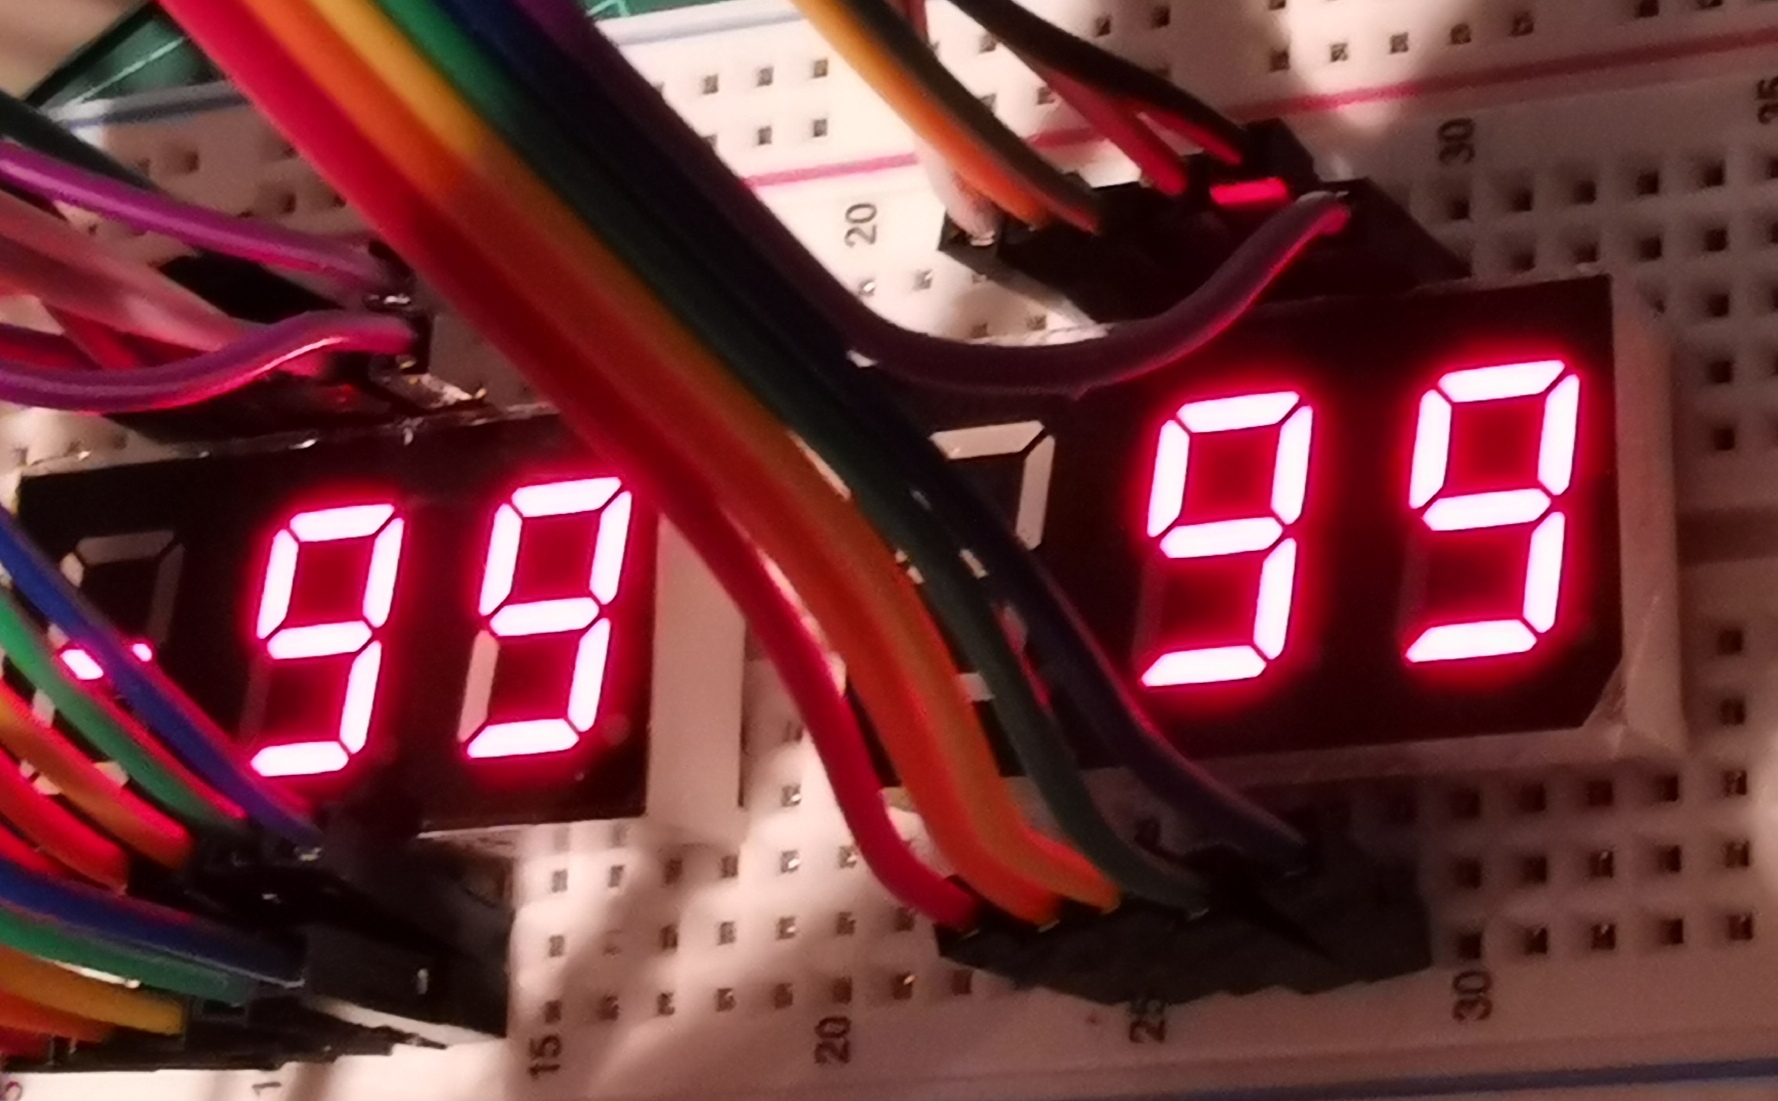
Ok this is working fine now i can use an encoder to select up and down over 3 displays.
but I cant figure out how to have a single button replace the need for the three test buttons here:
EVENT_BUTTON id= 4 type=Meta meta=SetBankOfHwId:1 range=1:1 button_mode= OnOnly # "Bank 1"
EVENT_BUTTON id= 5 type=Meta meta=SetBankOfHwId:1 range=2:2 button_mode= OnOnly # "Bank 2"
EVENT_BUTTON id= 6 type=Meta meta=SetBankOfHwId:1 range=3:3 button_mode= OnOnly # "Bank 3"What would be better is not to have a button and when the selection encoder ( encoder id 5) is turned to the relevent item from say "bank 1" to "bank 3" that it automatically allows me to use ENC_id=1 hw_id=1 to change the value of bank 3.
Or would this require a single button instead?
Im pleased i got it to sweep up and down the banks, its just the methid of selection now. I have looked over the forum for inspiration but not found anything yet.
any pointers gratefully accepted!
-
i had another idea on this,
instead of having 16 buttons to select each 3 digit display...... is it possible to use an encoder with push switch instead of all the buttons? give each button a range value so its not just changing per indent step.
using the buttons it works fine and has been tested. it also forwards to an Led to show its the active one
Is it possible to replace the buttons with an encoder instead? or could I use a pot and set the values ranges per display?
display 1: range 1-10
display 2: range 11-20
display 3: range 21-30
In effect it becomes a selection menu then press the encoder or pot knob down to select the display thats chosen, you then use the second encoder to change the value from -99 to 99.
I am trying to find an example on the forum to use as a template to modify to try this out.
If anyone has any pointers please let me know.
-
11 minutes ago, zener said:
hi , link seem no work ,
any chance for working one ?
thanks
here
http://www.midibox.org/dokuwiki/doku.php?id=mc_protocol_mappings
-
On 20/08/2020 at 0:08 AM, totoRaymond said:
Hi,
I'm not sure i undesrtood your question well but it seems to me that you need to use the bank function. for example:
EVENT_ENC id= 1 hw_id= 1 bank= 1 type= CC chn= 1 cc= 0 range= 0:127 fwd_to_lcd=1 lcd_pos=1:1:1 label= "%3d"
EVENT_ENC id= 2 hw_id= 1 bank= 2 type= CC chn= 1 cc= 1 range= 0:127 fwd_to_lcd=1 lcd_pos=1:1:1 label= "%3d"
EVENT_ENC id= 3 hw_id= 1 bank= 3 type= CC chn= 1 cc= 2 range= 0:127 fwd_to_lcd=1 lcd_pos=1:1:1 label= "%3d"

EVENT_BUTTON id= 4   fwd_id= LED:4   type= Meta meta= SetBankOfHwId:1 range=1:1 button_mode= OnOnly   # "Bank 1"
EVENT_BUTTON id= 5   fwd_id= LED:5   type= Meta meta= SetBankOfHwId:1 range=2:2 button_mode= OnOnly   # "Bank 2"
EVENT_BUTTON id= 6   fwd_id= LED:6   type= Meta meta= SetBankOfHwId:1 range=3:3 button_mode= OnOnly   # "Bank 3"
In this example, when you press a button, it activates the corresponding EVENT_ENC and deactivates the others.
Is it what you're looking for?
Cheers,
Thomas
On 20/08/2020 at 0:08 AM, totoRaymond said:Hi,
I'm not sure i undesrtood your question well but it seems to me that you need to use the bank function. for example:
EVENT_ENC id= 1 hw_id= 1 bank= 1 type= CC chn= 1 cc= 0 range= 0:127 fwd_to_lcd=1 lcd_pos=1:1:1 label= "%3d"
EVENT_ENC id= 2 hw_id= 1 bank= 2 type= CC chn= 1 cc= 1 range= 0:127 fwd_to_lcd=1 lcd_pos=1:1:1 label= "%3d"
EVENT_ENC id= 3 hw_id= 1 bank= 3 type= CC chn= 1 cc= 2 range= 0:127 fwd_to_lcd=1 lcd_pos=1:1:1 label= "%3d"

EVENT_BUTTON id= 4   fwd_id= LED:4   type= Meta meta= SetBankOfHwId:1 range=1:1 button_mode= OnOnly   # "Bank 1"
EVENT_BUTTON id= 5   fwd_id= LED:5   type= Meta meta= SetBankOfHwId:1 range=2:2 button_mode= OnOnly   # "Bank 2"
EVENT_BUTTON id= 6   fwd_id= LED:6   type= Meta meta= SetBankOfHwId:1 range=3:3 button_mode= OnOnly   # "Bank 3"
In this example, when you press a button, it activates the corresponding EVENT_ENC and deactivates the others.
Is it what you're looking for?
Cheers,
Thomas
Just to let you know I applied a variation of this example today, and it worked first time!!! i had to take the fwd to led aout for now as i only have the dout matrix running, but the selection for each 3 digit display from a button and a single encoder works.
-
Edit. Ignore
-
4 hours ago, warpboy said:
Hello,
I have 3 DOUT R5 pcbs, never soldered.
I'm in France.
Let me know if you're still interested ;)
yes let me know a price with postage to the uk. thanks
-
23 hours ago, novski said:
Where are you located?
in the uk i dont mind postage costs
looking for a couple 2 is great 3 better, 4 bonus!!
-
If anyone has some Dout r5 pcbs spare I am looking to buy some. Thanks
-
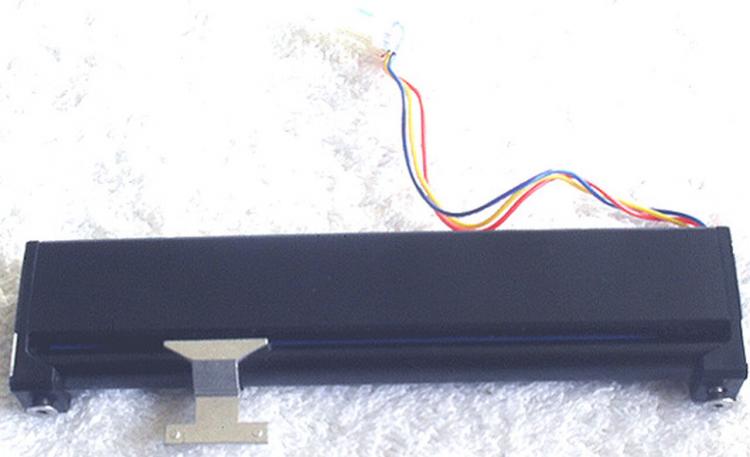
also need better photos please, all around the fader, showing it all in the shot not just close ups. top and bottom, also how the cable is mounted for the fader movement etc. Also what desk is it from etc. as asked.
-
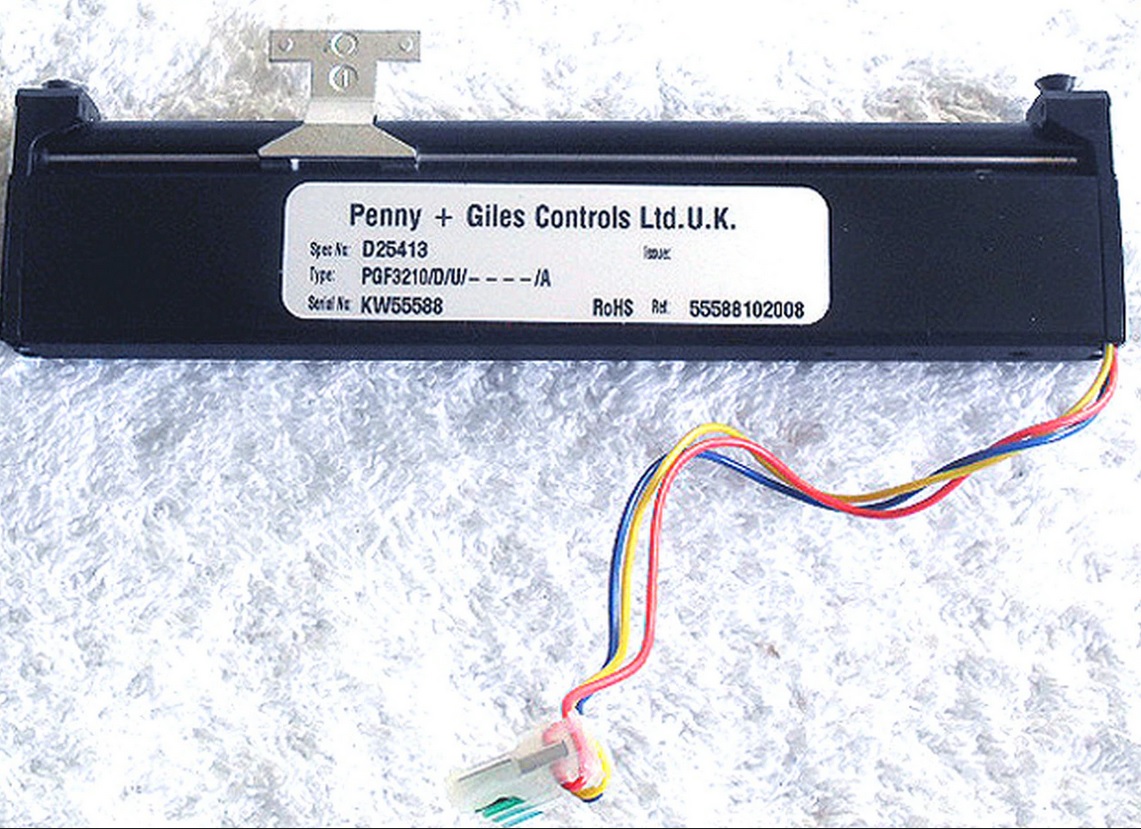
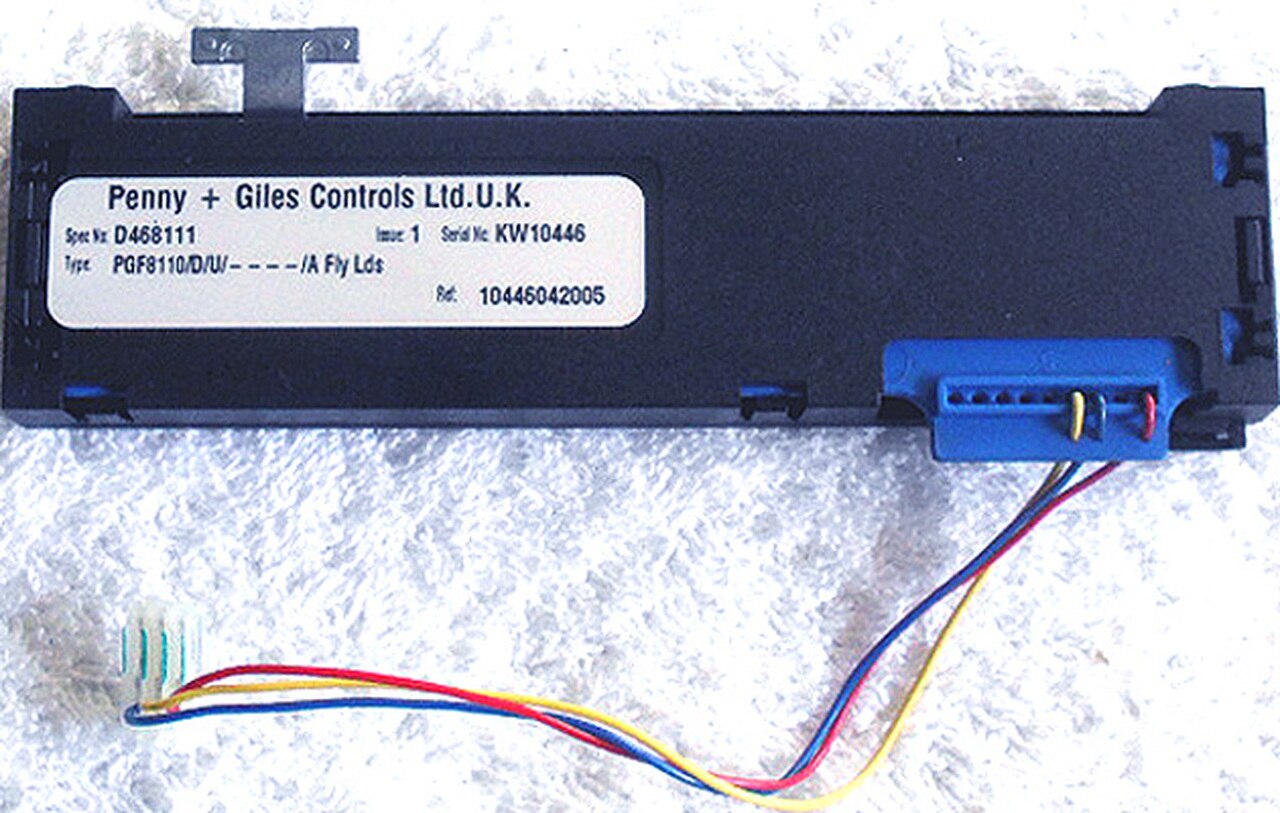
they are an older series. PGF3200 series. there should be a cable like this coming from it
this is before P&G were bought by curtiss-wright
you could try emailing them to see if they have got the legacy techincal docs for the fader.
the 8100 series and other has a side connector


-
this is what i am working on today, one encoder mapped to a button function. press button one and it changes display 1 value, press button 2 and it changes 2 value. Each button has a status led above it to show which is selected.
-
27 minutes ago, totoRaymond said:
Hi,
I'm not sure i undesrtood your question well but it seems to me that you need to use the bank function. for example:
EVENT_ENC id= 1 hw_id= 1 bank= 1 type= CC chn= 1 cc= 0 range= 0:127 fwd_to_lcd=1 lcd_pos=1:1:1 label= "%3d"
EVENT_ENC id= 2 hw_id= 1 bank= 2 type= CC chn= 1 cc= 1 range= 0:127 fwd_to_lcd=1 lcd_pos=1:1:1 label= "%3d"
EVENT_ENC id= 3 hw_id= 1 bank= 3 type= CC chn= 1 cc= 2 range= 0:127 fwd_to_lcd=1 lcd_pos=1:1:1 label= "%3d"

EVENT_BUTTON id= 4   fwd_id= LED:4   type= Meta meta= SetBankOfHwId:1 range=1:1 button_mode= OnOnly   # "Bank 1"
EVENT_BUTTON id= 5   fwd_id= LED:5   type= Meta meta= SetBankOfHwId:1 range=2:2 button_mode= OnOnly   # "Bank 2"
EVENT_BUTTON id= 6   fwd_id= LED:6   type= Meta meta= SetBankOfHwId:1 range=3:3 button_mode= OnOnly   # "Bank 3"
In this example, when you press a button, it activates the corresponding EVENT_ENC and deactivates the others.
Is it what you're looking for?
Cheers,
Thomas
Thanks Thomas, yes a slight variation of that.
I have my test setup on the table ready to try a few things out tomorrow. hopefully it will work!!
-
question:
if i have 16 buttons as selectors for each 3 digit 7 segment led, and one encoder for value. is it possible so if i press button 1 the encoder is mapped to the button one cc~ and value range selection and the led, then if i press button 2 it then changes for that and if i press 3 it changes for that?
so the encoder becomes active for the toggle button you press. This would save me from having an encoder for each 3 digit and function.
Is it possible to have an encoder function defined in a map?
Thanks
-
been busy with work and other things or a while so I havent been in to update things.
Today i had a play around with some new controller code, took a while to think about it and get it running, had to pick through some of my info i wrote down. All sorted in the end and i got things running.. the builds are progressing slowly these days because of lockdown here in the uk. But its giving me time to carry on learning new sections of code.
-
i got the ainser up and running fine, all the code i ran through it worked first time and it all did what i wanted. I am working on the pcb's this weekend in altium before i send the gerbers to the pcb house, I also found someone to make the front panels for my enclosures as well who makes synth panels in various formats. I will link them in here this weekend.
Picked up some really nice illuminated micro tact switches and for another project some larger size 12v illuminated rectangular switches that i pulled the bulb out and replaced it with a 3mm ultra bright led and it works fine.
Al in all its all looking godd at the moment, I will update with some pics and build designs soon.
-
Some of mine were jittery as hell. I opened them up and cleaned them with isopropyl and the brass contacts. There was far too much grease in them. All good now with a tiny bit of Teflon grease at the shaft point. No more jitters
-
just got the ainser 64 running set it to a single pot for now to test.
and here we go!!..
EOL
-
Someone left the door open and the light was on... So I had a quick look at the artwork..... This is like getting a lapdance from your favourite movie star but you can't touch.!! You sir are a tease, but I like you :)..... Queing patiently
-
 1
1
-
-
Working just got the 3 digit displays running after some advice and help from Thorsten. Just doing the dance, code to follow.

-
Just put the Ainser64 together only to realise I hadn't ordered the Ic's... gutting.. now ordered for delivery tomorrow. whats one night waiting for parts...


understanding the .ngc code
in MIDIbox NG
Posted · Edited by ssp
BRAIN FART!!!
slight issue.
I have managed to hook up the individual leds tonight and check the code, its all working however using this:
EVENT_BUTTON id= 4 fwd_id= LED:4 type= Meta meta= SetBankOfHwId:1 range=1:1 button_mode= OnOnly # "Bank 1"
is fine, and the led it forwards to lights up, however when you press the next button:
EVENT_BUTTON id= 5 fwd_id= LED:5 type= Meta meta= SetBankOfHwId:1 range=2:2 button_mode= OnOnly # "Bank 2"
led 5 lights up but led 4 also stays lit, what would i use to turn off the previous led?
in the past i used radio groups and maps leds.
Update: its working, just added the radio group... i knew what it was just having a brain fart
EVENT_BUTTON id= 4 fwd_id= LED:17 type=Meta meta=SetBankOfHwId:1 range=1:1 button_mode= OnOnly radio_group=1