Sasha
-
Posts
1,944 -
Joined
-
Last visited
-
Days Won
3
Content Type
Profiles
Forums
Blogs
Gallery
Everything posted by Sasha
-
You are working 2 years on this thing and now you are showing first pictures? That is not fair! But still, you are my next idol. Very good organisation, and extremly clean work. I can see great effort and love you put in it. I know how hard is it to wait to finish it but seams you do it slow but rght. MUCH respect man!
-
Thank you all @ultra I wanted to have one too from the moment I saw one. I dont think it is very expensive. To me, yes. But I see people spend much more money on car. This particular machine is bought in US for 15,000$ and transport to Serbia costed 1000$. This is very eficient machine. You can do zilion different things on it if you have Idea. This guy even make 3D wooden Icons. I cut my Extreme Torture puzzles with this machine @bill here are few more shots for you from cutting session. This puzzle I make of same type of acrylic (but thicker) I use for these illuminated buttons. My favourite one ;) And few variations:
-
Dengel, they are from my head ;) Check http://www.midibox.org/forum/index.php?topic=8417.0
-
Thanks all. ;D ...never tought that way before...and about clock, it is recycled Romanian clock from flea market. I love it! ;)
-
I am making illuminated buttons for my sequencer (http://farm1.static.flickr.com/106/281135266_8fbc2b13d2.jpg) based on same technique I already described here: http://www.midibox.org/forum/index.php?topic=4322.0 There are few other people from community using same technique for their buttons. Here some more pics that might currage others to trie it. I must say that finished button looks much better in real because camera shows yellow the part of button that is brightest. Colour of button`s light is orange. This is how raw buttons looks like after laser cutting/engraving. It seams perfect from distance but If you are perfectionist like myself and look closer you won`t like it`s unfinish look. As laser goes trough material and melt acrylic, it leaves small vertical marks. Other result of any kind cutting is sharp edges which needs to be rounded with fine sandpaper so buttons feels smooth and nice to touch. Buttons engravings is much more visible if filled with paint. I use acrylic paint. As it is same material as button it should stick well enough, and it is easy to sanded away. Another part I lasercut is LED spacer/holder. This is needed to keep LED on sertain distance from front button part so spotlight can illuminate whole surface of button. Also, same spacer transfer the pressure to button mounted on PCB. Most boring and dificult part of this illuminated button fabrication was prepearing the diodes. As SMD LEDs are pretty expensive, and perfect for this job, I needed to trim down regular 5mm LEDs to fit into the spacer. First I shorten the diode with cutters and than them sanded the top and skirt to make it as small as I can. Sure, I can use bigger spacer, but that will increase overall button length. One more from flickr...
-
It could be much compact, but recycled look was my main aim. Is is first synth I built, and I love it! :) The SID is 8580. This is actually starting point for building full CS quad - Endorphin ( )
-
I don`t know is it right to selfproclaim this a MIDIbox of the Week, but I see there is other posters here beside TK, so I tought it`s OK. Sorry if I`m wrong. There are few pics of my SID synth. I called it Woody because it is made of, you`re right... steel. :) Woody by night
-
Man, don`t drill it, mill it! I would never made those boring fader stripes by hand again, NEVER! I use my hands only for things I cannot do easier way. Sure, Illustrator, Freehand whatever... vector is vector. As already said, maybe you should save your draving as DXF or something else. Check what they use. Pay attention on lines width. It must be hairline for cutting! Here are the buttons in place i had to sanded with sandpaper, and fill it with paint... They are laser cut, but still there are alot of work. You just can`t avoid using hands, but you can minimise it.
-
I wouldn`t sugest using Photoshop for designing panels as it is made for bitmap graphics, not vector. Friend designed his box using Photoshop, and I needed to rebuild hole thing in Corel Draw as vector so it can be send to CNC service. You need to have ability to numerically change dimensions, to align objects, etc. The output file is usable on anny CNC machine. I am mostly using laser cutter. Panel on picture is designed in Corel Draw and it is waterjet cut. The result is precisely cut 1mm thick steel. It is waiting to be airbrushed and screen printed. This is the original design
-
Man, that is great! I would like to have one. :)
-
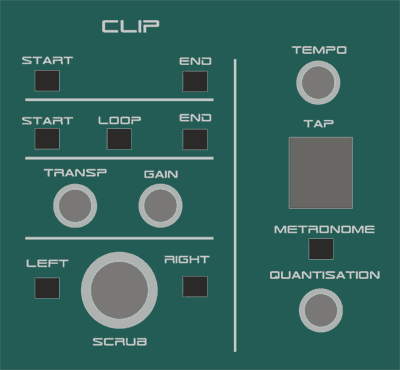
Strange. I`m sure I sucsessfully send answer yesterday... ??? I`ll repeat I wanted to make CS for production and DJing from time to time, but with accent on production. That is why I want 4 sends per channel. Also, why not to have all Live`s MIDI map supported functions? It cost insignificantly more than without it. The worst thing is that you have to integrate it logically on the panel not taking too much space if you want it compact. No, it is for winding the trach for prewieving, finding cue points and such. I figured out you integrated same function in your controller (those 2 almost invisible jog weels) :) But, how do you map them? That function is global for all clips. It works for focused clip as I remember. I tried that using LC emulation on Live 6, but it shouldn`t be anny difference.
-
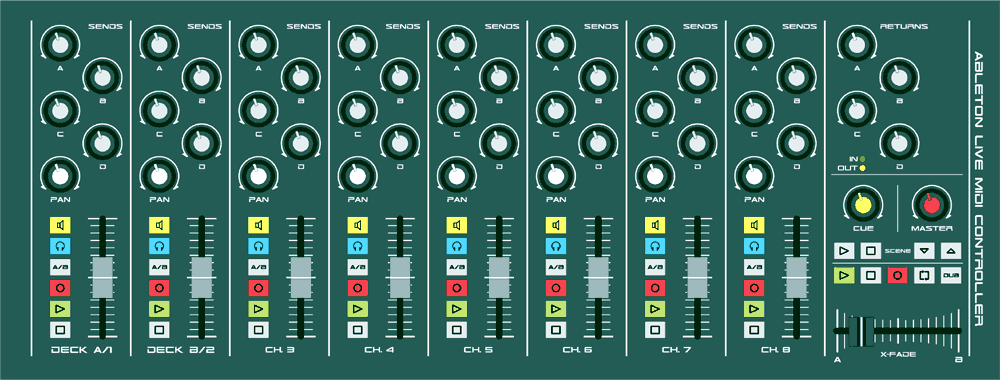
Hey Joost, wellcome aboard. You chose nice reference for you design. Xone92 is one of the most seriously looking controlers. Very tasty and clean design. I have one sugestion regarding you design. I would rather mark the section "clip" than repeat so meny times Clip Lounch/Clip Mute/Clip stop. Visually looks bad. About other things I cant complain, as it suits individual needs, as you said. Here is my vision of controller. It stil isn`t finished. I need to integrate the upgrade (immage 2) All coloured buttons are actualy laser cut/engraved opaque white acrylic with status LED in the background for signalisation.
-
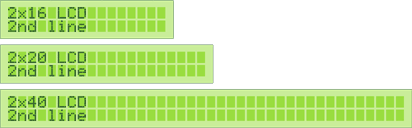
I`ve created patterns for 2x16, 2x20 and 2x40 LCD in Corel Draw and Adobe Illustrator. You don`t have to mess with perl. I hope it will help someone. Before opening the file install the font from the .rar LCD text.rar
-
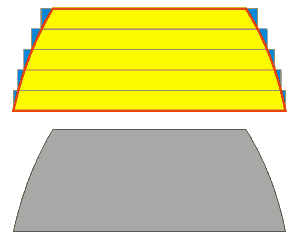
Here is the idea... You need to cut several sheets of acrylic like on picture. They are all roughly forming desired shape of knob or something. Glue them together using pot shaft to make them positioned right in the center. After they are glued you can sand down those blue triangles to make it round. Now you should have final know you can use for making a mold. At least you can be sure it has perfect geometry. If the knob you are making is same from bottom to top (cilindrical) it is even easier. You can even make all kind of chanals around it to be better to grip. PS. I found acrylic really good for sand shaping. This technique is used for making base for fiberglass molding, just instead of acrylic it is used styrofoam. You have attached EPS file of Albs type of knob (the one from TK`s sequencer) ready to lasercut. It has same dimensions as original one. You can use it to make prototype for mold. Good luck knob.rar
-
George, I like your design. What is it actually? Angled slider caps are something new and seams it sits well between fingers for right hand users. No man, you MUST go with triangle buttons. They looks great! They are not hard to cut if you use CNC laser cutter. ;) I advise people to use laser cutter all the time. Checkout any express engraving service in your town and ask them to cut the acrylic for you. Most of those laser CNC machines are 25-30W so they can cut acrylic up to 10mm thick. Ir you need something thicker just combine few cutouts. You can also make your own knobs by combining several sheets to get shape you like. I`ll make a quick sketch for you to understand better. Gimme few minnutes...
-
SLP, I just leftout my lastname. Sasha is my firstname. I am using same avatar, so I tought people remember graphics better than text.
-
I could attach some vectors tomorrow, so you need just to duplicate it and move it around as you like.
-
Layout planing could be difficult if you have strong criteria. It is definitly better to use some CAD program like mog-ur, but I manage to make my layout using Corel Draw. You can use anny other vector software like Illustrator or Freehand. Also, all CNC services accept cdr, ai vector drawings. This is the layout I made for alps encoders, albs knobs, 3mm led and 12x12 membrane pushbutton.
-
This beautifull ones? These are custom, colourfull and D shaft but they are for SID http://www.midibox.org/forum/index.php?topic=5169.0
-
Cool, I`ll go with 22nF then. No need to experiment by myself. Thanks Wilba
-
OK Stryd, thanks. I will try to find better ones in that case. ;)
-
What is the purpose of 6,8nF capacitors on SID module? Is it crytical to be styroflex 2.5% tolerance? I didnt find sugested caps so i take ceramic caps with greater tolerance (about 10%) It works but I`m worried how can it affect the SID? I also made optimised C64 supply. And in that case I should remove rectifiers and regulators from SIDs and Cores and jumpwire some pins? Right?
-
Actually, this is a desert. ;)
-
I scavanged alot of C64`s till now, but this is the first time I found one soldered directly to the board, and it`s 8580 :-\ I wasn`t sure how heat will affect the SID, but I had nothing to lose, so I tried... And It worked :)
-
Yeah, Lasse Gjertsen is living legend. He also have a lot of fans and followers who make similar videos inspired by his work. The idea is not new, but the way he use it is so funny. You must see all his videos.