Altitude
-
Posts
1,184 -
Joined
-
Last visited
-
Days Won
30
Content Type
Profiles
Forums
Blogs
Gallery
Everything posted by Altitude
-
d00rs, You need to be a little bit more specific so we can determine where your problem is. the midi out does not need to be connected to produce sound what are you powering your core and sid with? Did you correctly upload MIOS and the SID app? What does it say on your screen?
-
try different values see what is acceptable. Run it through a meter and see how much current you a drawing and its low with acceptable light level, you should be OK to run off of the core. I got acceptable results with my clear blue LED's using a 1k (which reduced the current draw from 120 mA per LED down to about 2.6 mA)
-
yes it is very thick. You should have no problem moving it around into position when its wet. It really does not fix its position until it all water has been pressed out from underneath and the decal has dried
-

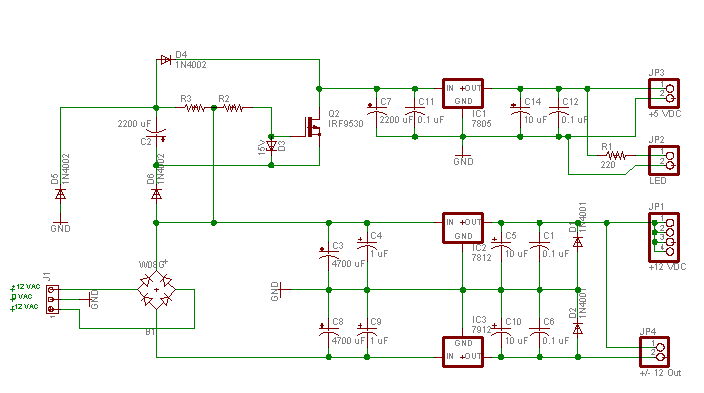
Mr modnaR's attempt at a MBSID psu - help needed (probably)
Altitude replied to Mr modnaR's topic in Design Concepts
I would add some caps after the regulators (10 uF electrolytic and 100 nf) I definitely like the dual secondary idea though and for the normal MBHP stuff that does not need the -12, this is the way to go I would look up how the ground is referenced though since i'm not sure how that applies in a half wave/ bridged mix might want to read this: http://sound.westhost.com/power-supplies.htm -
yes they do
-
you dont need to. If you already have the cap, then just use that and yes jumper the spot where the regulator was Bypass caps go on the solder side between the pins of the IC's 5v input and ground. look here: http://www.midibox.org/forum/index.php?topic=4455.0
-
No. that is referring to C5 (the big one) since there is some filtering already done on the PSU board, you do not need such a big cap
-
you sure your asking for the correct pn? I got mine in the mail today
-
I just measured my LED's (bright blue) and without a resistor they pull 120 mA (what i like to call 'flashlight mode') and with a 1k, which brings to acceptable brightness, 2.6 mA Bear in mind that there is never a case where all the LEDs will be on at once
-
We will see. I dont think it will go up by a factor of two though
-
its the B surface so there is no matrix or other stuff. I am using a shielded transformer and a filtered power entry module, both will be located inside the case. I have not adjusted the LED resistors so each led pulls close to 100 mA which is really high (i am using bright blue ones) so there is no way that the remaining stuff should pull another 500 mA from the 5 volt line
-
yep, using Tim's (smashTV) LCD. It really does not go up when producing sound (even in 4x link mode)
-
More developments: I tested the current draw on my rig (4 6581s and Cores + DIN + DOUT + 8 x Bankstick + LTC) and I am drawing 420 mA on the 5v and 130 mA on the 12v
-
the photo EZ is light exposed. You do it just like a circuit board where you print the art on a transparency, lay it over the screen and expose. The non-masked sections set with light and the masked sections should rinse away with water. The problem I had was exposing it correctly is alot of trial and error and seeing the screens are expensive, it just was not worth spending $50 for one good screen
-
Well copper melts at about 1100 deg C which well exceeds anything that it could be printed on (or that could heat it for that matter). Plating copper requires a nickel base so thats out. I dont see the big deal with etching, take me about 5-10 minutes
-
something like this? http://www.pulsar.gs/PCB/a_Pages/1_Menu/overview.html
-
I got my 2u 12" racks from a place in Minnesota. All aluminum, and I am VERY pleased. 65$ ea. http://www.enclosuresandcases.com/
-
I have used the photo EZ. It exposes really poorly and is too much work. I would look at the inkjet printed dry transfer or laser tran. Laser tran is a snap to do and the results are quite good
-
I have not done the math yet, but the only thing that needs to be adjusted is the resistance values for the voltage divider, everything else stays the same. Heres a good site re: voltage dividers (especially the part about how they work under load) http://www.play-hookey.com/dc_theory/voltage_divider.html here is my preliminary schem:

-
My schem is right, its based on Ray Wilsons with your added power resistor. I spent a whole weekend reading up on this and your design is sound and fits everything I read. I think the problem lies with the 7805 pulling a full amp, I will try to test mine on a pair of bench power supplies and see how much each rail is pulling but i seriously doubt mine was anything near 1 amp. They do tend to get hot when they pull over 500 mA and that coupled with the high voltage results in a hot ass part. I think going up to a to-3 size regulator with a big ass heat sink may be the way to go since a full C surface has tons of LED's and other stuff that will draw on that single little regulator and I can see it going over and amp easily. I also found this in and issue of EDM, and it seems like a decent scheme to deal with the extra voltage issue http://www.edn.com/index.asp?layout=article&articleid=CA6339248&spacedesc=designideas&industryid=44217#ref
-
I found a schematic for a MOSFET based setup. I'll post it when i get home
-
i think the problem is that the 7805 can only pull 1 amp max, so anything under that, there will be a ton of voltage to dissipate as heat and if your pulling 1 amp on the 5 volt rail, then you should be using a TO-3 size regulator. I think Alex's design expects a huge draw from the regulator, and in practice, this does not really occur and as a result, the resistor does not really do much Not that hot. Thats what i have been using until now and it does not even get half as hot, and thats with 4 sids and cores with high current LEDs
-
i'm seeing the same thing. I have an alternate solution that I will post here later
-
Danke :)
-
FYI, the setup_6581 has the LCD set to 4 not 5 like in the previous one