latigid on
-
Posts
2,524 -
Joined
-
Last visited
-
Days Won
149
Content Type
Profiles
Forums
Blogs
Gallery
Everything posted by latigid on
-
Hi Niels, I am also confused, tried the other day with @Hawkeye to get an LFO going but I don't know how. It would be interesting if you could get it working with a regular CC or MIDI note track then try to change the port to AOUT. Maybe a few notes are needed in the track? Sorry that I can't help! Best, Andy
-
TK.'s description is slightly ambiguous, but I agree with your assessment. The config file should stick and the hardware should know to keep the correct matrix assignments. Bruno is right; the 1MB flash confirms the correct VGT6 chip.
-
I have spare ones in white and can sell them for 4€ each. PM if you're interested.
-
For removing the SD card during runtime, we've established that this can break things, so please restart if the card was removed. (would be nice to reload the HW config file upon remounting the SD). I'm not sure if the MIDI file export is related to any particular hardware. Sounds a bit like a memory overrun. What is the flash size of your STM chip when you query in MIOS Studio/is the chip VET6 or VGT6 on the Waveshare board? Please post the request (maybe also the previous bug report) in the following thread and hopefully TK. gets some time to look at it. Additionally, provide an example session that could be tested. http://midibox.org/forums/topic/13137-midibox-seq-v4-release-feedback/
-
Looks like an I2C interface. You want 4-wire SPI.
-
@lp1977 nice! #22 Enjoy your SEQ v4+!
-
Hi Adam, Interesting, the MEC/Apem switches are typically quite solid! How are you determining intermittent behaviour? Could it be that the switches are fine but the LED legs are broken/intermittently contacting (compare DIN events in MIOS Studio versus LED emission)? Removing the switches is really a pain (as is inserting LEDs when the switch is already in). I don't think the LEDs are available at Mouser. Considering the issues you've had, I think we could send you a set of replacements. If that would be too slow for you, you could also find similar replacements on eBay but they will likely ship from Asia. Best, Andy
-
Sorry for the confusion, really what is written in the above posts is all correct and there is not much more to add. But to clear it up: all MIDIbox platform software is open-source, free for personal use. Some circuits are too, but some are not and this has been the case for quite some time. It is even less common to publish layout files. The non-commercial part means in this context that you are not permitted to run MIDIbox software in assembled devices that you sell. Peter and I provide a valuable service, which takes a significant portion of our lives, in making great, professional-quality projects available. We have the full support of the MIDIbox creator, Thorsten Klose, to do this. I hope that your confusion is resolved and you can work on your design with the documentation at hand.
-
What you see on uCapps is all you need to DIY a SEQ. http://ucapps.de/midibox_seq_manual_hw.html A SEQ is just two displays and series of encoders, buttons and LEDs connected to DIN and DOUT modules. You address the buttons in the HW config file; this way you can have all buttons and LEDs in the arrangement you like. You then need some sort of Core (with SD card) and a MIDI IO board or just use USB. CV would need an AOUT module plus an additional DOUT module. Best of luck with your design.
-
Alright then, have fun!
-
Did you purchase anything through midiphy? Just email a reply to your purchase order and we can supply certain schematics (some are based on uCapps designs).
-

Help with Modular Addict Control surface weird characters
latigid on replied to BG's topic in MIDIbox SEQ
What HW config file do you have on your SD card? -
Tried it! The LEDs flicker/pulse rather than dimming as the PWM/clock rates are not syncronised...
-
Interesting solution! Do you use the tiny ICs or SOIC ones? Did you use a power supply resistor for each? The bonus with WS2811s is you can get better dimming effects than with SRIO scan (and dimming is practically unusable in a matrix).
-
Sharing: Adding capacitive touchsensor to midiBox
latigid on replied to FantomXR's topic in MIDIbox NG
Cool chip and not too bad to solder! -
Padding would define the number of spaces; the width of each is defined by the font in use or simply a blank character if such an OLED or LCD was used. I also haven't messed around with .NGL files.
-
Here is the reference: http://ucapps.de/midibox_ng_manual_ngl.html
-
If I recall, the pin order was determined by PCB layout (might have something to do with the AINSER64 too? So backwards scanning it is if you use the MIOS routine.
-
Fancy! If these are custom PCBs they would've been very expensive back in the day!
-
What LCD driver is set in the Core bootloader? Maybe check that?
-
Is there a specific problem you are trying to solve? My gut feeling is that we should minimise the length of high-speed digital signals (lower impedance/inductance causing signal-integrity loss; less EMI) and buffer them to take load off the MCU, also minimising the number of interconnections. Things that interface to the shift registers (LEDs, switches) are much slower and could run over longer traces or cables. In practice I'm not sure if it really matters. Try for logical layouts and see how the performance is.
-
Thanks for the follow up! You're certainly not to blame for this, so I'll ask the fab what happened. Looks like the copper substrate was scratched from the beginning or some of the mask rubbed off before etching. Let us know privately with any subsequent order and we can spare you some $$ for the trouble.
-
I think you need to define your parameters. How many LEDs? How many spare I/O or GPIO can you use? Does an LED matrix with multiplexing go far enough?
-
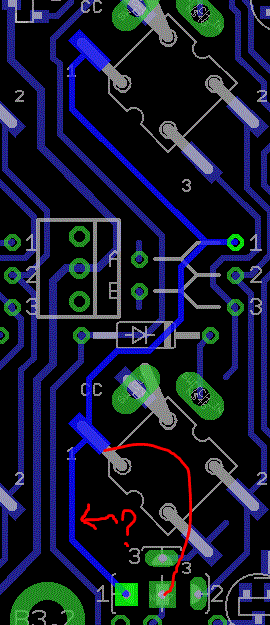
Hi Adam, I don't fully get it: are you able to illuminate both superflux LEDs (red) in this column? Also, is it the _L or _R board and what is the version number? You can see the board trace should connect all "red" LEDs in this row, but the SJ part will not be connected to the LED until the resistor is placed. This sets the output for the MEC LED but you were talking about superflux? I can see a scratch on the board in your picture, is it related? If you're feeling masochistic you could sand back the solder mask and see where the copper stops (if it does). If the trace I marked with a "?" really doesn't connect, I would suggest to use a 1k THT resistor as indicated with the red mark. It would also be possible to use one of the 2/3 positions, but the matrix addressing will need changing in the HWCFG file.
-
You're welcome. Device IDs are hardwired using IO pins directly on the PCB (or selected with jumpers on oldschool I2C modules).