jjonas
-
Posts
422 -
Joined
-
Last visited
-
Days Won
24
Content Type
Profiles
Forums
Blogs
Gallery
Everything posted by jjonas
-
Thanks for this Peter!
-
Peter, this part of your message was unnecessary to air in public.
-
While sessions can be deleted, currently there is no way to delete files in the preset folder. But it's on the wish list. At the moment you have to take out the SD card and delete the the unwanted presets on your computer. Another possibility (which I haven't tried) is to connect the SEQ to a computer and use MIOS Studio's file browser to delete the unwanted presets.
-
I agree with eptheca, hardware change is better than changing the code. (If we have the correct diagnosis, of course.) I'm afraid you will have to open up the box, unless you can sort it out with =FFW=>. I think borfo linked to the wrong page in his reply. Here's the page for the MIDI I/O board. J11E is a header on the core board (STM32F4) which connects to the MIDI I/O board (see this page and this schematic (pdf) for the core; in the schematic, connector J11E is in the top middle). The connection from the core's J11E to the MIDI I/O board is pretty straightforward: J11E has pins named MI1, MI2 (=midi in 1, midi in 2), MO1, MO2 (=midi out 1, midi out 2) etc., and the MIDI I/O board has the connector J1 with pins with the matching names. So J11E pin called MI1 should be connected to MIDI I/O board J1's MI1. Anyway, if your box uses ribbon cable (as seems to be the case), there should be no problem. In fact, looking at the order of the ports you gave (instead of 4-3-2-1, they are 2-1-4-3), it could be really simple: There's two MIDI I/O boards inside the case, and they might just be placed the wrong way, so that the board with ports 2-1 is where the board with ports 4-3 should be. If this is the case, you need to open the box and switch the places of the MIDI I/O boards (without changing the ribbon cable or other cable connections). Hopefully the ribbon cable is long enough though.
-
PM sent.
-
MBSEQv4 has many randomiser features, many of which would seem offhand to match your criteria. Have a look at the User Manual and the Beginners Guide and search the pages for "random". It might not be easy to understand at first the terminology used in connection with the MBSEQv4, like what are trigger and parameter layers etc, and thus the possibilities and limitations. On the terminology, have a look at the Beginner's Guide section 1.2. Basic Concepts. With that said: There are two trigger layers for random events, Random Gate and Random Value. The first plays the note in that step at 50% likelihood, and the second plays the note in the step one octave lower or higher than the original note. There is also a parameter layer for note probability (whether a note in a step will be played or not), adjustable between 0–100%. In addition there is a Random Generator, there is a good explanation in the User Manual (seach for "random generator page"), and some info in the Beginner's Guide (section 6.3. Random generator). There is also a Humanizer effect to introduce random variation to velocity etc, search the User Manual page for "fx humanizer" (see also "fx limiter"). Notes, randomly generated or not, can be forced to scale. See the Beginner's Guide section 6.2. Force To Scale and seach the User Manual page for "fx scale". Offhand I can't think of a way to have the tempo randomised, except by making MBSEQv4 a slave unit and controlling the tempo with an external source.
-
You could also try if using an Nth1 parameter layer helps. See Beginner's Guide, section 3.2.11. Nth1 and Nth2.
-
Hi, I added a link to Andrew Scheidler's instructional YouTube videos on some MBSEQv4 features in the SEQv4 Documentation front page, and I noticed both SEQv4 and V4L entries in the wiki had a "Fix Me! Update things" tag at the top of page. Offhand I couldn't think of anything that could be updated there (and nothing seemed terribly outdated), so I removed the tags. If someone disagrees, feel free to share here what you think needs updating there, so that we can put the tags back and hopefully update entries too so we can take them down again! :-)
-
This is a change in the latest firmware (4.092). From the changelog: EDIT: Though now that I tried it, punching in quarter notes, then starting the sequencer and switching recording mode on, I managed only to clear the whole track, instead of only "played" steps. So I don't really know how it works. It might also be that "(instead of the entire pattern)" should be "(instead of the entire track)" (in the changelog entry).
-
You should tell people where you're located, maybe you'll find local help easier that way. In terms of building the SEQv4, the bottleneck really is the availability of the CS board. If it's available, it's not too difficult to solder it and make the connections to the other necessary modules. Soldering the AOUT_NG needs SMD (surface mounted device) soldering, that's perhaps not for beginners. It's easy to overheat SMD components and the tiny scale requires some experience. But it's by no means impossible. Maybe if the CS becomes available and you manage to get hold of one, you can solder that yourself and test it without the AOUT_NG, and when you find it's working, then find someone in a local hackerspace (if one exists) to solder the one SMD component on AOUT_NG for you, and solder the rest yourself. That's one option.
-
Hi, I've added a proper entry about 'Save & Take over Patterns', because what there was there about it was just wrong as I hadn't really looked into it when I was writing the Guide. It's under the headline "5.2.3. Save & Take over Patterns". Just writing this in case someone has the time to check if it's understandable. http://wiki.midibox.org/doku.php?id=mididocs:seq:beginners_guide:start#phrase_mode_and_song_mode EDIT: I forgot to mention that a few day ago I also added something about the layers of which there was nothing there previously (Root, Scale, AfTch). http://wiki.midibox.org/doku.php?id=mididocs:seq:beginners_guide:start#trigger_layers_and_parameter_layers
-
[double post deleted]
-
I was updating the Wiki for some of the 092 changes, when I noticed this. The Changelog notes that However, when selecting a new layer on the Event page and confirming the selection with the GP button, the default PrgCh value is still "0" instead of "---" (disabled), and same for AfTch.
-
I'm on 092 as well, but I wasn't able to reproduce this. However, Port settings are the same across all sessions, as if it was a global setting. I don't know if this is intended or not. Other settings on the page in question depend on what their last value in the session was (regardless of whether the session was saved or not).
-
There is an item on the wishlist, "Add command which copies the current pattern configurations into multiple pattern slots". It was made by me. I have a few suggestion about how it could perhaps be implemented by using the current interface. In UTIL -> Disk -> Import, the Group & Track selection buttons select tracks (in the background), but perhaps it would be more useful if they worked like they do on the Pattern page, i.e. they select banks. Currently if you want to copy patterns to or in Bank 4, you have to scroll all the way from 1:A1 through everything that's in between to 4:A1. The Group/Track buttons could perhaps select both Source and Destination banks, depending on which one is selected for editing with GP buttons (you need to select Source or Dest for editing now too). This is just to make it easier to copy a single pattern, or a few ones. On the topic of copying a "seed pattern" (e.g. 1:A1), to several pattern slots with one command, you could perhaps have Destination options "Bank 1", "Bank 2", "Bank 3", "Bank 4", "All Banks" as target, instead of a pattern range. So for example Source Destination 1:A1-1:A1 -- Bank 1 would copy pattern 1:A1 to all slots in Bank 1, just like with the normal Import/Export copy, only more easily. On the question of where to put the extra destination options, they could be put before the current options, or after them. In my opinion they would work best if they came before the current options: There's only five of them, and it's less work to scroll over these five options than to select Bank 4 with a Group/Track button and scroll beyond 4:H8 to find the extra options. Also it would be ok if the default option for Destination is still 1:A1-1:A1, and you would access the extra options by scrolling left. Or, the multiple copy option could have its own page ("Seed Pattern" or something), selectable with GP9 on the Import/Export page, which now selects different Types – "Patterns", "Songs", "Grooves" etc. – for import or export. Other stuff that I have in mind at the moment: On the pattern save page, when writing the name for the pattern, GP button 10 selects "0–_ " (zero, dash, underline, empty space), but the display indicates "–_ 0" (dash, underline, empty space, zero). In my opinion the display should be made to reflect button behaviour (and not vice versa). Also, on the naming page, the cursor blinking could be made more prominent, to better indicate the cursor position. (EDIT: at the moment, the blinking is the same as everywhere else in the menus when something is selected for editing. This kind of blinking is ok on the naming page when the cursor is over a character, but when it's on empty space you have to squint to see where it is.) Also on the naming page, you can select presets for Category and Label parts with GP knob 15 (one or the other, depending on cursor position). Are they hard-coded in the firmware? It would be useful if there was a limited number of customisable presets for Category and Label (perhaps max 16 each?) in the HW-config file where the bookmarks are too. On Follow Mode: I haven't considered all possible ways of using the Follow Mode, but the way I'm using it has this problem: when it's selected, the display follows the cursor when the seq is running, but if you stop the seq to edit and scroll back and forth, you will be able to scroll only within the 16 steps that are currently on the screen, unless you turn Follow Mode off. From my point of view it would be more useful if you could use the datawheel to scroll around the track freely, whether or not Follow Mode is on. But like I said, I don't know if changing the datawheel behaviour in Follow Mode when the seq is stopped messes up other functions Follow Mode is used for. Just an idea based on my own use case, but it might conflict with others' use cases.
-
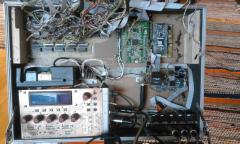
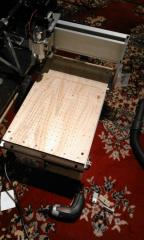
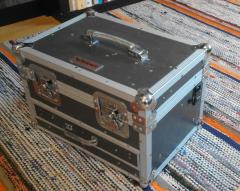
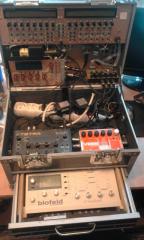
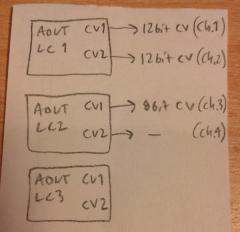
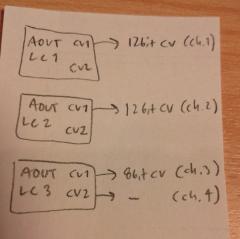
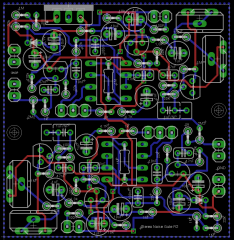
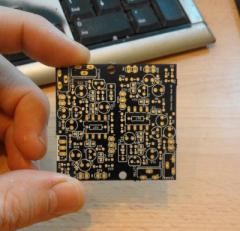
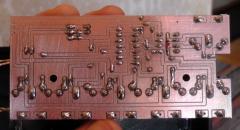
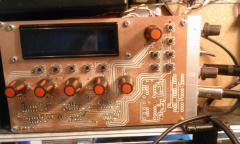
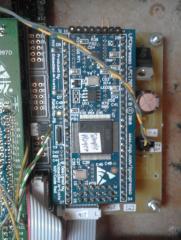
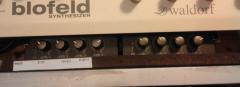
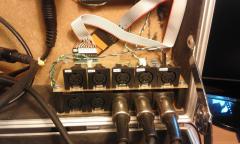
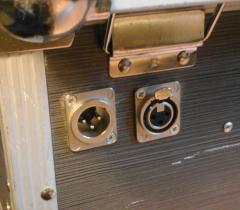
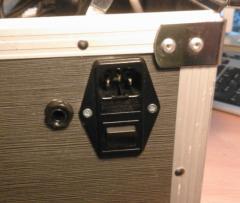
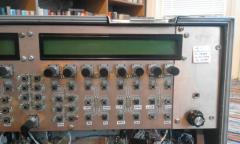
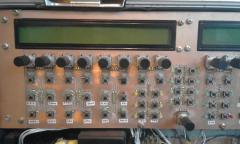
Hi, I had been thinking for a while how to integrate some sequenced stuff into our band's music. Initially I looked into an MBSEQv4 Lite, but there was no way with Lite to manage several sessions except by swapping micro SD cards. I realised quickly this would get both increasingly tedious as the song count would increase over time, and unnecessarily expensive, as the SD cards you can buy locally (i.e. easily) tend to be at least 16Gb nowadays, and the space would be mostly wasted when used for a single session. I guess one could buy a load of cheap no-brand 2Gb SD cards off eBay, but the juggling of microSDs and keeping track which one is which was not an appealing prospect. So I decided to design a custom version of the MBSEQv4. I used to use Eagle to make my custom PCBs, but the PCB size limitation in the free version had irritated me already previously. Even the paid-for versions of Eagle didn't allow for very large PCBs; IIRC, there was a ridiculous jump from a 160x80mm board from the second most expensive version to something like 4x6 METERS in the industrial version (which was also the most expensive). And nowadays Eagle is for annual subscription anyway. Nevertheless, already before the news of Eagle's subscription scheme broke, I had decided to teach myself Kicad. The annoying size limitation would be gone, which was doubly important to me, as I wouldn't be having the PCBs done at OSHpark etc., but I would isolation-route them on my own small Smoothieboard-controlled tabletop CNC (with a working area of 289x375mm). Initially I thought of designing a stripped-down version with only the bare essentials for band rehearsals use (basically a playback machine for sessions made at home with my main MBSEQv4). But given that the two LCDs would determine the minimum width, one that wouldn't really be "stripped-down", and that a few extra rows of buttons would't really take up that much more space considering the panel width, I decided to go all the way :-) The working area of my CNC was just about enough to make the PCB in one piece. If you look carefully at the front panel images, the end bit on each side of the seq PCB are made out of separate pieces, which was dictated by the CNC's working area limitations. In addition to the two-sided PCB for the panel itself, I put all the necessary DIN-DOUT boards into a single PCB as well. (So there's a mighty mess o' wires underneath the panel.) I first thought of the matrix IO, but quickly realised that with min. 1.27mm traces (isolation routing you know), two layers and all those diodes it would be if not impossible within the given constraints, then at least a lot of work. The DIN-DOUT way was certainly dirtier, but more transparent as well, in terms of which input and output goes where. After the seq PCB was finished and in working order, I drew a front panel / 2-sided PCB for an MBSID as well. The DINs are mounted on the bottom side, no DOUTs. There's also some extra circuitry I thought I'd use for bank memory and a small amplifier, but the banks fit under the hood in the end, and the amp was a terrible idea to begin with, so I didn't do it in the end. I had one extra SSM2044 filter PCB which I had drawn (or rather re-drawn) years ago based on Seppoman's design (the Gerber files are not published, but the image of the circuit is in the wiki), so I drew a custom version of the AOUT-LC board with two 12bit channels for cutoff (and two 4bit channels unused), plus a normal AOUT-LC for resonance, using two 8bit channels. The encoders under the LCD are for cutoff, resonance, LFO rate, LFO depth and Evn1 depth. The two pots on the right-hand side panel are for noise gate sensitivity and volume. Next I drew a stripped-down version of the LPC1769 PCB. I had three LPC1769s, one of which was a leftoever after migrating my main seqv4 to STM32F4, and another one was used in a sample player. The "official" LPC1769 PCB, containing all possible headers, was unnecessarily large for a humble sample player (which doesn't require even LCDs), so I could shrink it down considerably: the resulting PCB is hardly bigger than the LPC1769 footprint (MIDI in and TDA1543 circuits are under the LPC1769). I built two sample players, one for playing mellotron and SID drum samples, and another one to be used as a drummer's metronome (the tempo track being controlled by the seq of course). The metronome one's audio out is on the seq right-hand side panel, where I connect my DIY monitor earplugs, which I made years ago by sticking earbuds into putty, then sticking it to my ears and waiting for it to cure :-) The MIDI IO section is made up of one MBHP MIDI-IO (upstairs) plus a MIDI thrux5 PCB (downstairs), which just multiplies one of the outs from the seq. There's four MIDI ins (IN4 doesn't have a DIN5 socket) and fours MIDI outs (OUT3–4 don't have a DIN5 socket). In addition to the DIY stuff, there's a DSI Tetra, a Waldorf Blofeld and an EHX V256 vocoder. The two former ones, the MBSID and one sample player (four stereo sources; while the sample player is mono, it's connected to both left and right channels) go into two Behringer MX400 mixers under the Blofeld. The MX400 mixes four mono ins into one mono out, so you need two if you want to mix stereo. This combination was the smallest simple stereo mixer I could find. I tried to make my own op-amp mixer first, but there was a lot of noise I couldn't get rid of, and given that the MX400 costs only 23€ a piece, it wasn't much of a threshold to go for that in the end. All in all I'm happy with the box. It's got a mains in (with fuse) feeding the multi-socket inside the box (actually there's two, one upstairs and one downstairs in the drawer), and a single stereo out (for rehearsal room main mixer). The vocoder has its own in and out, however. But it's pretty easy to connect up at rehearsals, I'm done before anyone else (even the bass player!) after setting up this and the drums :-)
-
miscellaneous images relating to midibox stuff
-
-
From the album: miscellaneous
-
From the album: miscellaneous
-
From the album: miscellaneous
-
From the album: miscellaneous
-
From the album: miscellaneous
-
From the album: miscellaneous
-
From the album: miscellaneous
-
From the album: miscellaneous