jjonas
-
Posts
422 -
Joined
-
Last visited
-
Days Won
24
Content Type
Profiles
Forums
Blogs
Gallery
Everything posted by jjonas
-
I ran into this on Hackaday.com. It's another attempt replicate the SID digitally. The sound samples on the Project Details page (scroll to bottom) do sound good. http://hackaday.com/2016/11/24/giving-the-world-a-better-sid/ http://www.fpgasid.de/home http://www.fpgasid.de/project-definition
-
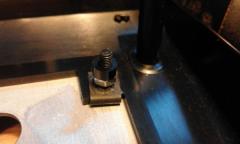
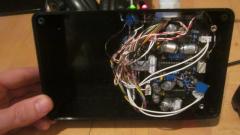
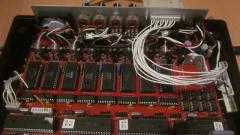
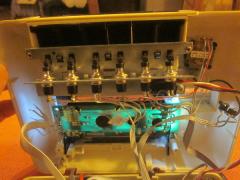
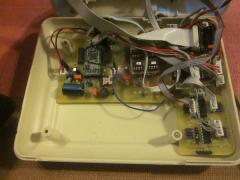
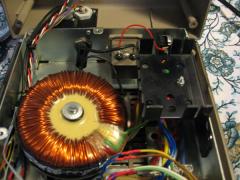
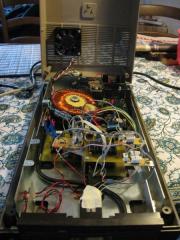
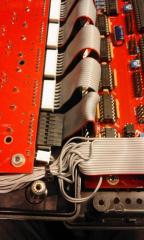
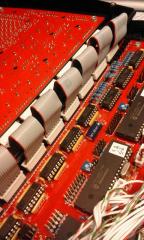
I opened my MB6582 to check whether Dupont connectors might fit. There's two images below, they show the way I've connected the two boards: I've used JST connectors for both ends of the connection. It would seem that Duponts won't fit on the base PCB end, but for the CS PCB it's different (see the lower image with an empty Dupont connector at the 8-pin connection closest to the bottom of the image). For the CS PCB you'll have to use angled pin headers if you want to use any kind of connector, and that way there's more space, so it seems Duponts would fit there. One way you could get away with just Duponts is that you solder wires straight into the base PCB and make a detachable connection at the CS PCB end only, with Dupont connectors. Probably ribbon connector is not the most durable material here, so if I was to do my connections properly some point, I'd use individual pieces of wire instead of ribbon cable. A few more words about the JST crimp tool. The originals cost over 200 euros (or was is GBP), so I bought a cheap "JST crimp tool" on eBay, but it didn't do the job. Then I went to a local shop where I asked to try out various cheap (less than 50 euros) crimp tools, and none of them worked for the JST crimps that I had. But they did work on the Duponts, so I bought a crimp tool for around 30 euros and switched to Dupont. So I'm not saying there's no good cheap JST crimp tools out there; I just didn't feel like buying several candidates on eBay just to try them out. But I would still prefer JSTs because they are so much smaller and thus handier than the Duponts.
-
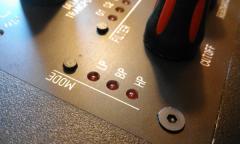
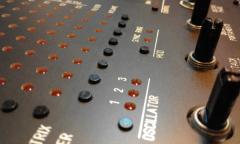
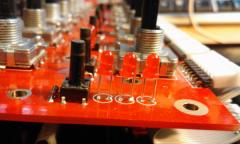
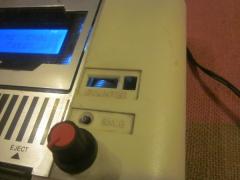
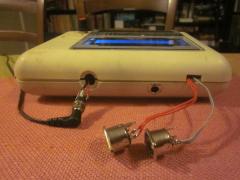
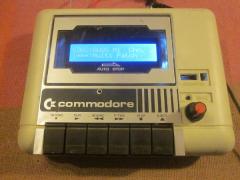
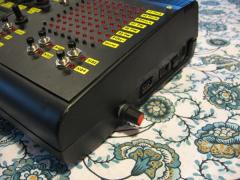
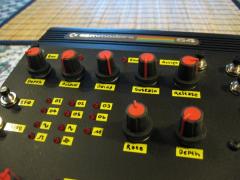
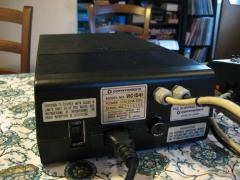
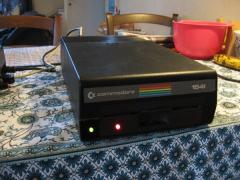
Pics of my midibox SID.
-
-
From the album: jjonas - midibox SID
-
From the album: jjonas - midibox SID
-
I have them, but I've never really used them. Mine are log. I haven't noticed any noise problems. With pot shafts and knobs I think you've got knurled shafts, round smooth shafts and D-shaped shafts. Knurled shafts don't have tightening screws on them, but smooth ones do. Of D-shaft ones I'm not sure, I think they tend to use push-on knobs, so no screw. Note also that the diameter of length of the shafts may vary; e.g. diameter can be 6.0mm or 6.3mm, and while you can fit a 6.3mm knob (with a screw) on a 6mm shaft, it won't be completely centered. Knurled shafts tend to be split (to facilitate a push-on knob), but smooth ones are always solid (as far as I can tell) and need a knob with a tightening screw. I have knurled shaft pots with push-on knobs. It was years ago when I built my MB6582, but I think the screws came with the PacTec case. I used JST connectors, but only because I have them (and the crimp tool) available at work. The biggest threshold for JST is probably the insane price of the crimpi tool itself, at least the JST original. I wasn't able to find a knock-off that would have crimped them adequately. I tried two cheaper models but neither of them worked properly on JST, so I'm using Dupont connectors nowadays for my projects. The advantage of JST though is that it's about 50% more shallow than Dupont, and I'm not sure if Duponts would fit in the space available in the PacTec case.
-

MB-6582 board set availability (possible bulk order?)
jjonas replied to urtzurd's topic in MIDIbox SID
@ChinMuzik You can check on the shop website whether your order has been shipped or not. In my experience a month's waiting time is normal. http://midiboxshop.bigcartel.com/shipping-status -
On MBSEQv4 this function is called 'scroll', which is found in the UTILITY menu. From the Beginner's Guide (section 4.2.2.): "Scroll allows you to move sections of steps with the knobs. When you press & hold 'Scroll', the screen switches to the EDIT page, and you can use a GP knob to grab a section of steps, so that the steps to the right of the knob (including the one above the knob) will be moved together, while the ones to the left will stay where they are. Releasing the GP button writes the moved steps into the new location, overwriting whatever was there previously. "
-
Is this section in the Beginner's Guide helpful? (EDIT: for understanding 'Take over Patterns'.) "On the PATTERN page you can select the four patterns that you need and see their names while you do the selection. (Naturally this requires that you've given your patterns a category and a label when you've saved them individually earlier.) After selecting the desired pattern for each group, you can press & hold SONG to select 'Take Over Patterns' with GPB13–14. This will copy the four selected patterns into the current song position on the SONG page, overwriting what was previously in that position. 'Save & Take over Patterns' does the same, but saves the patterns as well."
-
Thanks for the info! _b If all configuration options are available in the screen shot at your link, the maker of the emulator chips could probably be asked to make the preferred settings when purchasing the chips from him. Also, if someone has an opinion whether SSU sounds better than SS nano, I'd be interested.
-
As soon as someone (like @yogi!) has information on how it works with MBSIDv2, please let us know! Is it a 100% drop-in replacement, or does it need setting up etc..? Some guy has written a configuration program for it (on a C64), would it be necessary to use to make adjustments or can you do without it etc..? :-)
-
Hi, in the user manual's .NGC part, the EVENT_ENC intro section says, "An encoder can send and receive MIDI events. In 'absolute mode' it will handle a value internally, in incremental modes it will just send an inc/dec event and expects the handling of the resulting value at the host site.", However, in the possible enc_modes list, there is no enc_mode=relative, enc_mode=inc_dec or something, which would allow me to send NRPN value increment/decrement commands, instead of absolute values. If EVENT_ENC is type=NRPN, MIOS Studio shows that MBNG is sending the CCs for NRPN selection (98 and 99), and then the absolute value, but is there a way I can send CCs 96/97 for value increment/decrement with NRPNs, instead of absolute values?
-
Hi, I'm trying out if I can build a controller matrix of 8 encoders and 11 rows of selectable parameters (a bit like Waldorf Blofeld's matrix). Each row has eight parameters, and the 8 encoders at the bottom edit the 8 parameters on the selected row (selection is indicated with an LED). At the moment I have 11 buttons, each selecting a specific bank, and they're in the same radio group. That works as expected. However, I would like to avoid having a separate button for selecting each bank/row, and was thinking whether it's possible to divide the 11 rows into e.g. four groups – rows 1–3, rows 4–6, rows 7–9 and 10–11 – and have one button for each of these groups, with which I could cycle through the rows (i.e. banks & indicator LEDs) in the group (like on the Blofeld, or on the MBSID, for that matter). This way I would need only four buttons to select each bank, still relatively quickly. (With bank increment/drecrement I would need only two buttons, but I would need to press the buttons a lot to select rows that are far apart from each other.) I think this is possible, but the question is, is it possible within just the .NGC file, or does it require something in the .NGR file as well..? EDIT: To clarify further, the point is that only one row/bank should be selected at any time; this is why using several radio groups doesn't work, because one row/group will always be active within each radio group, so with four radio groups, four rows/banks will be active simultaneously.
-
EDIT (30.10.2016): This post is no longer relevant. Hi, I placed an order at Reichelt.de but forgot to include 6mm D-shaft ("flattened" shaft) encoder knobs. I'd like to avoid paying the extra 9,95€ that Reichelt charges for shipping just a few knobs to Finland, so if someone has at least 8 extra "waldorf knobs" or at least 4 of the Reichelt product linked to below (or something very similar), I'm potentially interested. Ebay is full of cheap and ugly potentiometer knobs with pointers, I don't want those :-) http://www.reichelt.de/KNOPF-10-150E/3/index.html?&ACTION=3&LA=446&ARTICLE=73960&artnr=KNOPF+10-150E&SEARCH=KNOPF+10-150E
-
MBseqv4+ is a firmware version which will only work on the newer core (STM32F4) because the old one (LPC1769) doesn't have the resources to run it. Basically, all requests for resource-intensive features that are likely to be too much for the LPC1769 based core have just been put into the MBseq4+ basket for some time now (a year or something?). Already some features (like 'undo') have been disabled on the LPC1769 firmware because of the LPC1769 hardware limitations. If your seq is already running on an STM32F4 core, I think you can just update the MBseqv4+ firmware on it (when it comes out).
-
It's true what k2z3k0 says, SELECT + CLEAR doesn't clear Layer A if it's a Note layer. I tried setting Layer A to Roll, that was cleared without problems, and also other note layers (Layer E etc.) cleared fine.
-
To clarify: when you record a note, the display jumps into the position where you recorded the note. If you record lots of notes, you won't notice anything strange, because the seq follows the cursor whenever you record a note. This is how I've done it most of the time, so offhand I remembered that recording always follows the cursor position, when in fact it follows the recorded notes. In other words, if you don't record anything for a long time (for more than 16 steps), the running cursor position leaves the screen, and only recording a note will make the seq jump to the recorded position. As to button combination shortcuts, I have cut out small pieces of sticker paper and written "BM" (bookmarks), "FOLLOW" (follow mode), and "TAP" (tap tempo) on them and put them underneath the buttons (SELECT, EXIT, and PLAY, respectively) that work in combination with the MENU button. Also, my selected F1–F4 button functions are marked similarly: REC, JAM (Jam page), TRACK (Track selection), SAVE (Save all). An immediate workaround for quick follow mode on/off would be to assign e.g. a F1–F4 button for it, if you've got one to spare. If you make the workflow page in the wiki (probably better than a forum post), please post a link and I'll write something there on how I do stuff.
-
I'm not entirely sure what you're asking, because when I record live, the displays follow the cursor position as long as I'm recording. Are you asking about playback and running cursor position? Anyway, MENU + EXIT enables/disables Follow Mode. When the mode is 'on', the displays will follow the running cursor position when the sequencer is running. When the mode is 'on' and the seq is not running, it's not possible to use the datawheel to scroll out of the current display.
-
Here's a link to my mellotron sample set (zip file, ~200Mb). Let it be said for the record that I downloaded the samples from somewhere on the internet, and my input was just changing them to the right format (the one required by Lee's original firmware), and making the bank.x files. Contents (names from the original files, i.e. not my invention) Bank1: MK II Flute Bank2: Cello Bank3: MK II violins Bank4: Combined choir Bank5: Woodwind 2 Bank6: M300A Bank7: MK II Brass Bank 8: String section Bank1 includes also entries for MBSID drum samples (included in the zip), though they're there just because I set them up, thought they could be improved, but didn't get around to it. The samples are assigned to the lowest keys in the range, with the exception of 0x00 (the first address), because it seems to result in unwanted notes for some reason. [UPDATE: MY DROPBOX ACCOUNT IS NO MORE, SO THE LINK DOESN'T WORK] https://www.dropbox.com/s/6ccbwf84us5lrdk/SP-mellotron.zip?dl=0
-
Another thing: If Rec is 'on', AStart is 'on', and Fwd is 'off', and you press PLAY, the first step of the active track won't sound.
-
One little thing I found: On the STEP VIEW page the running cursor position LED changes to a slower mode to accommodate the much denser step display (compared to the EDIT screen). If STEP VIEW button is set to toggle and you exit the STEP VIEW page with the STEP VIEW button, the change from normal and slow running cursor mode works ok. But if you exit the STEP VIEW page with any other button than STEP VIEW, the running cursor mode stays in the slow mode, and won't change until you press STEP VIEW. However, in all cases the STEP VIEW indicator LED does go out when exiting the STEP VIEW page, even if the cursor mode doesn't change.
-
Tested and working! Ok. I added this in the wiki: "For easily predictable results, the track set as Guide Track should have its divider value set to “16 (normal)” (the default setting) on the track's DIVIDER page. Smaller divider values (i.e. faster tracks) will result in repeating the guiding track wholly or in part, and bigger divider values (i.e. slower tracks) will result in a truncated guiding track." Ok.
-
The MBSEQv4 beginner's guide is now up on the wiki with some images. I've used EsotericLabs' eps files (based on Wilba's design) for frontpanel overview images, I hope it's ok. In principle the guide is exportable as pdf and printable (there's a button on the right), though at the moment certain "table like things" don't get rendered correctly. I might replace the "tables" with images to take care of the problem. If you want to add sections and correct stuff, go ahead, that's the wiki way :-) The path to the guide from the wiki front page: MIDIbox Projects -> MIDIbox SEQ V4 -> MBSEQv4 Beginner's Guide http://wiki.midibox.org/doku.php?id=mididocs:seq:beginners_guide:start
-
MBSEQv4 Beginner's user manual (draft)
jjonas replied to jjonas's topic in MIDIbox Documentation Project
Here's a few questions that I forgot to pick out from the mass of the text: Random gate trigger layer: is the chance 50/50 or something else? Random value trigger layer: does this randomise all the values in all parameter layers of the step, or just some? Is the random value anything between 0-127, or is the intensity guided somehow? MODE page option 'Sort' for arpeggiator mode: how does it sort the notes? Into an ascending order..? And is the unsorted note order the reverse of the play order, i.e. last played note is "number one" in the arpeggiator track notation? -
I tested pre7, AStart with Fwd 'off' works now. However, I also tested Edit Recording mode a bit more, and found (and this is identical to pre5) that while Edit Recording mode does work in Mono/Poly with both SELECT and GP buttons (like I reported back earlier), this happens only when Fwd is 'on'. If Fwd is 'off' and you try to use Edit Recording mode with Poly, only one note gets recorded. Here's also some older stuff that I came up with while writing some parts of the manual that I think were not dealt with yet (if you have them on a list somewhere, my apologies to repeating them needlessy): If divider is doubled (speed halved) for the Guide Track, it will proceed only half-way before forcing pattern change. (See this comment and the next one.) Muting a track cuts off all playing notes on that track, but muting an individual note layer doesn't do the same for the note that's currently playing in that layer -> hanging notes.