

Antichambre
-
Posts
1,291 -
Joined
-
Last visited
-
Days Won
101
Content Type
Profiles
Forums
Blogs
Gallery
Everything posted by Antichambre
-
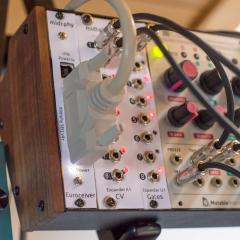
Hello, This is an introduction for my new baby, a really funny toy, the HAARP (yes I like conspiracy theory ;) It's a pure MIDIbox Project, just a dedicated CS and some coding. It works with any STM32F4 Core. Why? Many synths have an integrated arpeggiator, the SH-101 is well known for that, but the available parameters are still limited. There is also some good plug-in I think especially of the Ableton live's one but it's software. So I designed an hardware one, "LIVE" oriented, starting from the @TK.'s arp example. No encoder(except for MENU section Data entry), all parameters are directly accessible and are potentiometers. The screen is a small color TFT with a resolution of 128x160(sorry for picture, colors are better in real). It's 8 independent voices. 8 banks of 8 Presets. Session are saved/loaded from the SD Card. The Arpeggio parameters are divided in 3 sections: First is the TIMING Section (Purple pots): On/Off button, HOLD Button, it holds or releases the Notes in the notestack. The MODE Pot, it's UP, DOWN, UP-DOWN and AS-PLAYED, fr the moment but I will implement more. The RATE, from slowest to fastest, from 4 Bar to 32nd with dotted and Triplet value. The RESYNC, it retriggers the arpeggio, values are the same as RATE parameter. The OFFSET, it will shift left or right the starting step(note). Is Note Stack and MODE dependent. The DELAY, it will delay the whole arpeggio within the step range(duration), is RATE dependent. The GATE, the length of the Note, max is STEP length, is RATE dependent. The SHUFFLE, it will delay all the odd steps, in the range of an half step, is RATE dependent. Second is the TRANSPOSITION Section (Yellow, Orange, Red): Simple Transposition On/Off (Yellow). Simple OCTave Transposition, +/- 10. Simple SEMItone Transposition, +/-12 Repeat On/Off. Repeat, LOOPS number, 1 to 8. Repeat, SHIFTing on each loop, +/-32 semitones. Force to Scale On/Off Force To Scale, SCALE, list is the same as the Force to Scale example from the repo. Force To Scale, ROOT from C to B semitone. Third is the VELOCITY Section. REGEN Pre/Post(Target process) button. REGEN, +/- 100% Target process On/Off. TIME, the time to reach the target value, in PRE initial value is the regenerated value. in POST initial value is the one stored in the Note Stack. TARGET is the targetted value, 0 to 127. RETRIG, if on the TIME is retriggered by the RESYNC parameter. The main page of the screen represents an octave range, the note color changes depending on the octave, there's a Velocity section on the bottom, it's like a piano-roll. In the code, the arpeggio processing is ready, it remains me to complete the MENU section, I was waiting for the CS PCB to write it, now I can... ;) This little guy is to much fun, so I can't keep it for me. Then i will propose it to you ASAP. and I hope it will help me to finance some other bigger projects I've got in my back-pocket ;) I will try to make it available in two format, I'm currently working on a PCB for USB host/device, sdCard MIDI etc.. which will fit for both version and will be reuse for other small toys like that. An Eurorack version for the patching addicts. I used a MCP3204(4 channels) instead of a MCP3208(8 channels) for the AINSER, it's an AINSER32. I use only 2 channels for the 16 pots(8Multiplexed lines * 2 channels), it remains 16 analog Inputs which are accessible to connect some CV In Modules, thanks to @Hawkeye for making me think about this. The SRIO Chain is available too, you can connect GATE In (DIN) easily. You will be able to connect the MIDIPHY CV/GATE Out Modules which will be available soon. @latigid on is working on it. MCAN will be available, for an internal MIDI bus within your Eurorack, I reuse the BUS1 and 2 from the Euro Power connector for that purpose. A Desktop version, for MIDI purpose only(except if i find a way to add some CV/Gate without designing a too much big box). Voilà! More information will be available soon. For the moment this is a small video I made, I seem a little febrile but it's because I continue to discover it every day. I really love this little toy, it is very effective and musical, even in LIVE and if the Force To Scale is activated, there's no wrong note ;) Best regards Bruno
-
You can try to call the AINSER_Handler with a Timer set at the desired rate,but usually a freertos task is used to call it, and its minimum period is 1ms( 1 / portTICK_RATE_MS ) Check tutorial#012b_ainser_muxed: ///////////////////////////////////////////////////////////////////////////// // This hook is called when an AINSER pot has been moved ///////////////////////////////////////////////////////////////////////////// static void APP_AINSER_NotifyChange(u32 module, u32 pin, u32 pin_value) { // toggle Status LED on each AIN value change MIOS32_BOARD_LED_Set(0x0001, ~MIOS32_BOARD_LED_Get()); // convert 12bit value to 7bit value u8 value_7bit = pin_value >> 5; // send MIDI event MIOS32_MIDI_SendCC(DEFAULT, Chn1, pin + 0x10, value_7bit); } ///////////////////////////////////////////////////////////////////////////// // This task scans AINSER pins and checks for updates ///////////////////////////////////////////////////////////////////////////// static void TASK_AINSER_Scan(void *pvParameters) { portTickType xLastExecutionTime; // Initialise the xLastExecutionTime variable on task entry xLastExecutionTime = xTaskGetTickCount(); while( 1 ) { vTaskDelayUntil(&xLastExecutionTime, 1 / portTICK_RATE_MS); // scan pins AINSER_Handler(APP_AINSER_NotifyChange); } }
-
The AINSER is usually called every ms, but! if you are using the 64 version, it's one multiplexed line every ms then scanning the 64 inputs takes 8ms. This is something easy to do in a regular App, using the AINSER_Handler, but in NG I don't know. Best Bruno
-
Yes I soldered the TLC5958 (VQFN56) for the OLRE16 like that.
-
Hot air station is enough.
-
Yes it's a good chip, I already used it. I confirm it's 90mA for each output. But It's a on/off output. In this range I prefer the TLC5947, it's a 24 outputs(better for RGB leds), chainable, with a 12bits PWM outputs. But it's not the same in code for sure it requires a specific driver.
-
Hi Thorsten, For the basic mode nothing more than the node number is necessary. It's 3 bits (0...7) then 1 byte is enough Something like this: # define MIOS32_SYS_ADDR_DEVICE_ID_CONFIRM (MIOS32_SYS_ADDR_BSL_INFO_BEGIN+0xd0) // 0x42 to confirm value # define MIOS32_SYS_ADDR_DEVICE_ID (MIOS32_SYS_ADDR_BSL_INFO_BEGIN+0xd1) # define MIOS32_SYS_ADDR_FASTBOOT_CONFIRM (MIOS32_SYS_ADDR_BSL_INFO_BEGIN+0xd2) // 0x42 to confirm value # define MIOS32_SYS_ADDR_FASTBOOT (MIOS32_SYS_ADDR_BSL_INFO_BEGIN+0xd3) # define MIOS32_SYS_ADDR_SINGLE_USB_CONFIRM (MIOS32_SYS_ADDR_BSL_INFO_BEGIN+0xd4) // 0x42 to confirm value # define MIOS32_SYS_ADDR_SINGLE_USB (MIOS32_SYS_ADDR_BSL_INFO_BEGIN+0xd5) # define MIOS32_SYS_ADDR_ENFORCE_USB_DEVICE_CONFIRM (MIOS32_SYS_ADDR_BSL_INFO_BEGIN+0xd6) // 0x42 to confirm value # define MIOS32_SYS_ADDR_ENFORCE_USB_DEVICE (MIOS32_SYS_ADDR_BSL_INFO_BEGIN+0xd7) # define MIOS32_SYS_ADDR_SPI_MIDI_CONFIRM (MIOS32_SYS_ADDR_BSL_INFO_BEGIN+0xd8) // 0x42 to confirm value # define MIOS32_SYS_ADDR_SPI_MIDI (MIOS32_SYS_ADDR_BSL_INFO_BEGIN+0xd9) # define MIOS32_SYS_ADDR_MCAN_NODE_CONFIRM (MIOS32_SYS_ADDR_BSL_INFO_BEGIN+0xda) // 0x42 to confirm value # define MIOS32_SYS_ADDR_MCAN_NODE (MIOS32_SYS_ADDR_BSL_INFO_BEGIN+0xdb) Let me 1 day or 2 and I will do the stuff for the Bootloader Updater, as you get the minimum to do, just valid/correct. Except if you really want to do it yourself. Best regards Bruno
-
Yes of course, just check the levels from the datasheet. Just take care if you use encoders, for example I never tried a pec16 with a 3V3 voltage and they are given for 5V.
-
DIN and DOUT modules were made a long time ago with HC, more than that with HC and 541(forJ8/9 andJ19) DIN/DOUT modules stay compatibles to all SPI ports. J8/9 J19 and J16 included. HCT version are only 5V(Supply voltage) and J16 is a 3.3V SPI port. But you can use HCT595/165 and remove the 541 on your own design. Keep in mind HCT need 5V supply voltage.
-
it would be great! :) ... I will definitely go in this direction. Thank you for your answer Best regards Bruno
-
@Zam I just restore then mod a juno 60 for a friend using the juno-66 from tubbutec, it works great! The only critic is that they provide not enough length cable, I was obliged to change them to follow the existing cabling path, I did not change the MIDI I/O cable then cable is straight from cpu to old DCB position(not very good too). But this mod is great and add a lot of features to the juno-60 I highly recommend it to you, do not reinvent the wheel, they made it very well. Best regards Bruno
-
I don't manage collisions in basic mode, it was the case before but after some tests I removed it cause it was working fine, for a basic mode. Errors happens only when the traffic begins to be very dense. On error It doesn't stop or isolate the node I just loose some frame. It's a choice for this mode. Very short frames but collision are not handled. In enhanced Mode the Extended Id is used there's no problem. But I will do if you think it's a bad idea to let it like that, for that I've got 2 choices: Using the extended Id for basic mode too. I can add 3 bits for node signature in the standard id and limit the basic mode to 8 nodes maximum. struct { // extended u32 none:1; u32 is_request:1; u32 is_extended:1; u32 src_node:7; u32 dst_node:8; u32 app_type:3; // standard u32 cable:4; u32 type:4; u32 vman_prio:3; // ports u8 src_port; u8 dst_port; }; } mios32_mcan_header_t; I can shift vman_prio field after type and cable and use it for a 3 bits limited Id. I decided to add a Basic Id field, 3 bits which will allow 8 Cores on the MCAN Bus. And remove the vman_prio field which was an optional feature. I think it's the best compromise. struct { // extended u32 none:1; u32 is_request:1; u32 is_extended:1; u32 src_node:7; u32 dst_node:8; u32 app_type:3; // standard u32 basic_node:3; u32 cable:4; u32 type:4; // ports u8 src_port; u8 dst_port; }; } mios32_mcan_header_t; - Message types are always prioritized(type) - We keep the 16 MCAN ports (cable) - 8 chained cores max in the basic mode(basic_id), the basic_node field will not be used in extended mode and replaced by the src_node. Of course this basic_node id will have to be declared in mios32_config.h and different for each core on the buss, value from 0 to 7. Notes: the type of message is always a priority, the cable has priority over the id @TK. What do you think about? Best regards Bruno
-
I still did not take the time for that... But if i remember well you already tried it ;) oh yes you need it in the NG.
-
There's an other solution, try to contact @Zam here, he's working on something similar, chaining multiple Core with one Master connected in USB. Best regards Bruno
-
You can give him the number #0 not as a null one but as the origin, the source, the root, the base one!
-
Well done, if it's not a reused box it's time to smoke a good cigar ;)
-

LRE 4x1 breakable RGB LED-Ring/Rotary-Encoder PCB bulk order
Antichambre replied to weasel's topic in Bulk Orders
You can maybe reduce the angle. by hand ;) -
LRE 4x1 breakable RGB LED-Ring/Rotary-Encoder PCB bulk order
Antichambre replied to weasel's topic in Bulk Orders
All is made with my cheap and Chinese CNC, but it's a solid one with powerful motors, after it's a question of production and method... ...For example, to mill both side of the mask you have to think how you will reverse the material in the exact symmetrical position etc... I use 1 tooth bit from 0.8mm to 2mm, speeds depend on the plastic you use, best is cast acrylic. I always use water+soap it avoids plastic melting(not sure of the English word), I put some every 5min with a syringe. Everything is disassembled, out of dust in a closed box, I will not work on this for the moment, sorry. Yes I experimented that, with epoxy, I don't know if I used the right method but this was difficult and not a good result. this kind of operation needs the precision of a machine, to respect the right dose with repetitive same movement. By hand with a syringe I put too much in some holes, not enough in others, difficult to protect the front plate too. lol, yes I also thought to adapt a syringe dispenser to my CNC, a lot of work for an hypothetical result :) -
Last one left this morning. The bulk is closed. Thanks to the people involved, without you it would have been impossible to get my set! Best regards Bruno
-
LRE 4x1 breakable RGB LED-Ring/Rotary-Encoder PCB bulk order
Antichambre replied to weasel's topic in Bulk Orders
Yep it is the Troglass-Led from Trotec. -
Building the MB-6582 Control Surface - Photo Tutorial
Antichambre replied to Hawkeye's topic in Tips & Tricks
Yes, just extend the overall size of the window and mill the difference with a 1.5mm depth, your window will flush the surface and be held at the back. -
LRE 4x1 breakable RGB LED-Ring/Rotary-Encoder PCB bulk order
Antichambre replied to weasel's topic in Bulk Orders
Hi guys, I don't know the best for your project but I can explain what I did for the OLRE16. First is the MASK, it's black PMMA. Both sides are milled. I let some space between the leds on the pcb to keep some matters between the leds housing. Led size is 1.5x2mm On the other side(front side) there's some stripes which will fit inside the translucent PMMA, they will block the light between the leds, between the rings and between the rings and the oleds. . Note: the olre16 top pcb(ring) has no component on the top except the leds and the oleds. In blue are the back leds housing. In Red there are the holes. In Yellow, some stripes to block the light on the front, those stripes will fit inside the back of the translucent PMMA. The second part is the 'WINDOW', in translucent white PMMA, it's a LED special one, the same I used for the beat led window of the Seqv4+. The back part will fit inside the MASK, in other word the base of the WINDOW will receive the MASK's stripes, of course the WINDOW's pipes are in front of the MASK's holes. Then the Aluminum front panel comes to finish blocking the light and the pipes of the WINDOW will fit inside the panel, flush the surface. When they are coupled When coupled , assembled the thickness without the pipes height(front panel thickness) doesn't exceed 2.5mm Voilà! I don't know if it will help you and It's surely an "over-engineered" thing but this is the only solution I found, and it works. Best regards Bruno -
copier! ;) fine you received it :) For the light leak just paint in the sides of the switches with a permanent black marker, this should be enough. Have a good WE Bruno
-
New eurorack modules from midiphy - preview
Antichambre commented on Hawkeye's gallery image in Members Gallery
 the panels will be made of classic aluminum or steel like for the seqv4+ ?
 -
With a redesigned white casing too?
