Search the Community
Showing results for tags 'MB-6582'.
-
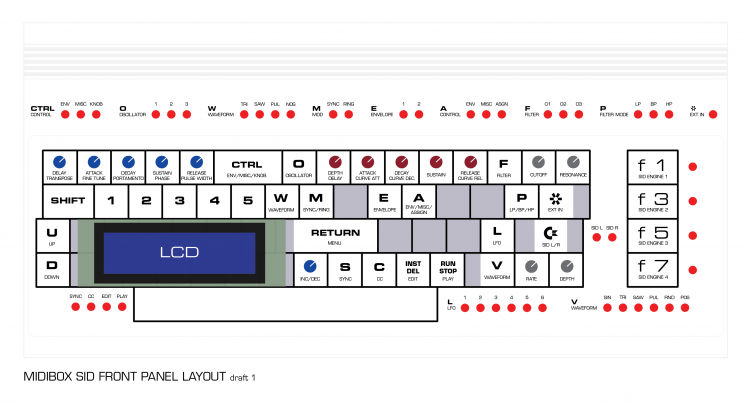
My MIDIBOX SID build is using the MB-6582 main board and a custom control surface. I'm building it inside a VIC-20 case and the control surface is built on a modified keyboard using the keys as buttons. The encoders I got push up through the holes in the keyboard tray. Due to a lack of room I'm not including the matrix. LEDs are placed around the keyboard area and my attached layout shows where I'm thinking of putting them. I went through a bunch of different layout ideas and ultimately went with whats attached. I tried to keep knobs near the edges so i can put labels right next to them. My goal is to have the chosen keycaps represent the button functions, but I'm limited by the fact that I only have a single keycap set. I'm using the old PET style keys so its hard to get extras without paying an arm and leg. Hence I'd love to have two CTRL keys, but I only have one so I'm using A for Osc knobs ENV/MISC/ASSIGN selector. While I think I tried to place everything as optimally as possible, I lack the experience of using these devices so I thought I'd see if any of you seasoned MIDIBOXers might have any thoughts, suggestions, or see any obvious pitfalls I might be missing with what I choose to do. For anyone interested, I'm documenting my progress on a blog on my website: http://www.fallenturtle.com/c64blog Thanks!
-
- control surface
- mb-6582
-
(and 1 more)
Tagged with:
-
Hi all, My beloved MB-6582 has developed a problem with the rightmost menu button, i.e., the one used to select the SAV page. It used to work, but now when I press it, it selects either the ENV or MOD page instead, irrespective of what page is actually shown above it. This means I’m no longer able to save any patches. Does anyone know what the cause might be? Hardware or software? I’m not sure how to begin diagnosing it. Thanks in advance for any help.
-
Hola, Could spare two hours for the first jam in 2018 :), this time with MBLoopA, MBProgramma and the MB-6582 :) Me had some troubles with the Programma, as it was suddenly inoperational from one day to the next, fortunately only the SD card was damaged, no file system could be recognized. I just formatted it, restored the files and all is well again - the prototype still works :). In this track, the Programma is used to control the bassline synth, the Ensoniq ESQ-M (the spiritual successor of the C64 SID, also from Bob Yannes). Some wild osc-octave switching with quite high filter resonance can be heard later on in the track :-). No MBSeq used here, only the MBLoopA - thanks to Andy, we hope for the public availability of LoopA boards and essential/hard-to-source parts somewhen in springtime! :) Thanks for watching and listening and have a great time with your synths whenever you have the chance to do so! Many greets, Peter
- 12 replies
-
- mbloopa
- mbprogramma
-
(and 1 more)
Tagged with:
-
As the title says, If anyone has a spare set of front and rear panels they want to sell then I'd be interested in buying them. I'm not too concerned about colour or condition, only that the price including shipping to New Zealand beats what I'd need to pay to fabricate a new set.
-
Hello guys! Finally I reached my hands to try to fix jumping behavior of non-detented encoders on my MB-6582. Wilba says that only one (menu) encoder has to be left detented in his CS construction guide. I'm curious then why ALL 15 encoders are assigned as MIOS_ENC_MODE_DETENTED3 in setup_mb6582.asm by default ? Were MIOS_ENC_MODE_DETENTED* modes designed only for detented encoders? As for my non-detented ALPHA encoders MIOS_ENC_MODE_NON_DETENTED works best. However, not perfect (it's more noticeable on large range values like cutoff): even if I move encoder very slowly, sometimes value gets rapidly advanced by ~10 (jumps a little forward). And sometimes even it jump backward, but not so often at least (like MIOS_ENC_MODE_DETENTED3 mode does). By "forward" I mean sporadic acceleration, and by "backward" I mean direction opposite to direction in which I turn the knob. So, I've checked all the modes and MIOS_ENC_MODE_NON_DETENTED seems to be the most close to perfect. I've tried also another encoder. It is almost like my ALPHA, however without "ALPHA" logo on it's bottom and contacts are white instead of yellow. Metal tongue inside is also white, not yellow. I've made it non-detented also. I must admit, this encoder does not jump backwards in MIOS_ENC_MODE_DETENTED3 mode. Almost :-) It jumped to ~30 (of 256 range) back only once. I slowly moved it back and forth during 10 minutes - the feel is very symmetrical and uniform compared to original ALPHA, however, not as smooth and still a little "clicky" (may be I didn't remove detent perfectly). So, if I want to set a precise value - it feels a little rough and non linear compared to original ALPHA, but in large scope (when I turn encoder faster) - it works in polite and predicted manner. Please, let me know what do you think
-
I don't think I've ever posted some sounds in this forum so with a little inspiration from Hawkeye its time to start! Heres a short dub techno jam with MB-6582 on chord duty, going into a Zoom MS-100BT pedal, Roland JU-06 provides the background sequence and a Yamaha RS7000 provides drums.
-
Making a big Mouser order for the MB-6582 parts I couldn't source from Tayda. I have a few questions about the BOM. - Is there anywhere to source the necessary rocker-style power switches? All I can find is a couple references to Wilba selling them from a larger batch. I used the photo on the old group buy wiki page to figure out what part it was, but can't find any place to purchase it. Is there another suitable part? Does anyone on the board have these? Should I just go with some other (probably panel-mount) switch and adjust the rear panel design as needed? I think I'm going to do that with the power jack anyway, since I'm gonna run it from a single 12V supply and want to use a standard jack instead of the 7-pin DIN jack. EDIT: I seem to have found a switch that matches. First of all, it looks like the switch that Wilba was supplying is the R8011L from Salem (caveat, this is my best guess based on the image on the group buy wiki page). As far as I can tell, this switch (E201J1AV2BE2 from C&K) seems to be a close match. Only difference I can find is that the rocker sticks out an extra fraction of a millimeter. Not cheap, unfortunately. I'll probably buy one and give it a shot unless anyone points out that I've missed some crucial detail that makes it incompatible. I'll report back whether it works or not. Hopefully this is a help to anyone else looking for this rare part. Actually, upon closer inspection, I think the switch that Wilba supplied was the R8017L from Salecom. Ever so slightly different. C&K lists a matching part in their datasheet (E201J1V5BE2 ), but it doesn't seem to be for sale anywhere. Back to the drawing board. - The feedback pots aren't on the BOM. I think they're supposed to be 500k dual-gang pots, right? Log or linear taper (I think log, right)? Can anyone suggest a matching pot/knob combo? I know that the pots probably aren't hard to find, but I feel totally inept at match knobs to pot shafts. - Speaking of the feedback pots, how useful do folks find them? I'm considering leaving them out entirely. Despite seeing successful installs from other folks, I worry about noise coming in on the audio-in pin, and about eventually blowing the SID filters, which I've heard the audio-in can do. I'm using 8580/6582 SIDs, if it makes any difference. - There's nothing in the BOM about securing the base PCB to the Pac-Tec case. Are the screws included with the PT-10 sufficient or are those only to close the case? I can't really tell from the PT-10 data sheet. - Can anyone give me a quick primer on crimp pins/female connectors for the headers on the base PCB? I promise I've googled this, but I must not be searching for the right things. It seems like a lot of DIY stuff assumes knowledge on what pieces and parts one needs to buy to assemble female connectors for headers, but this will be my first time not just soldering wires directly to the board in lieu of headers altogether (trying to do this right!). - Speaking of connectors, can anyone offer Mouser part numbers for the correct LCD connector. I have a better idea how to assemble this piece at least, thanks to the guide to MIDIbox display cables, but I just want to be sure I'm getting the right part; again, first time working with these types of connectors. -Any other parts that aren't on the BOM that I should pick up? Even just basic stuff that most folks would already have in their workshop. Only things I've come up with are shunts and a few machine-pin female headers (for SID capacitors and LED resistors). Sorry, I know this is a ton of questions about stuff that most folks here (and elsewhere in the DIY world) take for granted as simple matters. Just looking for a little guidance before I drop a bunch of money on parts. Better to ask these questions now than after parts arrive and I get the wrong stuff. As a post-script, let me just say that I do not recommend buying IC sockets from Tayda, or at the very least, not the 28-pin wide sockets (i.e. SID sockets). On two separate sockets, a pin came loose while placing it into the PCB and the wipers slid upward. Really poor quality.
-
Hey guys, I know this is a long shot but just wondering if anyone has a MB-6582 control surface PCB that they want to get rid of? I have the MB-6582 base which I've just completed and I've been working on a control surface but the CS PCB makes it all so much tidier! :) Cheers! Steve
-
Hey guys, apologies for the rookie question, but is there a particular length the headers should be?
-
Hi there, I don't know if something like this has been proposed already but if it hasn't, here's a simple two-transistor virtual-earth summing amplifier for the mixer output of the MB6582. It's suboptimal in many ways because I wanted to keep it simple and cheap (and try to use as much as possible existing components value from the main project, e.g. BC547, 10uF caps, etc). I wanted to make it so that it did not require any modification of the existing hardware to work (including running from available voltages), and I also wanted to keep its PCB footprint small in case someone wants to add it to the MB6582 PCB. I think the schematics is pretty self-explanatory, the general idea here, as with all virtual-earth summing systems, is to basically have 0Vp-p at the summing point to reduce crosstalk between channels. The setup is a two-stage tansimpedance amplifier: T1 turns current at its input into voltage and is buffered from the output via the voltage-follower T2. The bootstrap capacitor C3 improves linearity and reduces bus residual. The existing mix resistors are pictured as RM1-RM8. This circuit has a lot of shortcomings, but since we're not exactly going HiFi here, it should still deliver much better results than the original passive summing system which had some severe crosstalk. It should also be fairly easy to add a volume control stage to that mixer output. Note: this is an inverting stage: the output phase is reversed. I wasn't entirely sure where to set the mark for the gain: the circuit will hard clip at around 4.8Vp-p input, 10Vp-p output. I've done some very basic (read: almost none ) testing with my MB6582 and it seems to do the job. Comments welcome. By the way, speaking of comments, I'd have two suggestions for the MB6582 PCB: Please add thermal relief on the ground plane: soldering the ground pins at safe temperatures, even with a 80W iron, is really not easy without them. While ENIG looks beautiful, it's really not DIY friendly either: HASL is much better in that regard: it has excellent component wetting. ENIG only has the upper hand if you have a lot of SMDs and need perfect surface level, which is not the case here. My 2c ! Cheers, T. mixer summing.pdf
- 6 replies
-
- 1
-

-
- mb-6582
- active mixer
-
(and 1 more)
Tagged with:
-
Hi all! Thought you might like to see my synth! It uses a MB-6582 as the core, running through an SSM2044 filter module, controlled by an Arduino.. I only just realised that the Midibox SID has an analog CV out, but it was too late! I ended up coding an Arduino with a seperate envelope generator and CV out, with two modes - one is a dirty PWM output that mashes up the CV through some filthy capacitor filtering - this is what I'm using in the video clip.. I've since added a seperate DAC chip output for a cleaner CV, but since I liked the sound the PWM filter makes, I kept it, and added a switch to toggle between both modes. I also cannibalized the C64 power supply, so now the whole unit all runs from a kettle lead on the back of the box.. There's some big faders on the left controlling the ADSR, which makes hands-on control of the filter a piece of cake, which is crucial when you're in the midst of a funk jam! There's a MIDI controller built into the box, and the Mod Wheel also controls the filter.. Excuse the MDF box and marker pen labels - presentation was never my speciality! I think it fits the disgustingly mighty sound this monster monosynth creates! Here's a clip from the reCyclotron 64's first outing last week at my Groove Night.. Enjoy the filthy sound of four SID chips running through an SSM2044, into a Roland Jazz Chorus, with some extremely funky British musicians! And big up TK and Wilba for some awesome electronics x Carl
-
Bad news turns out that my LCD screen letters sticking was a sign it was on its way out because now it's had it, backlight seems ok, but letters are dead. So I'm happy to buy a nice high quality LCD display and may as well turn this into an opportunity to learn something about the workings of the MB-6582. So I now need a replacement, is there anything stopping me using an RGB LCD like this http://www.adafruit.com/products/498 What extra electronics would I require in order to put a pot (or switch) in the box some place that lets me change the LCD colour assuming that is possible? (if I wire this up as 'normal' will it work on the MB-6582 as a red display?) Any advice or assistance would be greatly appreciated, I am very much an electronics novice but not completely clueless and very happy to learn. Much Thanks, SF
-
Too bad I missed that last Waldorf knob buy, but it still looks pretty awesome, IMHO. This thing came out amazing. Thanks so much TK and MIDIbox for all your work on this. Thank you to the community here too, who helped me at each step of the way that I found a way to mess up. Seriously, I'm gonna get a lot of great use out of this box. I'm looking forward to trying another one soon.
-
-
-
-
Hello everyone, I have a pretty dumb question. I have ordered 15 encoders for my MB-6582 control surface, and the shaft size is 20mm, however I'm not sure what the size of the knobs I order for them should be. I assume they shouldn't be the same (as in 20mm) but I'm not sure. I did a search around the forums to see if this had been asked before, and tried to compare other peoples builds to part sizes but couldn't find any for-sure answer. Thanks for any help!
- 5 replies
-
- MB-6582
- Control Surface
-
(and 1 more)
Tagged with:

