nILS
-
Posts
4,314 -
Joined
-
Last visited
-
Days Won
4
Content Type
Profiles
Forums
Blogs
Gallery
Everything posted by nILS
-
DON'T DO IT! It holds together the whole thing. The display itself is just sitting on the contacts with no attachment whatsoever. If you remove the case the entire thing will come apart.
-
I just stumbled across their site. They have a decent collection of useful stuff (they should as they call themselves "Special Mailorder for DIY music electronics". Might be wort giving it a shot. They offer: Enclosures, Switches, Jacks, Potentiometers, Knobs, ICs, Diodes, Transistors, Capacitors, Resistors, Transformers, Tubes, Kits, Speakers, Plugs, Wah parts, Wires, Circuit boards, Labeling, Nuts, washers, screws, accessories and books. They have a nice collection of decent priced knobs =) Shipping costs for delivery inside europe: Weight Mode of dispatch Shipping costs up to 50gr letter 2,-€ up to 0,1kg letter 2,50€ up to 0,5kg letter 5,-€ up to 2kg small parcel 8,50€ up to 5kg parcel 15,-€ up to 10kg parcel 22,-€ Delivery inside Germany: Weight Mode of dispatch Shipping costs up to 2kg small parcel 4,50€ up to 5kg parcel 6€ up to 10kg parcel 9€ http://www.musikding.de
-
Whenever I solder sth onto a board I usually solder the two outmost pins first. Then I can just put some pressure on the component, melting the soldering tin on one of the two pins and move the component all the way to where I want it. Same thing again for the 2nd pin - done. Nice and straight. Now you can go ahead and solder all the other pins without having to worry about the component being placed crookedly.
-
SLP: I soldered a test-board with the encoders in the same distance and found it really nice to work with, thx! More updates: Basically done with the frontpanel layout. Just not sure if I'm going to go for black background or simply clear-coat the wood (really light brown KINDA LIKE THIS)


-
Okay. Um, 40 views one comment. Not that great a ratio. I'd really appreciate some more feedback :-) So, here's the more detailed and aligned plan. The first one is the front panel with the drill holes and cut-outs for the power switch and LCD. The second one is the layout of the bread-boards with the drill holes to screw it to a backplate. Cheerio, nILS (fossi.bs)


-
90% for some days now. Can't wait any longer. If the update takes more another 5 days, I'll just build it myself :D
-
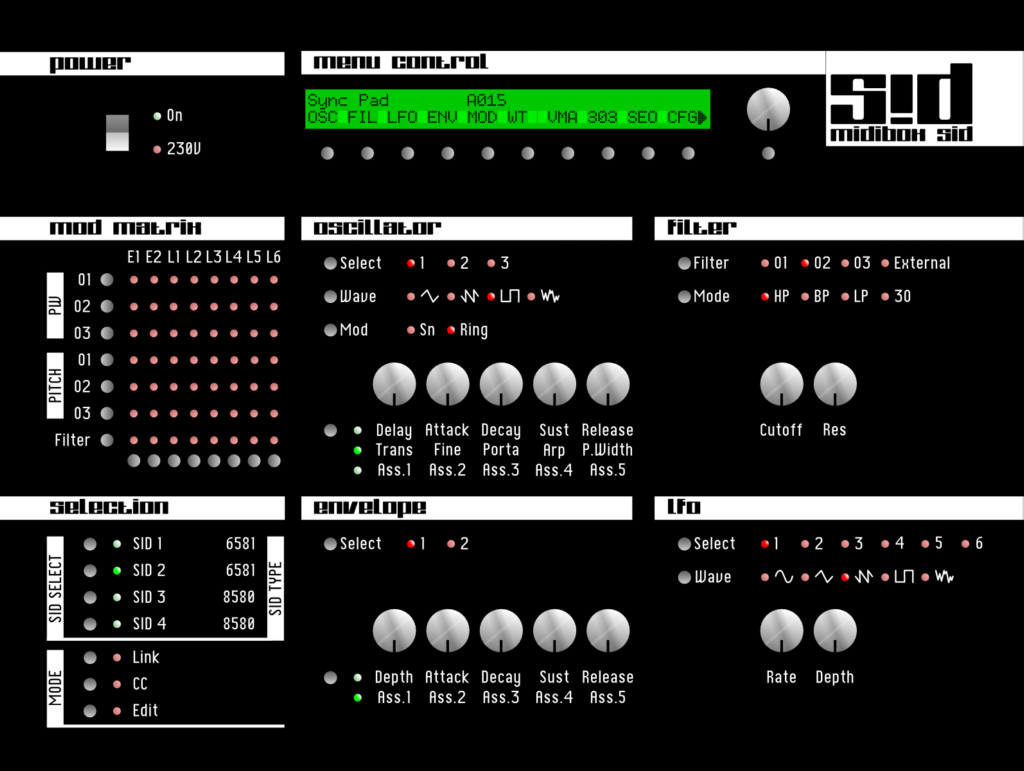
After I finally got back to working on my quad-MIDIBox SID I started working on the 1st draft for the front panel, since my old one won't work with the new case :-/ Some notes: * Display is a 40x2 * Nothing is exactly aligned yet * All the text is temporary * The light-colored rectangles in the back are the modules (green = sid, red = core, purple = dinx, blue = dout, yellow = psu and cooling) * the rounded rectangles around the different parts are the PCBs Anyone see any major problems as of yet? Any suggestions or questions are welcome ;-) The whole thing is 39x29 cm (15.3x11.4 inch). EDIT: The V2 changes are NOT implemented yet (thx Wilba for pointing this out)
-
Welcome ;-) BTW, this is *not* the original one. I made that one last night. But I'm quite confident the proportions match.
-
Sure ;-) The .zip contains .svg, .emf., and .eps Versions. MIDIBox Logo.zip MIDIBox Logo.zip
-
edit: Oh yeah, feedback would be great =) Actually, while I'm at it, here's some more stuff I did recently: Original stuff: http://www.schickt.de/temp/new/music/nILS - Some stuff/nILS - The Chase.mp3 http://www.schickt.de/temp/new/music/nILS - Some stuff/nILS - CGST.mp3 http://www.schickt.de/temp/new/music/nILS - Some stuff/nILS - 4 Measures.mp3 http://www.schickt.de/temp/new/music/nILS - Some stuff/nILS - sidFun.mp3 http://www.schickt.de/temp/new/music/nILS - Some stuff/nILS - Intro64.mp3 http://www.schickt.de/temp/new/music/nILS - Some stuff/nILS - sidBreak.mp3 http://www.schickt.de/temp/new/music/nILS - Some stuff/nILS - sidMore.mp3 http://www.schickt.de/temp/new/music/nILS - Some stuff/nILS - sidStep.mp3 Remixes and covers: "Hip to be square" - Remix http://www.schickt.de/temp/new/music/nILS - Some stuff/nILS - sidHip.mp3 "Rubber Duckie" Remix http://www.schickt.de/temp/new/music/nILS - Some stuff/nILS - Rubber Duckie.mp3 "Time Requiem" Remix http://www.schickt.de/temp/new/music/nILS - Some stuff/nILS - Time Requiem.mp3
-
Okay, I know there are about 17 million "Super Mario" remixes, but... I reinstalled my system and had to resort to playing on a 233MHz computer while doing so. I didn't have any games except for an old NES emulator, so I played "Super Mario" while the installation was running. And I thought to myself - that's an awesome theme. Funny how I never noticed before just how cool it is. Sooo... ...one more won't hurt anyone, right? Here's the deal: It's far from finished and definitely far from being mix and mastered. I'm kinda stuck with a pair of chinese desktop speakers at the moment, so I have now idea whatsoever what it's going to sound like on real speakers. Probably crappy. http://www.schickt.de/temp/new/music/nILS - Some stuff/nILS - Super Mario.mp3
-
Hopefully I'll find the time to stay :) Life is keeping me pretty busy - college, girl-friend and the likes... I kinda have to stay though - put too much time, effort and money in my SID to just quit working on it! I didn't really go anywhere actually - I believe in my profile it says something like "don't go to college" - I think that explains where I've been all the time :D
-
It's so nice to see that the midiBOX project is still running ;) You even use the same intro page, I created like decades ago: Woohoo! I really need to find the time to finish my quad-midiBox-Sid =)
-
...symphony
-
Off-topic, but: How did the chicken cross the road to the thrift store? Couldn't resist ;D nILS
-
Dude, you've already got all the parts? I believe this and the money that you have to spend for all the buttons, encoders,... is one of the bigger problems for most MIDIboxers! :D Anyways, you probably want to do a lot of reading first. Read thourgh all of the information on uCapps.de first. When you think you understand what you're about to do then go ahead and solder the boards. Test and if needed troubleshoot them. The Step A control surface is rather simple to build so there shouldn't be any major difficulties. If you do run into some - post in this forum and you'll most likely get some answers. Powersupply: I just bought two transformers from Conrad (~5EUR each) which will transform 230V~ to 15V~ for the SIDs and 9V~ for the Cores. Solder them to some board, do some wiring - done. This is a cheap and easy way to go. You want to make sure you've got some good isolation though when working with 230V! And a fuse is a must, too. A 1.5A fast blowing one will do. This is about as much as I can tell you besides: You're the one who has to get started. If we get you started you're probably not going to finish the project... ;)
-
Duuude =) I'd check your site out, if you'd tell us where it's at! nILS
-
cheats and tricks (for the heck of the rhyme ;D)
-
If I'm not mistaken, the 2 bottom lines are displayed as if it was a 40x2 display. At least that's what my test LCD did =) So, it should display 5 items in the top 2 lines and 5 in the lower 2 without any code changes. nILS
-
Are you sure you want to do that? In a transparent case all of your wiring will be visible - and the wiring of the front panel tends to get just a little bit messy. Just a thought. nILS
-
I cannot answer all of your question, but I'll give it a try: First of all, you'll want to do a lot of reading, so you know what you are actually going to have to do. Second, as you already thought, you'd plan out your box. What do you want it to do, what controls do you need for that etc. Then you'd probably want to find out what boards you need (Cores,...). When you've got those you can go ahead and soldert all of that. That's a good bit of work so far. Set up your controls, and troubleshoot it. Get it to work just the way you want it to. Now for the panel: I would probably not have my panel cut till I've got all the controls on boards and working. Getting a panel cut is way expensive, so you wanna be really sure about everything fitting and being in place. Next, combine panel, case and other stuff - have fun. Sorry, if I forgot something =)
-
Make sure you check your board for the tinyiest blobs of solder tin =) If you've got a short *somewhere* on the board the tests may all be ok, but you still get no MidiIn. That's what fixed my Core... nILS
-
I agree with Moebius. Whenever I get a new SID, I stuff it into one of my C64s and see if it'll do the job. If you do so, just make sure to take the a C64 with the same SID (6581/8580) nILS
-
All's well when ends well (SID and Core finally working)
nILS replied to nILS's topic in Miscellaneous
No, if I had ever doubted that it would work out in the end, I would have said: "midiboxin' is fun, IF it's working..." ;D nILS -
All's well when ends well (SID and Core finally working)
nILS replied to nILS's topic in Miscellaneous
What's that about? Did y'all figure I messed up with the wiring? :-[ Just bought the case for my SID. ;D This is gonna be good! nILS