

latigid on
-
Posts
2,524 -
Joined
-
Last visited
-
Days Won
149
Content Type
Profiles
Forums
Blogs
Gallery
Posts posted by latigid on
-
-
Can you measure the main power rail voltage in this state? E.g. using the J3 jumper? Just on the weekend I was happily switching between layers (you should get a kind of VU meter display).
-
Reminder for tomorrow!

-
Thanks, seems to be working now after removing device/disabling and other fiddling. The ploytec wouldn't progress past the "connect your device now" without a proper GM5 I guess.
-
Sorry, not sure exactly what you mean? I will order a batch of miniCore boards to go with the BLMs, or if you prefer you can use a regular Core8 as the circuit is identical (linked above). It's just less convenient. The 125 chip simply buffers SO, SC and RC and there's even extra buffers on the main PCB. Probably neither of these are necessary now we know more about the brown out reset behaviour.
-
Just now, matcom3 said:
No, I don't compile a new .asm just the original one , looks like the software it's written to control 32 or 64 digital inputs and when an IC it's no present the behavior its crazy
Exactly, you should instead disable the unused DINs and build a new .hex file otherwise the PIC is looking for registers which aren't there!
-
Did you compile a new setup_midibox64.asm file? Can you post it?
-
Relevant in setup.asm
Quote; This DIN map allows you to customize the MBMF application to different hardwares
; The MBMF dump structure allows the use of up to 64 buttons, they are grouped to 8 buttons per shift register
; Define the used shift registers for the buttons here
; the shift registers are counted from one - means: 1 for the first, 2 for the second, etc...
; mark unused button groups with 0
#define DEFAULT_DIN_SR_PIN_01_08 2
#define DEFAULT_DIN_SR_PIN_09_16 3
#define DEFAULT_DIN_SR_PIN_17_24 1
#define DEFAULT_DIN_SR_PIN_25_32 4
#define DEFAULT_DIN_SR_PIN_33_40 5
#define DEFAULT_DIN_SR_PIN_41_48 6
#define DEFAULT_DIN_SR_PIN_49_56 7
#define DEFAULT_DIN_SR_PIN_57_64 8
Is this correctly done?
-
I don't know much about MB64, but if the number of shift registers configured in software is greater than what you have installed I can imagine their addressing could get messed up. Feel free to post a pic, that always helps.
-
Salut Pierre,
Here are the schematics;
http://www.ucapps.de/mbhp/mbhp_blm_scalar.pdf -- SCALAR module which is just a mixed DIN/DOUTX3 board. There are a few modifications such as enabling a power on delay and B-E resistors for the current sink transistors. Five of these are integrated into the BLM PCB.
http://www.ucapps.de/mbhp/mbhp_blm_map.pdf -- this is the matrix routing for the buttons and LEDs.
http://www.ucapps.de/mbhp/mbhp_core_v3.pdf -- this is the 8 bit Core of which unneeded headers and the LCD driver circuit have been removed for the miniCore. There's an extra line driver implemented for the digital signals, and the MIDI I/O and power come in on the same 2x5 DIL header.
Best,
-
Just to correct you there hawk, the resistors are pull ups to +5V. The other point to check is if resistor networks are oriented with the dot aligned with the PCB silkscreen. If this is a DIN kit from SmashTV then you have the correct components. Something else to consider is that DIN (or DOUT) modules will not cascade unless all chips are installed because the specific SI or SO data signal is routed through each subsequent shift register.
-
http://www.mikes-elektronikseite.de/
Funnily enough I don't think my Quad IIC is working either. I wonder if the 16Fs I bought from Mike aren't bootstrapped because I didn't ask by default...
-
13 minutes ago, doc007 said:
Hello
I'm in France
How can I buy the PCB to built the BLM 16 x 16 ?
Thank you for the answer.
-
As far as I know this the (in)famous VCA issue inherent to SIDs
-
Okay, I went to the beginning of time and it's fixed. Many thanks!
-
 1
1
-
-
Works properly in M$ Edge thingee but not in Chrome. No difference if I close/empty cache etc. It's not a big deal, just strange!
Thanks for the help,
-
Is there a public source for those drivers?
-
You can always get the image back by clicking the "lightbox" icon.
Meanwhile, my interface is still a bit funny:

The icons are shifted one over while the centre and left align buttons are for
Quotequote
and
Spoilerspoiler
-
Windows 10 recognises the SEQ (STM32F1 Core) and its four USB ports but communication over MIDI in MIOS Studio isn't possible. I think it was working fine with Win8. An old Win7 machine works fine and recognises the ports as "GM5 Port 1-4".
I can't spend much time fixing this for the next few weeks, but I thought I'd put it out there if somebody already knew of a quick solution.
-
2 minutes ago, dadacore said:
nope, are non latching, Normally open momentary tactile switches, kind of the ones of a '80s keyboard such as an AtariST or similar.
What puzzles me is: if switches are supposed to be already connected two pins by two pins, this could be the same as using a 2 pin switch and jumpering the other two on the board? But my head hurts when I look at the schem below .
.
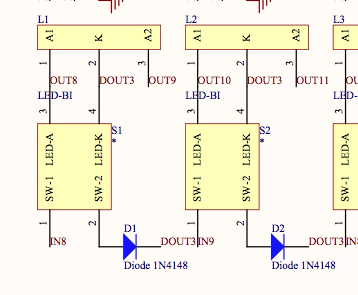
Is that the schematic for the SEQ or something else? The SEQ is connected in a matrix. From the layout data it appears Wilba used the common halves of the switches to act as PCB jumpers.
-
Side comment: where do the 24 CS lines come from? I only see J15A (8 lines) and J28 (4 additional lines). And apparently you need tristate buffers for SPI, meaning 24 extra MCU pins to drive them...? DOUT module?
-
8 hours ago, mongrol said:
Hi folks,
Hi mongrol,
8 hours ago, mongrol said:I've read in a few places that Midibox isn't suitable for song composition.
Where did you read this ;)
8 hours ago, mongrol said:I see it has a song mode that allows chaining of patterns and I'm wondering if this is still true, or out of date information.
MIDIbox only adds features, never takes them away :)
8 hours ago, mongrol said:I currently use a Midirex for full arrangement. It's a 4 track realtime recording sequencer with a pattern chaining mode and I work quite well with it. Being realtime though it's impossible to edit, or add CC's without directly recording them so I'd like to move to something that provides both realtime and step recording. Midibox looks good for this.
Is the song mode functional enough to do a full arrangement?
I've never gotten to grips with full compositions done on hardware, although it's available in many units like the SEQ, machinedrum, probably electribes etc. and I want to work on this when my setup is more solidified. That said, live recording is built into the SEQ and all parameters should be tweakable. 16 tracks should be plenty and if you really get into it you can modify tracks with other "loopback" tracks. It's just a question of whether you gel with the interface. There's not a lot of risk and you keep the option using both units.
Realtime recording demo by stuartm
You might also be interested in the MBLoopA by Hawkeye.
-
If you didn't find it yet:
http://www.midibox.org/dokuwiki/lib/exe/fetch.php?media=mb-6582:mb-6582_base_pcb_r2_color.pdf
Will make it much easier to trace the tracks exactly where they need to be.
-
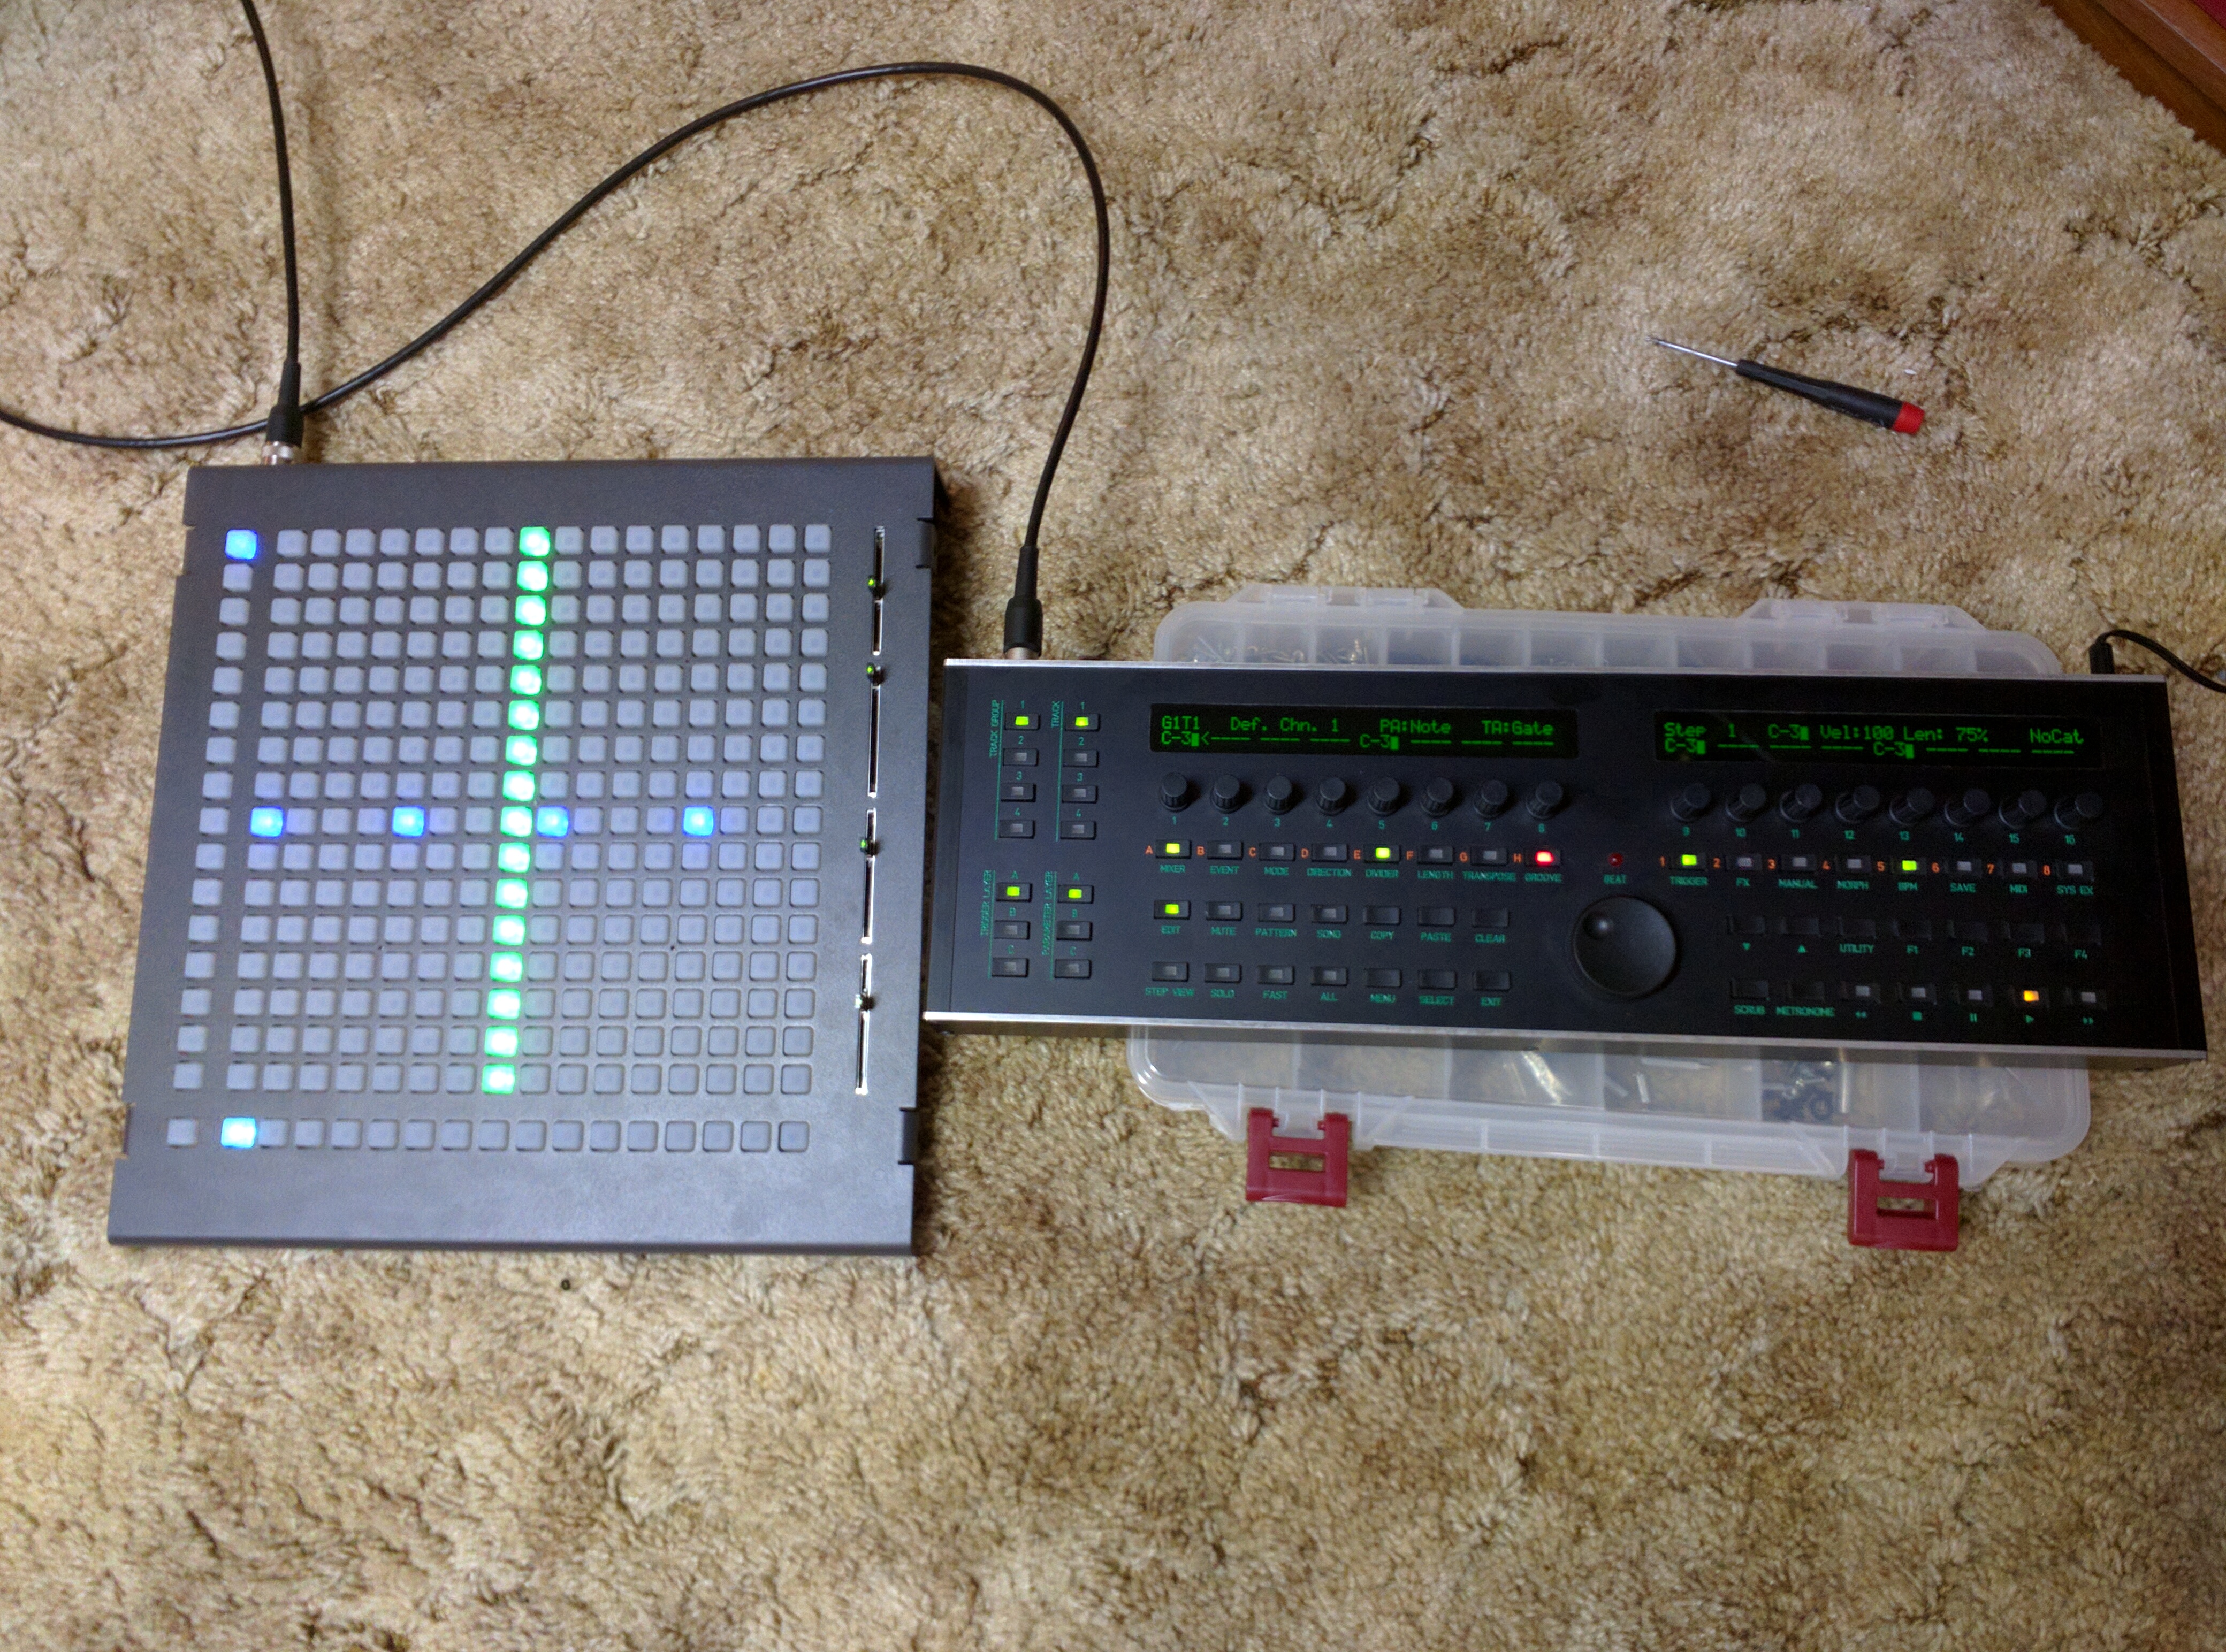
48 minutes ago, Altitude said:
yeah, been pouring over that info. Is all that consistent with your BLM? Kept thinking the bottom row had alt functions for some reason..
What is the spacing between button centers? I'll draw up some labels for people with a label maker
I think it's consistent although I haven't updated to the latest firmware miniCore side. Just check how extra column 3 and 4 toggle mutes/solos.
Normally the extra row just shifts the step view; you'll notice with drum tracks enabled that blocks of 2/4 etc. buttons will be illuminated to indicate a shorter track length. In keyboard mode it should transpose.
Button centres are 15mm apart while the extra row/column are 22.5mm.
QuoteThanks for your hard work! It's amazing this is finally a reality after so long.
QuoteReverend Mother Gaius Helen Mohiam: The mystery of life isn't a problem to solve, but a reality to experience.
-
1 hour ago, workspace said:
up & running! thanks to everybody!
now I have to wait for the silicon buttons. I ordered them from mouser at the beginning of december and they will ship in february...
 1 hour ago, Altitude said:
Done!
Question: Where is a good guide of the left and bottom row controls? I really need to make some labels until I'm comfortable with everything
Well done to you both! I award you No Hardware Advice Needed badges
.
@Altitude there isn't a lot of info about, this is kind of useful (I think extra column 3 and 4 toggle a sort of mute and solo behaviour):
Quote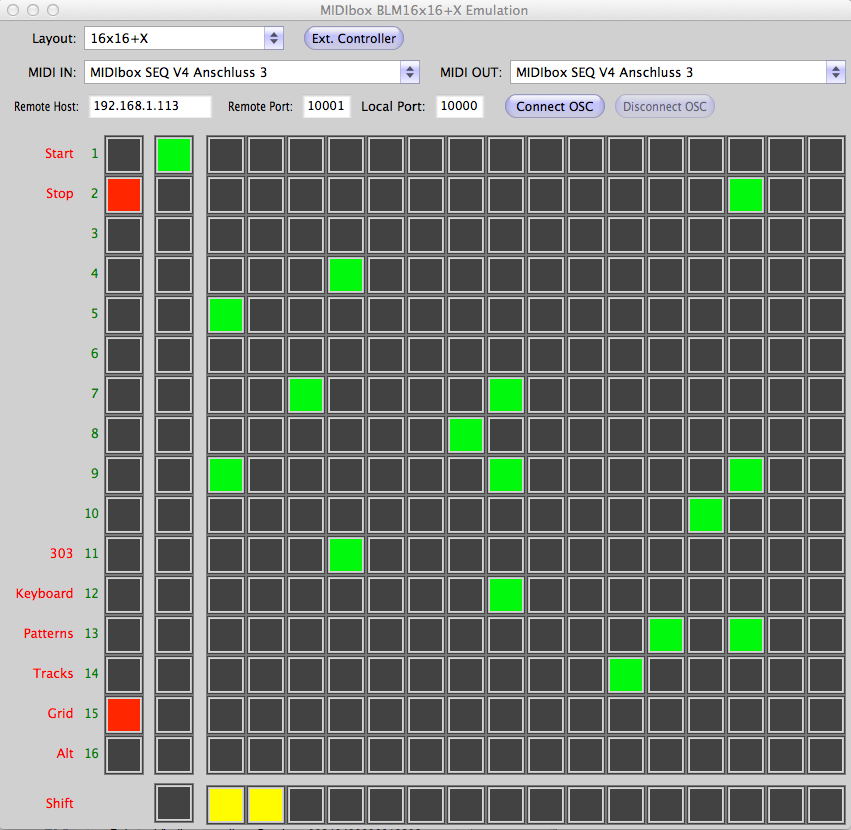
and
Quote
Grid mode: displays a 16 step view of the selected track. The usage depends on the parameter layer assignment:
Note Layer: each 16x16 row will play a different note. The 16 notes per column are pre-selected based on the current scale (MENU+FX->Scale) to increase the octave range, and to simplify the entry of harmonic notes.
Important: one note per step can be selected if the track only contains a single note layer (default). By adding more note layers in the MENU+Event page it's possible to select multiple notes per step for polyphonic sequences.
Any other parameter layer such as velocity/length/CC/PitchBender/Roll/Probability/etc.: each 16x16 column works like a VU meter.
Drum Tracks: each 16x16 row is assigned to a different note (drum instrument) as configured in the MENU+Event page.
Hint: instead of drums you could also play a synth. Since each note can be predefined, you are able to create your own "scale" this way.
Extra Column: selects the track that should be edited. Push the button twice to mute/unmute a track.
Extra Row: selects the step view. Increase the track length to play more step views. Use loop mode or the section function to play only a single step view.
ALT+Extra Row: selects the octave
Planned future enhancements: pressing SHIFT+16x16 button should set accent, pressing SHIFT+extra row button should select the section that should be playedTrack mode: displays a 16 step view of all tracks.
16x16 buttons: set/clear a trigger.
Extra Column: selects a track. Push the button twice to mute/unmute a track.
Extra Row: selects the step view. Increase the track length to play more step views. Use loop mode or the section function to play only a single step view.
ALT+Extra Row: selects the trigger layer
Planned future enhancements: pressing SHIFT+16x16 button should set accent, pressing SHIFT+extra row button should select the section that should be playedPattern mode: displays the patterns of all 4 groups.
16x16 buttons: each quarter directly selects the pattern of a group (up to 64 patterns per group)
ALT+16x16 buttons: each quarter stores the pattern into the selected slot
16x16 LEDs: green: pattern is selected for next measure, red: pattern is played, yellow: pattern is selected and played
Extra Column: selects a track. Push the button twice to mute/unmute a track.
Extra Row: no function yet.
Planned future enhancements: pressing SHIFT+16x16 button should select the pattern synchronized to measure independent from the global "synch-to-measure" function.
The extra row could select a song phrase (so that all 4 groups change to predefined patterns)Keyboard mode: allows to play notes of the selected track "live".
16x16 buttons: each 16x16 column will play a different note. Than higher the row, than higher the velocity of the played note. The 16 notes per column are pre-selected based on the current scale (MENU+FX->Scale) to increase the octave range, and to simplify the entry of harmonic notes.
Extra Column: selects a track. Push the button twice to mute/unmute a track.
Extra Row: sends a note to the transposer (starting from C-2, unscaled)
ALT+Extra Row: selects the octave
Planned future enhancements: pressing SHIFT+16x16 button should play&hold a note until the same column is selected again.
Support for playing notes on drum tracks.303 mode:
first row selects accent
second row selects glide
third and fourth row select octave (4 different selections)
remaining rows select key of octave and set/clear gate
Stop: stops the sequencer
Start: starts/restarts the sequencerhttp://www.ucapps.de/midibox_seq_manual_blm.html
@workspace a real shame about the buttons, sorry for the poor recommendation! At least it should be under the VAT threshold.

BLM software or hardware bug
in MIDIbox BLM
Posted
No problem on my unit replicating your test conditions. I have a 2A PSU for the SEQ, adafruit Verter regulator inline inside the case, Schottky diodes piggybacked and 8 mapped AIN, with unused AINs jumpered.