

Hawkeye
-
Posts
3,636 -
Joined
-
Last visited
-
Days Won
36
Content Type
Profiles
Forums
Blogs
Gallery
Everything posted by Hawkeye
-
 thx :rolleyes: no problems with the long cables so far - ca 50% of the inputs/output wires are connected to cs modules by now... I tested up to a meter and it worked... even without din/dout chain terminators (which I installed for sanity reasons). Now the distance from the core to the CS is about 50-60cm. We will see what happens when all modules are connected... Have a good new year y´all :clover:
 -
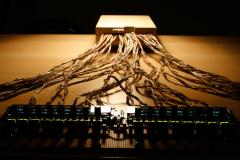
From the album: Hawkeyes MB stuff
3xDINx4 + 3xDOUTx4 + 2xVFD Cables :) -
Step 25: Creating and Installing the Right Step Sequencer Control Surface Board Parts Used: * See Steps 19-24 * Three additional "Beat" LEDs * One 2-pin board interconnector plug and socket * A few centimeters of ribbon wire Description: * Build the right step sequencer board as described in the steps 19-24, but: * Instead of building the elevated step encoder surface identical to the left board, create a protuded area and use a second piece of vector board to elevate the rightmost two encoders (photo 1). * Use the additional surface area and install a two-pin board interconnector plug for the encoder switch line from the left central surface board (photo 2). * Add three "beat" LEDs and wire them in a color as you please (green, red or both (yellow/orange), if you connect the outer pins). * Connect all step encoder switches as before and attach them to the 2-pin board interconnector plug, so that the interconnection cable is shorted when any encoder push button on any step sequencer module is depressed. * Lead the encoder push button interconnection cable and the LED power cable to the right side of the vector board and solder a 4-pin cable to it (2 pins for the beat LEDs, 2 pins for the step encoder switch function) (photo 3). * This 4-pin ribbon wire will be plugged into the "menu" control surface module, which will be located right of the step sequencer modules. * When finished, test and enjoy (photos 4 and 5) :-)


-
<missonary mode> ok, this may not be helpful, but you could always switch to vfds and sell the lcds to some new-schoolers :-) </missionary mode> merry x-mas!
-
You could try any other commandline image converter instead (system invokes a command line call) - maybe your installed version of convert does not have png output capabilites because of missing libraries or png was not configured during installation time? You can always install cygwin, which is a nice unixy addon for windows - it should provide packages for conversion, a quick google search yielded xpm2png.sh, which is available in the libAfterimage cygwin package.
-
[S] Core32 PCB,DIN PCB,DOUT PCB CORE32Kit (SMASHTV) +
Hawkeye replied to Boris's topic in Fleamarket
Hi Boris, you´ve got mail ;-) Bye, Peter -
bwahahahah that thread has made my day... you guys rock :flowers:
-
That looks very, very nice :D
-
Nice! I like the voice samples :shocked:... Had shaky hands before listening to it and trying to solder the seqv4 cable madness. Now they are steady :)
-
thanks, man! The arp was modulated by a completely unsynced ebbe and flut lfo... one more reason why i cannot afford to eat for the next year or my government will put it on ebay :)
-
 thx, Smithy! The blurring will be gone, when the foil is applied firmly to the vfd. i tell ya, never ever touch vfds... if you have seen one, you don´t want anything else - i would love to own a ~10 inch 80x25 character "pure command line" vfd for hacking, if it only existed :-).
 -
Hi Smithy, Very nice drum demo! Great to see your MB6582 in action! Best regards, Peter
-
From the album: Hawkeyes MB stuff
... using a cheap yellow color foil. These color foils are used to change the light color of presentation "spotlights" usually. The foil is not yet applied firmly to the glass vfd surface, which is why you see a "ghost image" of the font. -
Step 24: Creating the Display Cables and Performing Initial Testing Parts Used: * A length of 16-pin ribbon cable (only 9 pins used) * 2 pcs 16-pin IDC connectors (plugged into the display ports of the Core32 module) * 2 pcs 10-pin crimp housings * 18 pcs crimp connectors * A multimeter Description: * Crimp the IDC connectors onto the 16-pin ribbon wires. * Create two different display cables with pinouts as reported in step 12: J15A DISPLAY1 WHAT 1 -> 1 GND 2 -> 2 VCC 5V 4 -> 4 RS 5 -> 5 RW 6 -> 6 E 11 -> 11 DB4 12 -> 12 DB5 13 -> 13 DB6 14 -> 14 DB7 ------------------------- J15B DISPLAY2 WHAT 1 -> 1 GND 2 -> 2 VCC 5V 8 -> 4 DB1 -> RS 9 -> 5 DB2 -> RW 10 -> 6 DB3 -> E 11 -> 11 DB4 12 -> 12 DB5 13 -> 13 DB6 14 -> 14 DB7 * Use your multimeter in resistance mode to measure the proper connectivity - if something is wrong, simply change the crimp connector order. Photo 1 shows how i performed testing - the cable was already installed in the core case, led through the floppy door and was held by a clamp (upper middle part of photo 1). I checked the 1:1 connectivity on the bare VFD pins (lower middle part of photo 1) using a multimeter. If you are confident, that your connection is right, you can cut off the unneeded 7 ribbon wires directly at the IDC connector which is plugged into the Core32 module. For this type of Futaba VFDs, the cable for the right display needs to be different, as other data pins are used to drive the control lines - see the wiring table above. * Photos 2 and 3 show the installed and connected left central control surface module including the VFD. I just received a yellow color foil today, which I tested. Photo 4 shows, that it does a good job in shifting the VFD color hue towards the LED green - that was the desired effect. * Using your favourite synth, you can now play with a half-pattern of notes - see photo 4. You can use MIOS studio to virtually "press play" and change the first half of the pattern notes by turning the encoders and pushing the switches. Currently, the sequencer just sends notes over the virtual MIDI ports (not MIDI OUT 1), which is probably due to the midi port routing not being set up yet correctly (which we cannot do just yet without menu access). But using a software MIDI forwarding tool, we can send these commands received on the USB port to another MIDI-out port on your audio interface, and you can control your synth :-). * If you haven´t done so, build and install the right central control surface board now, re-doing steps 19 to 24. Notes: * I will sign off for some time now, as I need to build the right step sequencer board and holidays are nearby. Have a great Christmas time! * Later on, we will continue with the "menu" control surface module, which allows us to change the sequencer configuration.


-
Step 23: Attaching the VFDs to the Central CS Boards Parts used: * VFDs * M3 nuts * M3 washers * 8mm M3 screws * 12mm M3 screws * 5mm M3 hex standoffs * 10mm M3 hex standoffs * A roll of electrical insulation tape * A few centimeters of 9-pin ribbon wire * The temporary construction base from step 18 * A bench drill or a hand drill and a 2mm and a 3mm drill * Your favourite soldering equipment Description: * Using enamelled copper wire, create a 90-degree turn of the upper nine d1 display pins as shown in photo 1. * Solder connection pads for the display cable (photo 2). * Solder a short 9-pin display ribbon cable to the connection pads (photo 3). * Use electrical insulation tape to mask the upper part of the CS board to avoid any contact between the VFD contacts and the CS board (photo 4). * Arrange the VFD and CS board on the temporary construction base, so that the VFD is close to the center line (but does not overlap it) (photo 5). * Mark drill holes with a pen (photo 6) and pre-drill with a 2mm drill, then drill with a 3mm drill. * Install the CS board by inserting 12mm M3 from the underside of the construction base and fixing them with a M3 nut (which is about 2.5mm thick). Install 10mm M3 hex standoffs to fasten the CS board (this is the distance to the aluminum frontpanel). Using M3 washers and 5mm hex standoffs, create four elevated display standoffs with a height of approximately 7.5mm (photo 7). * Cut the display cable as short as shown in photo 8. * Cut away unnecessary VFD connection pins, then bend and tin them as shown in photo 9. Splice and tin the display cable ribbon wires. Create five shorter and four longer tinned ribbon wire ends. * First solder the short ribbon wire ends to the right-side display connections as shown in photo 10. * Then solder the long ribbon wire ends to the left-side display connections as shown in photo 11. * Turn over the assembly and install with two M3 screws, using washers if the M3 screws are too long (photo 12). The Futaba VFD drill holes are not exactly in the 2.54mm raster, so only fasten the upper left and the lower right screw. Our final aluminum base will have the correct screw spacings, so that all four screws can be fastened, of course. * Photo 13 shows the slimness of the control surface. The whole assembly including two 3mm aluminum panels will only be 20mm thick!


-
Step 22: Connecting and Configuring the Rotary Encoders Parts Used: * Enamelled copper wire (from step 21) * A few centimeters of two-pin ribbon wire * A multimeter or connection beeper * Your favourite soldering equipment Description: * First, let´s create the common encoder ground line. It is the middle pin of the three encoder pins (photo 1). Wire the middle pins of the four left rotary encoders to i1/i4 ground and the middle pins of the four right rotary encoders to i2/i5 ground (pin 10 on the crimp plug). * For the leftmost encoder, connect the lower of the three pins to the first pin on i1/i4, and the upper to the second pin of the i1/i4 crimp plugs (photo 2). * Follow that scheme and wire the first four encoders to i1/i4 and the second four encoders to i2/i5 (photo 3). * Let´s create the parallel push-button cable for encoder value entry acceleration, when the encoder buttons are depressed. This will be connected to the other step encoder control surface board and the menu dial control surface board (which we have not built yet). Solder a short 2-pin ribbon wire cable to the right side of the central control surface boards for interconnection to the other boards (photo 4). The other central cs board and the menu dial control surface board should have an angled two-pin interconnection socket on their left side to receive the push-button cables. * Now parallely-cable the push button encoder pins for every step encoder as shown in photo 5 (in this photo, the wires are layed down, but not all connections are soldered, yet). Pushing any rotary encoder switch will short the cable when using this wiring method. * Using your connection beeper or your multimeter in resistance measurement mode, test all push buttons as shown in photo 6. Notes: * With a soldering iron set to a high temperature (above 400° celsius), it is possible to melt the laquer of the enameled copper wire. Using this method, you can easily create linear connections (e.g. the ground connections of the encoders) by just properly heating the wire above the to-be-soldered connection points and then pushing the wire down into the solder blob using a screwdriver. * Credit, where credit is due. If you understand german, have a look regarding step encoder modes and configuration. For the ALPS STEC12 encoders, a setting of DETENTED3 in the MBSEQ_HW.V4 file is perfect. Thanks to avogora for the work on this matter!


-
Building the MB-6582 Control Surface - Photo Tutorial
Hawkeye replied to Hawkeye's topic in Tips & Tricks
thx :-) have fun with this awesome synth! -
Hi and welcome! the current draw depends only on the installed LED, the push button itself (just a switch) is passive... just consider it as a bridge when "switched on". BUT: 1) it says "on/off", that is potentially not the button behaviour that you want - it locks in every state. 2) din/dout in conjunction with the gm5 module?!? maybe nILS could move this thread to "parts questions" :-)
-
a few questions/suggestions * did you test the all modes lowpass/bandpass/highpass and the combined modes? * is "ext in" off (if the sammich sid has that option)? * if you have a working C64-II (every good household should carry at least one :-)), you can test the 6582 in there, there should be some filter demos available. if nothing works: * can you post an audio example?
-
MBSeq V4 - Building the step button/encoder control surface
Hawkeye commented on Hawkeye's gallery image in Members Gallery
 thx, just some aliens hopping around missing :)
 -
endlessly falling snowflakes... time for some chipmusic :-)
-
Hi and welcome! Your design looks nice and may be the thing of choice to build, if you have severe space restrictions. But.. if you have room, I would recommend to go for separate units (bought or self-built), as this simplifies things enormously... Pursuing a modular MIDI concept allows for nice separation of responsibilities and more easy extendability... you can buy or build launchpad-style midi controllers, build a well-designed and very stylish looking wilba-style mbseq v4 (with cv-out) and extend this with a bought good midi master keyboard with weighted and proper-size keys... Bye, Peter
-
MBSeq V4 - Building the step button/encoder control surface
Hawkeye posted a gallery image in Members Gallery
From the album: Hawkeyes MB stuff
-
Step 21: Connecting Tactile Switches and LEDs Parts used: * A roll of enamelled copper wire (0.35mm diameter - Reichelt CUL 100/0,35) * Enamelled copper wire insulation removal pliers (Reichelt KN 15 11 120) * Flat nose pliers * Your favourite soldering equipment Description: * This step is really fun, but it is quite time-intensive. We strive to avoid cable spaghetti in the case and use enamelled copper wire (contains an insulation layer of transparent laquer) threaded between upper and lower layer of the vector board to wire control surface components. * Choose the best way of routing the cables for yourself, avoid getting too close to the hex standoffs and stay clear of the cutout zones for the VFD components. * When routing cables, you can use flat nose pliers to tighten the cables everytime you change from the vector board top to the bottom and vice versa. Use special enamelled copper wire insulation removal pliers to remove the laquer layer before soldering. * Connect the tactile switches to the eight data lines of "i3". Photos 1 and 2 show the common ground cabling of the tactile switches. Photos 3 and 4 show how the two switches on the right of the control surface board are connected to i3. * The nice thing is, that you can test connections instantly. Consult the DIN wiring diagram to see which DIN wire is connected to which function by default (we will adjust the mapping later on). Photo 5 was taken after a button, that was still mapped to "play" was pressed. The update speed of the VFD is absolutely stunning. * When you have tested all eight buttons, wire the LEDs. First create a common ground interconnection link wired to every middle pin (photo 6). Then wire the data pins of "o2" to the right pins of the LEDs (viewed from the top), connecting a pair of LEDs with every data pin. You can test the functionality for every LED pair soldered by connecting an "out" cable from the sequencer core (photo 7). After that, connect the data pins of "o1" to pairs of the corresponding left pins of the LEDs (viewed from the top). Note: * When looking at the DOUT wiring diagram, we see that the LEDs 1...8 are inversely wired to data pins 8...1 of the shift registers. To fix that problem, we can either rewire the control surface boards (not nice) or change the data wire order in the o1...o4 crimp connectors, which is very easy to do. For your LED testing convenience, I have added a MBSEQ_HW.V4 (remove the .txt extension), which is tailored to the two central control surface boards (no other buttons configured!), so that you can test the step LEDs by pushing the corresponding step buttons. MBSEQ_HW.V4.txt


