sineSurfer
-
Posts
346 -
Joined
-
Last visited
-
Days Won
3
Content Type
Profiles
Forums
Blogs
Gallery
Everything posted by sineSurfer
-
is it just me, or is the FORUM going OFFLINE alot ?
sineSurfer replied to Artesia's topic in Miscellaneous
so, where is everybody gathering now?, what's the the "new" IRC channel named? pd. I miss the chat!!! :'( -
no invoice for me ???
-
"What font is used on original x0xb0x?" a little help with the font: original x0xb0x font is bank Gothic BT medium (commercial font), you can check it here:http://www.myfonts.com/fonts/bitstream/bank-gothic/medium/ Sasha's font used is TR-909 (free font) which is just a look-alike of the font on Roland's TR 909, close but not really the same and lower quality. Tip: if you can, use a commercial font, as free fonts tend to be not as polished as you would like, specially important on small sizes. And talking about small sizes you may want to run some print tests before committing with any particular font as sometimes a good looking font on your screen is not as good when printed. My rule of thumb: simpler it's better, test if you can be comfy with this rule, it may be worth it. btw. nice panel's typography dissection kartoshka! ;)
-
bankStick x4 brd., keeps formatting... help to debug it
sineSurfer replied to sineSurfer's topic in Testing/Troubleshooting
Hi TK!, microchip eeproms. all of them. -
price is on the wiki
-
bankStick x4 brd., keeps formatting... help to debug it
sineSurfer replied to sineSurfer's topic in Testing/Troubleshooting
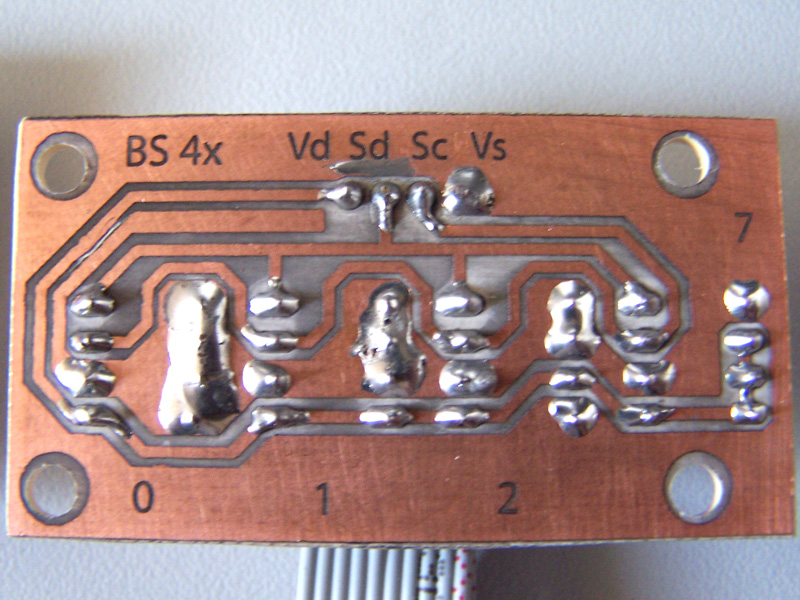
Hi s1 and Sebo! ok, so far: good pcb 3 votes(4 including me :D), bad pcb 0 votes. for both boards I'm using sockets on the chips and pin headers with dil connectors for the cable, but different cables. As the first board its made on veroboard it ended up with a funny wiring so I had to build a new one for the last pcb. forgot to tell but that's the first thing I did, plugging the 2 good chips on the new pcb 1 as A0 and the other as A7... also each one on A0, then on A7(just 1 chip at a time on the board) the 2 good chips keep working just fine on the older board and aren't formatted as the core says, old presets are still there and I can modify and save them, etc.. after a lot of chip swaps from one board to the other I tried too with another set of chips, this time every socket is populated... same results and so far I have made 3 different cables just to rule out a bad wire:( Sebo: i'll check that too but it's long shot as the older pcb works just fine :( a picture of the pcb:
-
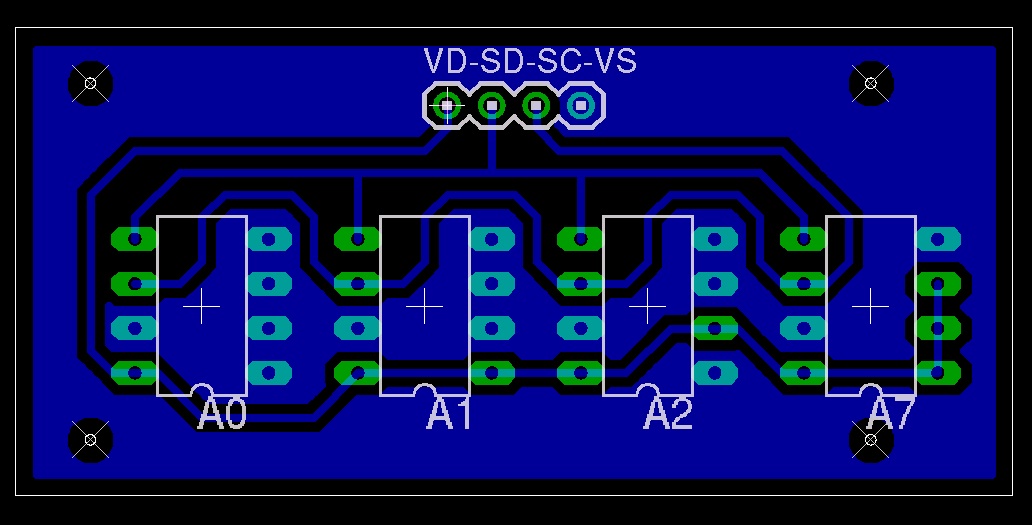
Hi, I built a 4 banksticks pcb (A0, A1,A2,A7) and been trying to make it work with the mbSid V2, when I plug the pcb the core detects it and formats every patch and ensemble, or at least it think it does as I can select all the banks from A to G, obviously this is wrong as it's only 3 regular banksticks plus the ensemble bankstick. And it does the format thing each time I turn the box on. Already tried any possible combination on the wiring from the core to the pcb without any luck(only the correct wiring makes the core to "format" the banksticks) and it seems like there is no bridge or cold solder to blame so my guess is that I have some pins wrong on the pcb layout but I've failed to find if this is the case, can anyone help me to verify it?, it's driving me crazy already ;D thanks! some hints: -When this pcb is connected the sound on the default patch is 4 octaves below the correct pitch, so weird :( -If I plug another pcb(2x, A0-A1) everything works fine again, I can select only 2 banks, the pitch is correct, etc. i'll post the .sch and .brd files if necessary, here is a screenshot of the pcb:

-
On my case I work as a Actionscript programmer, and graphics designer for a small agency doing Flash based websites and online games for big international brands here in Mexico, and freelances on the same field for US and AU clients ;D, before this... 10 years as a musician... i'll return to that sometime ;D btw. I bet almost everyone will have a work related to electronics or computers.
-
btw. a useful tiny little apple script to open a Terminal window with the current finder active folder path: http://www.entropy.ch/software/applescript/
-
noise when plugging MIDI cable on the mbSID MIDI output?
sineSurfer replied to sineSurfer's topic in MIDIbox SID
oh, this is sooo embarrassing but i'll confess anyway, it turns out I was plugging the wrong cable, a midi out from my ms2000 kb instead of the midi in to the midi interface :-[ -
MB-6582 front panel - I'm about to start. Feedback ... ?
sineSurfer replied to nebula's topic in MIDIbox User Projects
thanks for the JB weld test report nebula! so, 24 hours is a must... will remember that ;) at the end of that video: "Don't be cheap and JB weld your bushings. Buy a new ones" :P btw. smithy, what's up with including a youtube video on all your posts? not good for the slacking time vs building time ratio! ;D ;D -
que tal Carlos, bienvenido! el secuenciador es diseño tuyo?
-
noise when plugging MIDI cable on the mbSID MIDI output?
sineSurfer replied to sineSurfer's topic in MIDIbox SID
thanks TK! i'll remove the ground connection, Lucem told me the same on the chat so hopefully that will solve the buzz ;D -
Hi, just when I thought everything was ok: After building all the cables for my mbSID and plugging everything together turned on the box just to hear a big fast pulse noise, something like a furious bee :) coming out along with the sids regular sounds. After a panic attack :-[ and some tests plugging one cable at a time, found the source of the noise to be the MIDI OUT cable, the noise is only present when the cable is plugged, without the MIDI cable the noise goes away. I disconnected all the CS cables to see if there was the fault, leaving the box basically as the last time I tested it without troubles, nothing wrong it seems. what should I look for to fix this? a broken wire form the core could do this? i'll replace that cable from the core to the DIN tomorrow just in case. thanks!
-
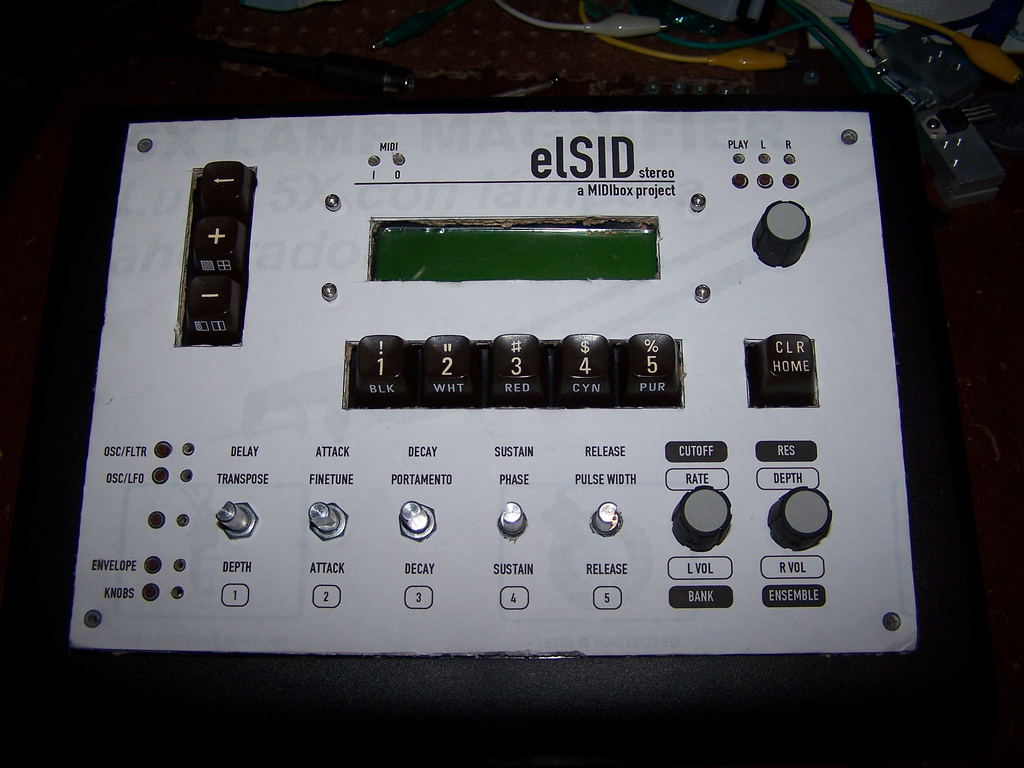
small update: found some problems when trying to run the V2 app, check here, but now it's all ok. The wiring is almost done and I built a test panel on cardboard to check if everything fits nice in the box... all fit!!, now, the plan is to start a new thread in the following weeks with pictures and the relevant info for tips, troubles, etc. as a build Log. The new thread may be in tandem with nILS's box info("mxSID" is the box name still?) as both boxes have a lot of things in common and he helped me a lot with comments and tips all the way ;D It would be interesting to have both designs and construction processes side to side for everybody to see the steps we went thru to build the two boxes with almost the same functionality but different looks, sizes and certainly different approaches. ;) and a picture:

-
got it working too, second time with the Mac at home was really easy ;D steps taken(sorry for the long post, this may belong to the wiki instead but it's useful to have all the needed info condensed in one place): - Verify that Xcode is installed(or at least C compiler gcc), I'd say to make things easy install everything... it won't hurt. If not installed, you can find the installer on your Os X Install discs or download the installer from http://developer.apple.com/tools/download/ - download gputils source from http://gputils.sourceforge.net/ - expand the file - open Terminal app -type cd -add a space -drag the folder containing the gputils files to the terminal window, at the time of this post the folder name was: "gputils-0.13.5" the folder path will appear on the terminal window, the whole line will read something like: yourUserName$ cd /Volumes/HD/downloads/gputils-0.13.5/ press enter, now you are on the gputils folder - type the following command ./configure press enter - this command returns a long output, should be very fast and ends with something like this: gputils-0.13.5 is now configured for Build: powerpc-apple-darwin8.11.0 Host: powerpc-apple-darwin8.11.0 Source directory: . Installation prefix: /usr/local C compiler: gcc -g -O2 -now type make -press enter this command returns a long output, it takes some more time - type make install this command returns a long output, should be fast to verify that gputils is installed go to Finder, open a new window and press shift+option+g, type "/usr/local/" on the input text field, press "Go" you should find a folder named share with this folders inside: gputils man doc aclocal also you should find on the bin folder this files: gplib gplink gpdasm gpvc gpstrip gpasm gpvo - now you have to add usr/local/bin to your path environment: - go back to the terminal window, type echo $PATH and press enter you should see something like this: “/bin:/sbin:/usr/bin:/usr/sbin†copy that last line(the output from the terminal window) -type $PATH=: -paste the copied text -type :/usr/local/bin - the resulting text, in this example should read(may be different on your machine, +/- or different defined paths): PATH=:/bin:/sbin:/usr/bin:/usr/sbin:/usr/local/bin -press enter -alternative way: Type in Terminal cd ~ to return to the home folder, next type pico .profile to bring up a text editor with the .profile file, or to create it if it doesn't exist. Add as the last line: export PATH=$PATH:/usr/local/bin Press CTRL-X, then Y to exit and save. you are done now and ready to compile new hex files, for the next example I used midibox_sid_v2_0_rc17 source files: -type cd -add a space -drag the folder containing the app source files, press enter now you are on the source files folder -type make -after few secs. or so, the output reads something like rm -f *.cod *.lst *.err rm -f *.hex gpasm -p 18f4685 -I ./src setup_6581.asm gpasm -p 18f4685 -I ./src setup_8580.asm gpasm -p 18f4685 -I ./src setup_tk.asm gpasm -p 18f4685 -I ./src setup_mb6582.asm that's it, you'll have a new hex file to upload to the core.
-
As i'm having troubles with this too I thought about posting here ;D so: I used GPUtils installer from: http://1710.co.uk/cms/content/view/17/26/ added /usr/local/bin to PATH, checked that GPUtils are installed on usr/local/bin too. When I try to use the make command I get on the terminal: -bash: make: command not found ??? sineSurfer != friend with the terminal :D duh!, I need to have Developer tools installed, right?
-
Hi Foona, you can have up to 8 banksticks, from 0 to 7, the ensembles are stored on # 7 by default but you don't need to have all the 8 bankstiks, just add as much as you want taking care of the wirings example: 0,1,2,7, this way you would end with 3 banksticks for presets, 1 for ensembles
-
I hear daft Punk helmet? :D: http://www.engadget.com/2007/06/20/get-your-own-daft-punk-helmet-maybe/ ... MIDIO128...I should explore that hehe
-
If I come to the forum via RSS feed link, cookies are preserved and I'm logged in, otherwise I have to login again and again :( Mac/Safari here, same thing happens on every machine I use to browse the forum.
-
mbSID stereo(1 Core, 2SIDS) mbSID V2 app refuses to work
sineSurfer replied to sineSurfer's topic in MIDIbox SID
right TK!, somehow I could not connect the dots on this one ;D Update: Tried with latest MIOSStudio (v7.5) couldn't load mbSID V2 app on smart mode Switched to manual mode without "wait for upload request" and voilá!, setup_6581.hex is loaded but found out that CAN mod was wrong(both diode and resistor were connected to Vs :-[ ) Some minutes later CAN connections are fixed... two beeps sound and mbSID app starts up fine... every time I turn it on, the screen reads: E002|H128*Ld Chn.16 1***|<No BankStick> is this the default behavior? Then uploaded v2_vintage_bank.syx with SysExLibrarian (Os X) on bankstick A, this step fine. Now the problem is: after the two beeps on both SIDS, no more sounds!!! I can hear a a "click" each time I change presets via MIOStudio but that's all, what could be wrong now? ??? btw. using 6581 chips, both worked fine on mbSID v1.7 new update: Tried the test tone app, both sids emitted sound, and after that I can upload the hex files with MIOSStudio using smart mode!!?? I guess the test tone killed the gremlins ;D As everything seems to be fine now, next step is to wire the CS and -gulp- install GPUTILS to start with the code -
Hi, so finally I wired everything to work with the mbSID V2 app, the problem: MIOS studio says the hex file transfer was successful, but the core freezes or something, the LCD shows just black squares on the top row. Then i tried uploading mbSID V1.7... all works fine, both SIDS make sounds... What could be wrong?, what should I check? already downloaded the latest V2 hex file again, same results ??? thanks!
-
To ease things a little more for the dudes with closing assignments... or for that matter, anyone feeling the wait is too long: i'll build your mb6582, there is only one thing I ask: send me the pcb's, parts are on my dime ;D
-
http://web.archive.org/web/*/http://www.ucapps.de wow, I knew about ucapps when the website still had black background... why it took me so long to be tempted?!!! ;D and yes, thanks for sharing and spreading the love TK!
-
fossi likes to steal ideas!!! :P Ok, after a long ping-pong with the sensei fossi (Thanks a lot fossi! ;)), it all came down to layout #5.4 next step: to actually build it ;D