

verpeiler
-
Posts
55 -
Joined
-
Last visited
-
Days Won
2
Content Type
Profiles
Forums
Blogs
Gallery
Everything posted by verpeiler
-
From time to time I try to understand the circuits I'm soldering. In most cases I fail already at really simple things... Lets take a simple MIDI-IN. Whats the purpose of the 220Ohm resistor (R7) and the diode (D1). I know this is in the MIDI-specification but what exactly are they intend for? I guess the diode should do some kind of polarity-protection. But inside the 6N138 between pin 2-3 is already a diode (in the other direction) and this LED will light up if the polarity is right and not if the polarity is wrong. And the resistor should limit the current in case of a short circuit? If so where could a short circuit come from in this case?
-
There is a thread anywhere in this forum where Wilba confirms that Mouser part no. 538-25001-0802 will work.
-
I will never get my MB6582 completet... connection Base <> CS :( See SID forum thread.
-
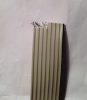
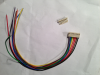
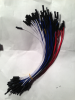
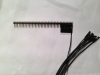
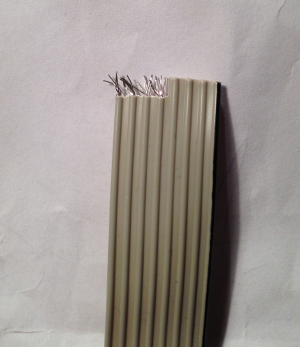
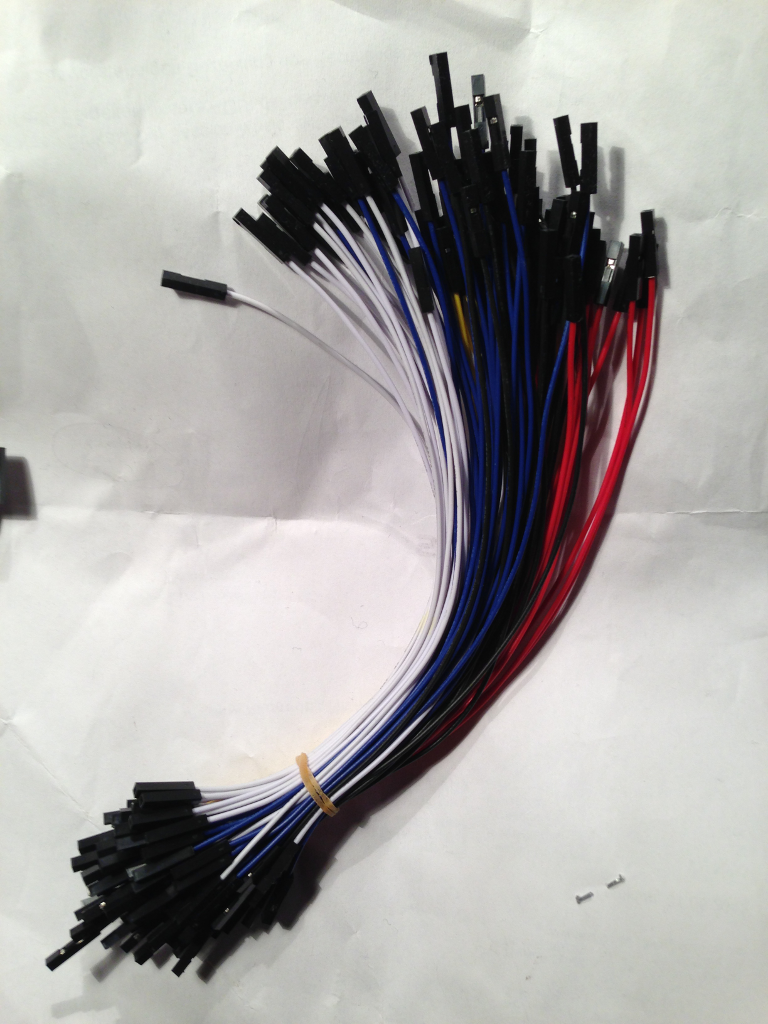
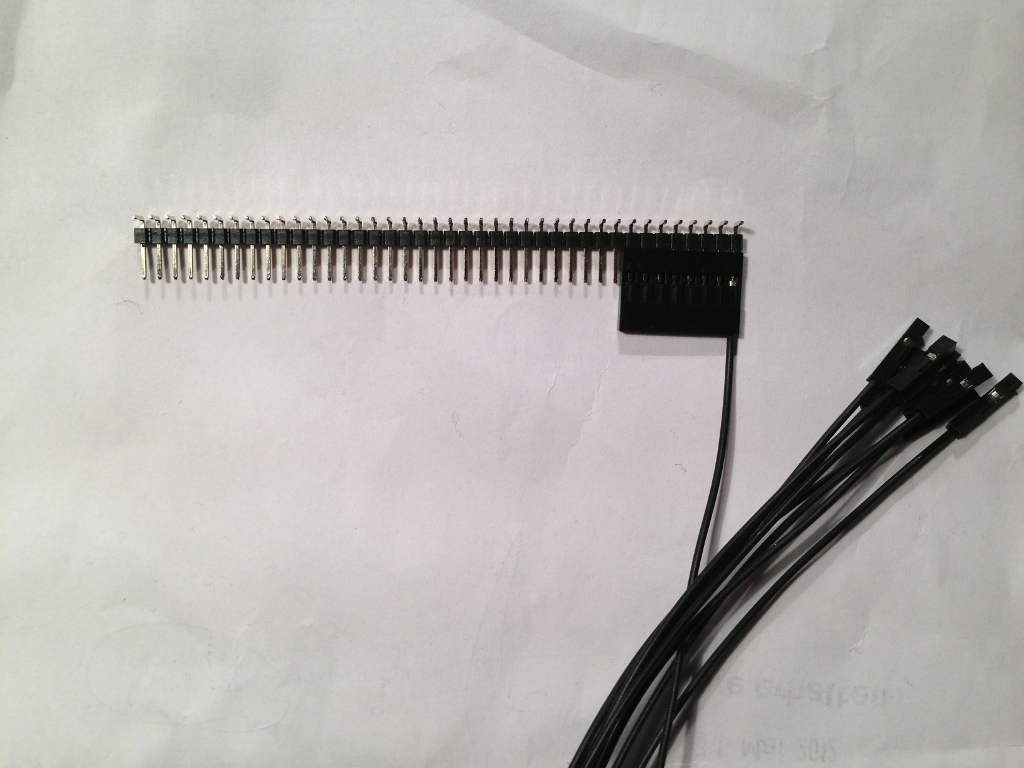
Resurrecting this thread... The connection between Baseboard and CS makes me a lot of headache. The 100mil spacing ribbon cable (Part Number: 606162-F0) from Conrad is no longer available (discontinued summer 2012). As a replacement Conrad proposed a different cable (607378-62). I've tried this without success. This is not the stiff solid wire! It's stranded wire (see first picture) which won't give a strong connection (wire breaks between the soldered connection and the insulation) and it's a pain to remove the insulation without partly destroying individual wires... Then I found bunches of jumper cables at ebay (search for "Dupont cable" or "jumper wire"). They are 20cm in lenght and crimped to a 1-pin female header at each side (see third picture). The cable itself is AWG26. My idea was to cut it to a short lenght and solder one end to the baseboard. At the other end I pulled the crimped connector out of the housing and pushed it into 8-pin SIL housings (Mouser Part Number: 855-M20-1060800), see picture 4. Looks good, but same problem here: Seems to break easily at the soldered end. :( Of course I found other threads with different solutions (from Bugfight; the superb guide from Hawkeye...). The Reichelt PSK 254/8W connectors for example (see picture 2) seems feasible, but the cable here is thicker (AWG24 compared to AWG26 above). I tried them (like others did sucessfully) but they are to stiff in my opinion and it's to hard to close the case. As I couldn't found 100mil ribbon cable (solid wire) in Germany at the moment I might go shopping at Mouser again... After searching for hours and days I came to another idea (and this thread): FFC - Flexible flat cable. So far I found a couple of vendors (like here) but no supplier which sell FFC cables as long with the proper LIF or ZIF connectors in small quantities. That's why I'm asking for here. :smile:
-
I also remember Still unsure how to go...
-
Got one MB6582 window today. I would like to take a photo but you won't see it because it fits so perfectly! Very very nice!! Thanks to Adrien!!!
-
Knobs arrived today. Thanks Martin! :)
-
Cool! Didn't know that. Could you elaborate? Didn't found the sammichFM schematic (only the PCB layout) up to now. Are there information's about that anywhere online?
-
Could you add me for 1 x MB6582 window, please? Verified the FPD file, seems to be fine. :) BTW: I live in Frankfurt (am Main).
-
[S] x0xb0x, MBFM built modules, PIC & SID boards, Waldorf Knobs
verpeiler replied to rosch's topic in Fleamarket
Got the Thomas Henry PCBs today. Thanks a lot rosch! :) -
Have a look at the encoder wiki page
-
[S] x0xb0x, MBFM built modules, PIC & SID boards, Waldorf Knobs
verpeiler replied to rosch's topic in Fleamarket
Hi Rosch, I'm interested in the QuadBass++ and the MPS PCBs. And BTW: Do you sell opaque white Shruthi-1 4pm cases? :D -
Fears JB-Weld... How to get perfect blobs?
- Show previous comments 2 more
-
-
absolutely happy! result is good! hope the hex spacers won't come down.
http://imageshack.us/photo/my-images/197/img00247201210022224.jpg/
-

-
Meine letzte Bestellung bei Mouser: 08/30/12 21:25 Auftrag im Webshop eingetütet 08/30/12 23:19 Auftragsbestätigung erhalten 08/31/12 01:51 Abgeschickt ... 09/03/12 09:13 FedEx-Mann klingelt Sau schnell! Habe den FedEx-Mann noch gefragt, ob er sich auf seinem Ritt von Texas nach Frankfurt a.M. denn überhaupt an eine Geschwindigkeitsbegrenzung gehalten hat, aber das hatte er nicht verstanden, weil auf dem Paket Absender Mouser Electronic in Munich stand. Aber es kommt wirklich aus GRAND PRAIRIE, TX, dass sieht man schön in der Sendungsverfolgung. Er wollte auch keine Zollgebühren und Steuern haben -> konnte aber auch nicht sagen, ob nicht doch noch was nachkommt. Auf der Rechnung waren dann die 19% MwSt. (bzw. Einfuhrumsatzsteuer) schon drauf. Die sieht man bei der Bestellung erst ganz am Ende, sprich die Preise im Shop enthalten noch keine Steuer, immer hübsch mit 1,19 multiplizieren! Bislang also nur positiv. Allerdings ist mein Fall noch nicht abgeschlossen, da es sich nur um eine Teillieferung handelt. Ich warte noch auf Taster für Shuthis und Pactec-Gehäuse. Konnte mir bei der Bestellung aussuchen, ob ich eine Teillieferung aller verfügbaren Artikel wünsche, oder ob alles in einem Paket kommt. Da war ich mir zunächst unsicher, ob bei Teillieferung zusätzlich Versandkosten anfallen. Aber ich wollte Löten. Habe Mouser in München dann gebeten, wenigstens die restlichen Artikel in einem Paket zu schicken. Und jetzt heißt es abwarten. Bislang wurde meine Kreditkarte nur für die bereits gelieferten Teile zzgl. Steuer belastet. Kein Zoll! Habe gehört, dass bei FedEx nach 4-6 Wochen durchaus auch noch mal Post kommt, in dem Zoll+Gebühren für die Zollabwicklung eingefordert werden. Mal schauen. In jedem Fall trotzdem besser, als wochenlang auf seine Teile zu warten, eine Stunde zum Zoll fahren, dort eine Stunde zu sitzen, eine Stunde wieder nach Hause zu fahren... Da zahle ich lieber den Zoll per Überweisung und einen 10er an FedEx. Soweit meine Erfahrung. Papierkatalog gab's bislang keinen. Vielleicht habe ich irgendwo ein Kreuz beim Bestellen nicht gesetzt. Ist der Brauchbar? Bei Reichelt wähle ich die Option mangels Kaminofen immer ab.
-
I'm looking for a PSU for a MBFM... I thought switching power supplies and audio is a no-go because of the HF noise?! Also what are the differences to Reichelt PSA 25L-301 (except for the output power)?
-
Thanks guys for your feedback! In the meantime I ordered panels at Schaeffer. I'm going to try it first with four 1mm thick ventilation slots and no fan opening, see attached picture. Other builders are also welcome to vote in this poll, I think this is interesting. :) Thanks again! verpeiler Edit: We need a new "Thermometer" module, called MB_THERM. :D

-
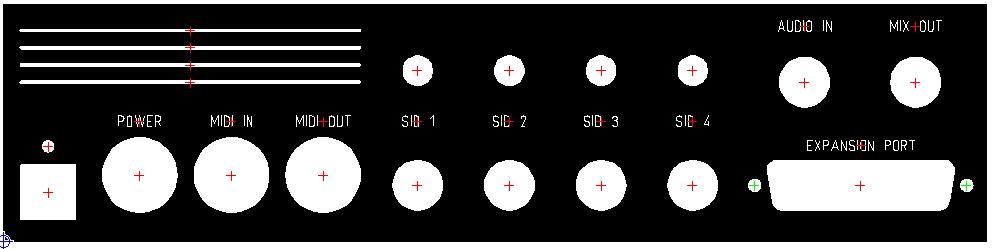
I'm asking all the builders who already finished and used their MB-6582 whether an actively cooling fan is required in the Pactec PT-10 or not. I'm not asking if it "looks cool", rather than is it really needed to avoid overheating SIDs. My plan is to use heat spreaders (like Hawkey) in combination with ventilation slots below the voltage regulators (seen on pics from Wilba) and use the backpanel space (where the fan was intended) for additional 6.3mm audio-in and the mix-out jack.
-
Fun with the United States Postal Inspection Service
verpeiler replied to kristal='s topic in Miscellaneous
kristal, didn't you know that your real name is quite similar to one of the most wanted terrorists? They are looking for a really bad guy from Texas. Recently he hold up a stagecoach near Waldorf, killed all the passengers and stole a big bag with thousands of plastic knobs. http://youtu.be/HZ1-Ta7BJFs -
As the Wiki page for the MB-6582 panels is more than three years old, I like to ask whether there are changes in the software which justify modifications to the panels to (like different descriptions/labels).
-
I'm interested in midification of the Monotrons also... What do you mean by that?
-
Alpha RE160F or Bourns PEC16??? Difference in quality?
-
Wenn Du das Kontrol S4 per USB an Deinen PC stöpselst und die passenden Treiber installiert sind (falls überhaupt notwendig für die reine USB-MIDI-Funktionalität), sollte das Deinen Rechner um eine Midi-In und eine Midi-Out-Schnittstelle erweitert haben. Dann verbindest Du Midi-Out vom Kontrol mit dem Midi-In des Core-Moduls und mit einem zweiten Kabel gehts vom Midi-Out des Core-Moduls zurück zum Midi-In des Kontrol S4. Soweit zur Theorie, ich kenne das Kontrol S4 nicht. Dann lädst Du MIOS Studio von http://www.ucapps.de/mios_studio.html herunter. Damit kannst Du mit dem Core per Midi quatschen und per SysEx eben auch die passende Firmware draufspielen (runter Laden, auswählen, "Start" drücken, warten fertig). Wenn Du das Programm vor Dir hast, ist es ziemlich selbsterklärend. Bei Problemen gehst Du einfach den Troubleshooting Guide durch.
-
Any shop that sells 40x2 OLED Raystar: REC004002A ?
verpeiler replied to Thomasch's topic in Parts Questions
It seems that this display is quite new, as it was announced in November 2011. It is listed under coming soon here. -
Wer baut mir einen MIDI-Controller mit 64 Drehreglern?
verpeiler replied to PRYPJAT SYNDROME's topic in Deutsch
Hallo Matthias, ich würde Dir fast eine MIDIbox64 bauen, nachdem ich in Deine Musik reingehört habe und durchaus angetan bin. Kompliment! Gefällt mir wirklich sehr gut! Einen Controller, ähnlich dem auf dem Foto abgebildeten, nachzubauen, ist (wie ilmenator bereits schrieb) gar kein Problem mehr. Nur einen Einstieg zu finden und die Zusammenhänge zu durchschauen, ist vermutlich das schwerste. Aber ohne Display, LEDs, Taster, Encoder, Fader usw. ist das von allen Aspekten her ein überschaubares Projekt. Ich würde das Thema wie folgt angehen... 1.) Platinen bzw. Bausätze für eine MIDIbox64 bestellen. ilmenator hat hier neuesten Module erwähnt. Die "alten" Module tuen es auch, sind günstiger und einfacher. Du benötigst: 1 x PIC based Core Module 2 x AIN Module Die Bausätze zum selber Löten kannst Du hier bestellen: http://www.mikes-elektronikseite.de/mshop_deutsch http://www.avishowtech.com (Letzere von SmashTV sind qualitativ schöner, kommen aber aus den Staaten, d.h. Zoll + Versand) 2.) Module löten. Danach die fertigte MIDIbox64-Firmware via MIDI auf den Microcontroller laden. Dafür gibts ein fertiges, wirklich selbsterklärendes Tool namens MIOS Studio. Wie ilmentator bereits schrieb, musst Du nicht programmieren und auch keine Klimmzüge machen um einen Microcontroller zu flashen. Spätestens da merkt man, dass TK (+ all die anderen) hier ein verdammt geiles Projekt auf die Beine gestellt haben. 3.) Die 64 Potis. Ich bin gerade etwas erschrocken, wie sehr Reichelt doch die Preise dafür angezogen hat. 1,45€ das Stück und das sind keine tollen. Wenn Du da welche von besserer Qualität möchtest, heißt es Recherchieren. Knöpfe nach Deinem Geschmack musst Du ebenfalls suchen. Von den Potis kannst Du dann mal welche in ein Stück Pappe drücken, um mit der Anordnung zu experimentieren. Es gilt herauszufinden, wieviel Platz zwischen den Potis bleiben soll. Einmal zwecks Ergonomie, zum Anderen auch aufgrund der Anschlüsse. 4.) Frontplatte. Hier würde ich mir einfach von der Fa. Schäffer den Frontplatten-Designer runterladen und damit ein Frontpanel entwerfen. 64 Löcher in sauberem Abstand zu bohren ist nicht gerade einfach und verlangt vernünftiges Werkzeug. Die Potis würde ich einfach mit der Frontplatte verschrauben und danach jeweils die Masse-Pins und jeweils die +5V-Pins miteinander verlöten und den Regler-Pin zu den DINx-Platinen verkabeln. 5.) Die Gehäusefrage ist so eine Sache. In der Galerie wirst Du viele Anregungen finden, schau da lieber nicht rein, man wird da sehr schnell angefixt. ;) Am einfachsten wäre ein Holzgehäuse mit erwähnter Alu-Frontplatte von Schäffer. Oder aber etwas in diese Richtung, die Teile gibts unter anderem hier. Mehr ist da vom Prinzip her nicht zu tun. Doch! Es gibt viel zu lesen! Im Forum, Wiki und der Hauptseite. Gruß, verpeiler


