

Hawkeye
-
Posts
3,630 -
Joined
-
Last visited
-
Days Won
36
Content Type
Profiles
Forums
Blogs
Gallery
Everything posted by Hawkeye
-
LoopA V2 Introduction, Features & Support Thread
Hawkeye replied to Hawkeye's topic in MIDIbox User Projects
The metal case LoopA kits are now available - fantastic work by Adrian from Hallik Engineering! :-) Also, this kind of reveals the new "2020 facelift" keycap style :) https://www.midiphy.com/en/shop-details/0/71 Hope you enjoy! :) Please stay safe! Many greets, Peter -

From the album: LoopA
The metal case LoopA kit is available now! Many thanks to Adrian Hallik for creating that fantastic case! Also this reveals our new 2020 all-custom midiphy keycap facelift! :) Hope you enjoy! :) https://www.midiphy.com/en/shop-details/0/71 -
Building the MB-6582 Control Surface - Photo Tutorial
Hawkeye replied to Hawkeye's topic in Tips & Tricks
@dwestbury great that you used one of the books i used ten years ago! It will work out, no worries, keeping fingers crossed! :) Enjoy and many greets! Peter -
@Antichambre all the best to you and your girl! Also, thanks a lot for joining the builders, @Phatline! Many greets, Peter
-
Welcome aboard @slo, thanks a lot for joining up! :) @Antichambre hope you managed to get home before the eurozone lockdown. If you want to apply for the french speaking countries only, no problem, you'd be very welcome to join. It seems like we're in for a bit of soldering in the next weeks, time to finish all those unfinished projects :). Stay safe, everyone! Best regards, Peter
-
LoopA V2 Introduction, Features & Support Thread
Hawkeye replied to Hawkeye's topic in MIDIbox User Projects
@JuanJerez, thanks a lot for your build report! Yes, definitely - every millimeter is used in the case, we did this on purpose to create a very slim unit, probably most other DIY builds with three layers of PCBs are a bit taller. Hope you enjoy your new LoopA! Will notify in this thread, once the new software version is available! :) Best regards, Peter -
LoopA V2 Introduction, Features & Support Thread
Hawkeye replied to Hawkeye's topic in MIDIbox User Projects
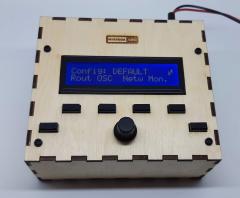
Hola @JuanJerez, welcome to the MIDIbox forums and great that you built a LoopA and that it already works! If I may ask, how was the build experience from your point of view? --- Regarding your question: I would recommend the following setup - i also have an X4 mini keyboard by the way, it's a cool and portable keyboard that fits perfectly with the LoopA! :) 1. Connect the X4 Mini via a MIDI cable to the LoopA MIDI IN1 port. 2. Go to the Track screen (same as in the picture) and change "Fw Off" to "Fw On" (MIDI forward on) -> this will forward any MIDI notes received from the X4 mini to the configured output device - in this case USB. The USB1 Chn 1 setting shown on the photo is correct, if you want to play a software synth/VST on your computer. 3. Arm the LoopA (the red LED on the ARM key lights up) and hit the RUN/STOP key on LoopA. The time cursor should start moving. When you now play notes on the X4 mini, the notes should be recorded in the LoopA (instantly shown on the screen). 4. Very important and most likely problem: In your software synthesizer, configure the LoopA as an INPUT port for the software synthesizer, currently you have the X4 mini there (directly playing from the keyboard). That's why we moved the keyboard over to the LoopA. Result: now you can record notes with your X4 mini directly on the LoopA, without the computer. As you enabled "forwarding", every note you play on the X4 mini is directly forwarded to your computer (USB 1, Chn 1). You've also already correctly set up your user instrument "ODSAY_VS" in the setup.txt, so you could select this output port in the LoopA instead of USB1 / Chn 1. Your VST (software instrument) must be configured to use the LoopA USB device as an INPUT (important!), then the VST will play the notes. When the LoopA is armed and looping, you will hear what you've recorded earlier on. Now you can expand your setup, e.g. with other hardware synths (directly connected e.g. to MIDI OUT1-3 of the LoopA) or software synths. Also, there should be a new LoopA software version coming soon, with more features, am working on it :). Have fun, stay safe and best regards! Peter -
It will have similar properties but will look slightly different - with one reason: it's optimized for a rather large and rather quadratic new product that is in the pipeline :), but i should probably better keep silent to not jinx things! :) Many greets, Peter
-
Hi Bruno, yes, focusing on the own geographic region makes sense and is encouraged - as you said, local trusted builders help to reduce shipping costs, import tax, language barriers..., if you want to join, we'd gladly recommend you for the France/Belgium region. Hope you can get home safely. Many greets, Peter
-
Thanks, Bruno! Indeed, the packaging your SEQ v4+ kit arrived in is adjustable - if you cut the bottom tape section and fold the bottom outwards, you can make the case a bit taller, so it protects the increased height of the assembled v4+ with the encoders and caps installed better! Do you want to be a trusted builder? You'd be very welcome to join, just send a PM/email, in that case! Best regards and stay safe! Peter
-
@slo great build, congrats! Regarding key cap alternatives to the clear ones on the standard builds, we might have something cooking in the lab, that could be introduced soon :).
-
Hola, while trying to offer build/video instructions as good as we can make them :), we sometimes still receive requests from customers who cannot build their own devices for whatever reason (could be time restrictions, medical reasons, general fear of 1206 SMT parts, bad eyesight or an angry spouse swinging a rolling pin :)). We also know, that there are some advanced builders in the these forums, that would like to offer their "build services" on a commission basis for such interested parties, of course with their work time compensated by the purchasing party. Basically, this commission work already happened for quite a few general MIDIbox projects in the past and also midiphy project builds more recently. Therefore we'd like to introduce a somewhat more clarified process, with a set of liberal recommended rules, that should make sense to protect everyone involved. We also spoke with @TK. about it and he agreed, that it would be a good idea. Thus we'd like to establish the "midiphy Trusted Builders Program": https://www.midiphy.com/en/builders/ If you'd like to apply, the contract would be always between you as a builder and the purchasing party and therefore you could legally of course define any contract you want :), but these are the minimum terms we'd highly recommend to agree upon: * Payment modalities must be negotiated before any work starts. It is typical for the purchasing party to pay the full sum (parts & work) upfront, including any shipping of parts to the builder. * The builder might request that you purchase the parts from the web shop and have the web shop ship directly to them. * The builder might suggest a quid pro quo arrangement e.g. buying one or more sets of parts in lieu of payment for labor costs. * We recommend to exchange the postal address data of builder and the purchasing party before a deal is made. * A timeframe for the work should be negotiated upfront and the builder should agree to photograph "milestones" of the progress. * The builder must provide email support and a warranty for technical/hardware issues for at least one year after the completed unit is delivered to the purchasing party. * Products sent via parcel service should be fully insured against loss and tracked to ensure successful delivery. * A contract is formed between the builder and purchaser; midiphy is not legally involved in the transaction except for sending parts or other materials to the builder. If you are interested in becoming a trusted builder and if you agree to the terms above, you can send us an email at shop@midiphy.com. After checking, and if the experience level is high enough :), we'd add you to the published list of builders. Your email address is also safe, first communications from interested buyers is done through a "feedback form" on the web page, so your email address is not listed publicly. Michael "menzman" Menze (who already built a few v4+s) volunteered to be the first official builder, so you could see what data would be published on the page. In general, it would be a picture of you and a short bio, and then up to four photos of projects you worked on or things you've published (e.g. artist work, written words, photos, articles). Hope you like this new program! Best regards and have a good weekend! Andy and Peter
-
Quick 'n Dirty Voltage Test Chart for MB-6582 Base PCB
Hawkeye replied to dwestbury's topic in MIDIbox SID
Thanks! It was time well invested, as the tutorial will be 10 years old in 2020 and it seems still useful! :) Always glad to receive it as a doc, for a digital archive - you could pm in the forums or send via mail to shop@midiphy.com - thanks a lot and have fun building your MB6582! Many greets, Peter -
scale explorer - konga trigger - sequencer
Hawkeye replied to Phatline's topic in MIDIbox User Projects
That's a cool modded keyboard! Looking forward to a demo! Many greets, Peter -
Quick 'n Dirty Voltage Test Chart for MB-6582 Base PCB
Hawkeye replied to dwestbury's topic in MIDIbox SID
Nice job! -
 Nice job - that's a cool "minimal CS" NG! Many greets, Peter
 -
As a follow-up, acrylic cases for the MIDI THRU PCB are now finally available: https://www.midiphy.com/en/shop-details/0/64 Have a nice weekend and many greets! Peter
-
@laual, congrats to your build so far, the displays should be fixable, too! :) I am sure Andy will chime in later on, but meanwhile, could you check R33A, R33B, R33C and R33D on the wCore? R33A-C should be all 1k, but R33D must be 560R. Now if you had a 1k in R33D, that might explain what is going on (happened to me, too :)). J15_S needs to be set at 3.3V. Many greets! Peter
-
Take a look in mios32/common/mios32_enc.c - the "state machine" code is in MIOS32_ENC_UpdateStates(), there you should find the logic. You could also try to swap around pins 2 and 3 of the encoder, had to do this a while back for smaller 12mm ALPS encoders to work properly, otherwise would observe random jumps, back then the wiring was incorrect, as i installed 12mm Alps STEC encoders in 16mm encoder slots :). Have a good weekend! Peter
-
@lukas412 If the computer introduces the noise, you could try to use a galvanic USB isolator, a potential model and how it could be attached is linked in the eurorack modules thread: I've spent a few hours measuring things with the scope over here: while i get minor digital noise with the v4+/Eurorack modules connected to the PC, i get no noise at all when connecting to a Laptop with a "travel adapter", that uses a 2-pin ac plug (without ac mains earth connection). I noticed some eurorack module manufacturers like Waldorf do use a "galvanic isolator" in the modules, e.g. in their "nw1 wavetable" module, probably to avoid similar noise problems in some setups. So, i'd recommend to try with a galvanic USB isolator, that powers the v4+ side with the same USB-only PSU, that gives you no trouble when connecting without PC. There should then be a very high likelihood, that the noise is gone, as there is no more directly wired connection to the PC. Best regards and have a nice weekend! Peter
-
Hi Aki, Have a happy 2020! If you would let them go, i'd take the MOD/PITCH wheel setup and 4pcs of the ALPS motorfaders - basically to have them as test components for the future. Thanks a lot! Will be in touch via PM. Many greets! Peter
-
Hi Niels, i'm using the same (cheap) DB-25 cable from Reichelt, about 1.5m long. It's also unshielded and you are right, it might pick up some noise, even a ground hum if you run it e.g. close to a transformer. But: my expectation would be that while reducing the DB-25 cable length and upgrading to a better/shorter USB cable (e.g. with a ferrite ring) will help to battle the minor digital noise introduced by the PC, it will probably not help with the ground hum. What you could do, if you are still unhappy with the MIDI-only solution is to try out one of these three options: 1) Try with a galvanic USB isolator, e.g. Reichelt has this one: https://www.reichelt.de/usb-isolator-with-5-kv-isolation-converter-delock-62588-p151307.html It is affordable and if bus powering is not sufficient you can use e.g. your 5V USB phonecharger-type PSU (that was unproblematic when powering your v4+/Eurorack modules) to power the galvanic isolated device (the v4+) with it. In that case, you'd need to add a mini barrel connector to your USB phone charger PSU, or buy a USB <-> mini barrel connector cable, but that should be no problem! :) 2) If you are willing to upgrade your studio PC, some laptops that have e.g. "travel adapter" PSUs without an AC ground pin should help - that will technically "lift ground" on your computer side, but in a safe way: https://www.amazon.de/Lenovo-Travel-AC-Adapter-65W 3) Maybe the cheapest method: as Graham suggests, improve the grounding between your devices externally with a well-dimensioned ground bonding wire, it might be necessary to include your amp/studio monitors as well. You'd need to make proper cables with cable lugs for safe connection and find proper "ground points" to which you can screw them on every chassis for it to work. --- All of these three solutions, at least in my thinking should eliminate the ground hum: - Methods 1) and 2) "lift ground" on at least one PSU, making the interal internal ground connection (long wire from flying busboard -> db25 cable -> v4+ -> usb cable -> PC) the only connection path, there then can be no potential difference anymore, no "ground loop" however controversial that term is :). - Method 3) will directly "shortcut" the potential difference while every PSU can stay connected to mains ground. Many greets, Peter
-
Hi Niels, going MIDI (and using opto decoupling) is a cool, easy and pragmatic solution! As Andy wrote, i did a few local measurements with all devices i had available out of curiosity, because i also sometimes experienced ground hums between some synths and my mixer and i was interested! :) Basically, i cannot reproduce your problem, i can see a minor bit of digital noise introduced to the eurorack system, when using my PC instead of my Laptop to power the SEQ/Eurorack modules over USB, but it is perfectly acceptable and there is no ground hum problem, scoped waveforms from multiple measurements are available, if requested :). This post by Graham Hinton seems to be a really good reference regarding the ground hum problem in general, he is very nicely explaining what's going on and how you could address it: https://www.muffwiggler.com/forum/viewtopic.php?t=102801#p1429534 In my own words (i may be wrong scientifically with some terms, as i am not an EE :)): when you experience ground hums, that is probably due to a different ground potential, e.g. between Eurorack PSU and PC PSU -or- one or both of those PSUs themselves being noisy, e.g. not being properly filtered. So, for example, if in one unit we have some unfiltered AC mains or switching regulator ripple being introduced, it will interfere with the other PSU over long and imperfect ground connections between those PSUs, over the PC<->SEQ<->Eurorack wiring, which is going over a long distance and many connection points, i.e. starting with the flying busboard wiring in your eurorack, the DB25-cable, the ribbon wires in the v4+, the USB cable and the wiring in your PC/PSU. Graham also explains, how different potential can exist, even if all affected PSUs are of high quality and are well filtered. It occurs, if the two independent rails draw unequal currents (statically or dynamically). Graham suggests to tackle the problem at its roots and run ground bonding wires between all affected PSU chassis/0V. Note, that also your mixer/powered amp/powered studio monitor elements might play a role in the audible ground hum noise and might benefit from proper external grounding too. Often, that step is not necessary, as the AC mains wire ground connection is completely sufficient, but sometimes it might be helpful. Also note, that the AC mains cable ground connection should always stay in place for safety reasons, be very careful with ground lifters! But, if you create your own improved "studio ground", that will basically circumvent any suboptimal ground connections and should help a lot. This method could also be employed, when you experience ground hums with other audio gear, e.g. between a synth and your studio mixer. That is also why you will sometimes find external "ground" connection points on some studio gear, for example i've got an audio patchbay with an external "ground hook" - adding proper grounding there makes a lot of sense, as it will affect all connected sound sources/synthesizers. Have a good upcoming weekend and best regards! Peter
-
Have a happy and healthy new year 2020! Many greets, Peter
-
 @cane creek yes, if it's basically the same part number, only a different color designator, it should work! If you watch the first LoopA videos on youtube, you'll see it had a blue newhaven OLED back then. Have fun building and have a nice holiday season! Best regards, Peter