

gerald.wert
-
Posts
131 -
Joined
-
Last visited
-
Days Won
2
Content Type
Profiles
Forums
Blogs
Gallery
Everything posted by gerald.wert
-
The beast case is way better quality. It would be worth your time to contact him to see if he can put together the rest of the case for you.
-
Depends on what your skills or tools are. If you are comfortable working in wood or metal or know someone that is finishing off the case would be doable. If you are not comfortable and do not know someone that is. You may want to look into local maker spaces and see what you have for local resources. If you do not have local resources your best bet would be to either order the acrylic case, the hendrich case or request a custom order from Julian. You have a lot of options you just need to decide what you want to do. The lead time on the case can be quite long so that really should be the first order of business. the acrylic case may be the fastest to get. You do not mention a time frame. The other option is keeping an eye on the flea market and one will come around. they seem to be going in the 600-1000 price range depending on options.
-

MBSEQ V4 build with MIDI, CV and DIGITAL OUT
gerald.wert replied to beautyofdecay_'s topic in MIDIbox SEQ
Excellent build it looks great! -
Describe the MIDI Router of your dream?!
gerald.wert replied to Antichambre's topic in Design Concepts
A way to quickly and easily switch to a new route and then switch back. Use case in a live performance is to switch to a second drum machine for a small section say 4 beats for different sound for accent and then want to switch right back. Could be used for other parts as well. Say for a lead part, especially when making a program change on an instrument when the audio drops or something weird happens when you make a program change or you want to create sustain on a part but want the pattern to come back in without cutting off the sustain. With a poly synth it is easy to set the same sound to come back in on a second poly within the synth. There are other ways to do this but a route changes vs channel change on the sequencer might be more fun and flexible in live settings. -
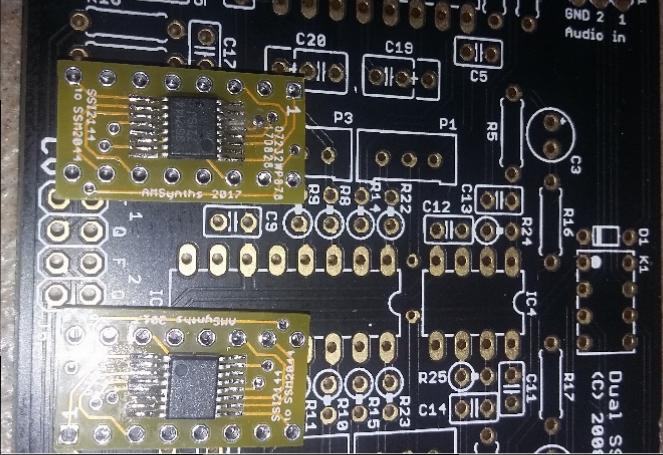
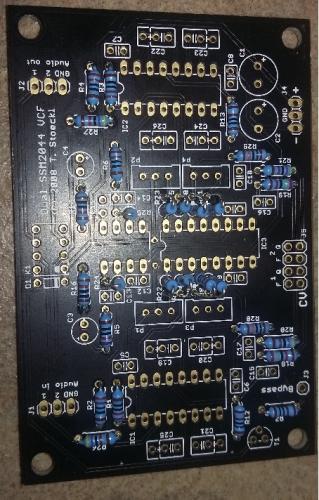
Started putting together the external filter for my sid. I am trying out the ssi2144. I have not seen anyone post about using one on here yet. I have the adapter boards for them. All I have to say is that is some super small soldering! I think I have them in good shape though! I reviewed the schematics and it looks like it should work ok. The ssi 2144 has slightly different recommended caps then the SSM2044. I ordered the recommended caps forom the data sheet for the ssm and the ssi I may test both to see if I hear a difference. Will likely go with the recommended caps from the data sheet. There are a few other minor resistance changes on the data sheets too but not sure if they are required I will have to see how it sounds. The adapter are from https://www.amsynthstore.co.uk/SSI2144_to_SSM2044_Adapter_PCB/p1461448_17854795.aspx modular addict sells them too but had been out of stock. https://syntherjack.net/ssi2144-to-ssm2044-vcf-converter/ also has published an file for them as well but I only needed a few of them... for 1.5 I picked up a few extra incase I broke them. If they all work may build another filter for something else. Did I mention that solder pitch is tiny!!! Here are the caps the ones on the left are for the ssm and the ones on the right are for the ssi. C19-C24 10nF, 6.8NF for SSI2144 6 STYROFLEX 10N C25,C26 820pF, 560pF for SSI2144 2 STYROFLEX 820P
-
You might be able to do it in NG where you do you sequencing in the sequencer then do a midi translation to the microtonal scales you want with pitch bends in NG. depending on how many octaves you are looking at you should have a good bit of room to play with in the existing structure. Maybe a bit clunky but should be functional.
-
http://www.midibox.org/dokuwiki/lib/exe/fetch.php?media=projects:sammichSID_build_guide_v1_0.zip There is a good picture in the build guide of what voltages should be where.
-
What are your voltages at the regulators and at the vcc on the pic and at the 8580? I would make sure you have your voltages set properly. You can test with the sids out so you do not burn them. If the voltage is low you may have a short or have a bad solder or bad component somewhere to find. Maybe you are using the wrong power supply as well. That could be causing a lot of extra heat if the regulators have to dissipate a higher voltage as heat.
-
GM5 driver not supported for STM32F4?
gerald.wert replied to gatesphere's topic in MIDIbox Tools & MIOS Studio
Maybe it is related to the cable bring a USB A type cable and you need the B cable: http://midibox.org/forums/topic/19105-stm32f4-communication-issues-with-mios-studio-no-usb-midi-available/#comment-166624 -
GM5 driver not supported for STM32F4?
gerald.wert replied to gatesphere's topic in MIDIbox Tools & MIOS Studio
Have you tried loading another app like NG? Since you are unable to access the core you will need to clear the stm and reload the bootloader http://ucapps.de/mbhp_core_stm32f4.html Use the ST link software to clear the STM and reload the bootloader. It may be a corrupt app file that was loaded or a failed transfer. It could be a hardware issue as well loading another app may tell you a lot. You may also want to try using another midi interface to talk to the core if you really feel it is a driver issue. You should also be able to talk to the bare core over usb with the power jumper connected and that should eliminate most of you hardware trouble shooting except the possibility of a bad core. It happens I have had a badly soldered core. Since you were able to connect to it with just the bootloader and it failed after loading the app. That tends to point to more of a failed software transfer or possibly a corrupt app file. Less of a driver issue though. -
GM5 driver not supported for STM32F4?
gerald.wert replied to gatesphere's topic in MIDIbox Tools & MIOS Studio
Normally any time you restart the core or load a new application to it in windows you have to restart mios studio for it to be able to work properly. It has to do with the way windows assigns a name to the hardware. -
GM5 driver not supported for STM32F4?
gerald.wert replied to gatesphere's topic in MIDIbox Tools & MIOS Studio
You have to restart mios studio when you restart it select seq4 as input and output and then restart mios studio again and it should be working in mios studio again. If you are not seeing seq4 as an option I would reflash the core with the bootloader and then get a fresh copy of the sequencer application and load that after you have reflashed the bootloader. -
if your sustain pedals are just on and off you just need a din. You can just build with 1 74hc165 and have 8 inputs. http://ucapps.de/mbhp/mbhp_dinx1.pdf
-
MBHP_CORE_STM32F4 built not quite yet working with LCDs
gerald.wert replied to mex's topic in MIDIbox SEQ
IIC will work you will just not have midi in unless you use midi on the usb interface. You can always use a midi routing program like midi ox on a pc to route to the midi in for now. -
Yes Julian not Adrian.
-
+1 no drag soldering you will make a lot of bridges too. I read about drag soldering on the internet. It sounded promising. +1 solder bulb way better than braid with way less heating. Braid also tends to leave little wires that make the bridge worse. Sometimes the mask is super tight and you can not heat the pad but if you can it is way better. Especially with the thin solder, th esolder wicks and flows right in where you put it. +1 to way faster unless you have to trouble shoot...
-
MBHP_CORE_STM32F4 built not quite yet working with LCDs
gerald.wert replied to mex's topic in MIDIbox SEQ
You have to set the hardware file up for the front panel you are using. Just use mios studio to edit the MBSEQ_HW.v4 file it or load the one for wilbas front panel if that is what you built from the SVN on your sd card. There are a lot of options so it depends on what you have built but you need to setup what you have for it to work right. http://svnmios.midibox.org/listing.php?repname=svn.mios32&path=%2Ftrunk%2Fapps%2Fsequencers%2Fmidibox_seq_v4%2Fhwcfg%2F -
MBHP_CORE_STM32F4 built not quite yet working with LCDs
gerald.wert replied to mex's topic in MIDIbox SEQ
Yes the lcd will work with nothing else attached. You should get text on boot. Check the contrast setting if it is up all the way on a regular LCD you will have black blocks and not be able to see the text. The cable that goes to the front panel should be 1 to 1. if you make the cable and align the connectors the exact same way on the ribbon cable it will work as long as the header was soldered on the board the right way. Make sure you have the cable built right. there is a good picture of the dual cable here: http://midibox.org/forums/topic/18868-building-a-midibox-seq-v4-wilba-control-surface-photo-tutorial/ and here on the core page is a good picture of the single cable if you scroll to the lcd section at the bottom : http://ucapps.de/mbhp_core_stm32f4.html You may want to build a single cable and make sure both lcd are 100% I find it easier to work with less when trouble shooting then build up to work out the rest of the problem. You do not mention what LCD you bought from mouser. They sell several. Maybe you have one that is not set up for parallel input? Often if you are getting black characters it is a cable issue though. I would also check the 5v jumper J15 and the ganged resistors R33 on the core they are often a source of problems for people. Also check everything around IC2 and make sure the 595 is in the socket right. -
Adrian built me a case for the regular Seq4. He builds a really nice case and has a few in stock. http://thebeast.co.uk/?product_cat=midibox I am not sure what the lead time would be if you want something custom but he does really nice work. Also Ponoko https://www.ponoko.com/design-your-own/products/midibox-seq-v4-case-9386 is always an option if you want acrylic or one of the other Front Panel Design people it just depends on how fast and what you want to spend. Would be fairly easy to DYI if you choose round buttons. I have not found a good way to make the rectangular button holes my self yet. Drill and file would take forever and just not look that good. I keep looking at mills for my drill press but have not put up the $ yet. Anyway so many options for midibox goodness.
-
If you decide to try the SMT I would advise a hot air rework station they can be had for about $30. They also have practice boards you can buy. the 1206 like to lift when you solder them if you use too much solder. Have a pick or small screw driver to put them down if they lift. Not your finger they are hot and will burn your finger. Practicing on a few soic before doing one that matters would be really helpful in the confidence department. The 74hc series are fairly cheap to buy and would be great to practice on. Highly recommend to practice on the cheap disposable SMT soldering practice boards. It is a lot harder to solder than through hole. It is also a lot harder to trouble shoot. You can not just pop out a socketed chip or throw on a chip clip for testing. You can not clip a test lead on a chip leg either. You will get some bad chips and hot air is the only real way to replace them. The 165 seem extra sensitive, I have had several not survive soldering. I do not like to solder without a lighted magnifying glass to really be able to see well they are about $70. The lighted helping hand ones are good too and are about $30. A lot of the helping hands do not have current limiting resistors on the led lights and the leds will burn out. I replaced all my leds and put a current limiting resistor in mine.Get the nicer ones with the glass magnifying glass, sooner or later you will bump it with the soldering iron and the glass one will still be good. The cheap plastic one not so much... I also check all the joints with a 10x loupe. The Russian Belomo one is about ~$30 they have the best low distortion optics you can buy. To get anything better is a 300 price jump. Get the neck strap it is good so you do not drop it or have to look for it while you are working. It is really easy to solder the top of the leg but not have the solder flow properly under the leg. This is especially true if you are using standard solder. It is a lot easier with the thin solder (.015). It only takes a very little amount of solder to solder the smt ic. Don't use larger through hole solder you will have bridges. Bridges are very hard to remove at first, more so if it gets under the chip. Keep your soldering iron tip super clean. A soldering iron tip with extra solder on it will create bridges. The small pencil point tips are the easiest to use on SMT. I prefer the chisel point on through hole. Also component placement is critical. If it is off just a bit not all the legs may not align to solder to all the pads. Hot air will come in handy here as you can heat it up and realign the chip. Use a small jewelers screw driver to align it not your finger. It is hot you will burn your finger. Don't say I did not warn you it was hot :) . Did I mention you will burn your finger? You do not have a lot of room for error even on the larger SMT stuff. The smaller is much harder. Test all the legs for bridges and shorts with your meter before applying power. It is also good to test from the leg to a place in the circuit this will find legs that you did not get 100% the first go. I am still fairly new to SMT but have not had a perfect build yet. My through hole is perfect almost 95% normally on through hole if something did not work I just missed a solder somewhere and it is a quick easy obvious fix. SMT I have had to put a lot more work into trouble shooting. The chip packages are marked differently as well. Be sure to study them to put the chips on the right way the first time. There are at least 5 types of marking for a soic chip I have seen possibly more. It is easy to get a wrong reversed placement if you are not paying attention. This should really be a sticky somewhere as this project seems to be going more and more SMT for the new folks that want to build something. SMT is not impossible or very hard but you definitely should have a few more tools and be prepared to test things a bit more. I would not go as far as to say it is easy but with a little practice first you would have a good idea if it is something you are able to do or not. I would bet most can especially with a few tools.
-
Yes back lit LCD are very power hungry! normally around 300ma each on a 2x40 some will peak over 500 ma on startup. Better have a heat sink on that regulator! oled 2x40 are normally under 50ma each... makes a huge difference on Thermal power dissipation. They are a lot sharper too just not cheaper.
-
Your cost to build will be a lower maybe much lower depending on component choices with the seq4. It looks like the seq4+ will be SMD. Wilbas regular seq4 is all through hole. Much easier to build and trouble shoot through hole. The buttons will cost much more on the 4+. Looks to be a lot more dual leds on the 4+ that will make usage hopefully easier but will also add to cost. If you are new and have not built much It may be a lot easier and less frustrating to build the regular seq4. It looks like the 4+ will have a bit better interface but cost a good bit more. The main added features may be the way mutes work and really the layout improvements. Good luck with making your decision. Gerald
-
Mkii will not work with the lpc17 unless the software is updated. The coding for the matrix setup is missing from the published app for the lpc17 as it is for the version 1 sequencer lite. Setting the config file with matrix settings returns errors. You can see the errors from mios studio. The app on the wiki mkii is only for the stm32f4. I built one a while back and was looking to use it with my lpc core as well but have not had the time to stumble through updating the code. If you get it working please post the update I would be happy to test it out as I have not built a case yet and the LPC would allow for a smaller case over the STM Core. Would also be interested in a case if you come up with something I have started on an acrylic top but have not been able to get back to it in a while. I wanted clear acrylic so you could see the print on the board as labels. My thought was it would be a cheap affordable case that way. Happy to share what I started on the case but honestly it is not far along I just had the holes on the top laid out. I was still trying to figure out placement as the board holes do not quite line up with the holes on either core for how I was trying to mount it. That is where I got stuck and the full sequencer became available again and I just have not gotten back to the light version to finish it.
-
I would be interested in the eagle files. I have not built a drum machine yet and it would be nice to replace my roland tr8 with something built.
-
multiple 2x40 LCDs on LPC17 Core (SOLVED)
gerald.wert replied to Phatline's topic in Testing/Troubleshooting
Your welcome, it is good to have the tools to test things. You can spend a lot of time going in a circle without good tools!

